
Instruction manual


Powering Up the System
2-50
Installation, SPM, Maintenance, and Troubleshooting Supplement
To connect the control unit to a dedicated AC outlet, follow the steps below.
1. Turn the basic carrier’s power supply switch to the OFF position.
2. Turn off the power supply switches on the expansion carriers.
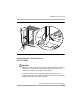
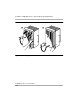
3. Plug one end of the power cord into the AC INPUT connector located to the
right of the power switch on the front of the basic carrier’s power supply.
4. Plug the other end of the power cord into the AC outlet, allowing at least 1
foot (30.4 cm) of slack in the cord.
5. Repeat Steps 4 and 5 for each expansion carrier.
CAUTION:
Do not attach the power cord or cords to any building surfaces.
Powering Up the System 2
CAUTION:
Follow the procedure below to power up the system only if the system is
completely installed. Failure to comply with this procedure can result in
shock hazard or damage to the equipment.
Don not power up the system unless all carriers are connected to an
approved ground.
1. Complete the procedure “Connecting the Control Unit to an AC Outlet” on
page 2-49.
2. Turn on the power switch for each expansion carrier: start with the power
supply in the rightmost carrier.
The green power lights on each expansion carrier power supply should turn
on.