
Instruction manual


Replacing a Module
2-47
Installing the Control Unit
Replacing a Module 2
CAUTION:
This section does not apply to the processor or power supply modules.
Before inserting or removing a module, the power switch on all power
supplies must be turned off.
When you replace a module, use the same module type. For example, do
not put a 008 MLX module in place of a 400 E&M module. If a module is
replaced with another type of module, or if a module is added to the
system without powering down the system first, a cold start (System
Reset) occurs.
If you move any module to a different slot, be sure to renumber the
modules by selecting Board Renumber from system programming. See
“Board Renumbering with the 016 MLX Module” on page 8-73 for
information about board renumbering.
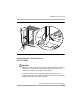
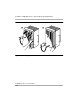
To remove and replace a module in a carrier, follow the steps below. See
Figure 2-14.
CAUTION:
Power down the system before removing or replacing modules. “Hot
swaps” should not be performed.
1. Label all cords (if they are not labeled already), and then unplug them from
the module.
For information about labeling trunk and extension cords, see Chapter 3,
Installing Telephones and Adjuncts” and Chapter 4, “Connecting the
Control Unit to the Network Interface” in the Installation manual. For
instructions on checking unlabeled wiring, see “Checking Unlabeled
Wiring” in Chapter 3 of Maintenance and Troubleshooting.
2. Power down the system. To power down the system, follow the steps
below.