
Instruction manual


Installing the Carriers
2-34
Installation, SPM, Maintenance, and Troubleshooting Supplement
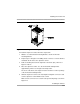
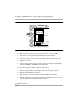
Installing the Processor in the Carrier 2
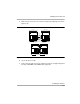
To install the processor in the carrier, follow the steps below. Refer to
Figure 2-11.
1. Align the circuit board guides inside the carrier, and slide the processor
module into the slot.
2. Make sure that the connector on the module mates properly with the
connector on the carrier as you push the processor back into place.
If the system is programmed for Permanent Key mode, check the
switch setting. Refer to “Modifying the Processor for Key Mode” in
Chapter 9 for detailed procedures. If the switch is set to Permanent
Key-only operation, all trunks revert to loop-start. If the switch is not
set, any programmed designation for ground-start trunks is retained.
The ground-start pool never has trunks assigned to it automatically but
must be programmed after the ground-start ports are designated.
Ground-start trunks are assigned to the ground-start pool on
initialization, except in a system switched for Permanent Key mode
operation.
The processor module contains a PCMCIA memory card interface
capable of accommodating a 4 MB memory card. This card is used to
install or upgrade system software and perform firmware upgrades on
circuit modules. It can be used to back up and restore system
programming.