
Instruction manual


Installing the Carriers
2-30
Installation, SPM, Maintenance, and Troubleshooting Supplement
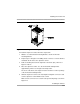
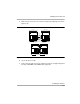
Figure 2-9. Marking the Basic Carrier Screw Holes
2. Drill a pilot hole in the center of each of the three screw-hole marks.
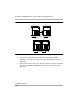
3. Anchor the screws approximately halfway into the backboard.
4. Position the basic carrier on the screws and slide the carrier to the left.
5. Tighten the screws.
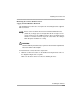
6. Connect the ground-screw on the basic carrier to an approved ground by
using a #12 AWG or #14 AWG solid copper wire.
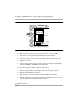
To Install the expansion carrier, follow the steps below:
1. Remove the filler plate from the right side of the basic (first) carrier.
2. Align the two backplane connectors.
3. Repeat steps 1 to 3 from the basic carrier installation procedure.
4. Slide the expansion carrier to the left, align the backplane connectors and
seat the expansion carrier with the basic carrier.
Backboard
Basic
Carrier
Mounting
Screw
Mounting Surface