
Instruction manual


Installing the Carriers
2-29
Installing the Control Unit
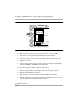
Mounting the Carriers With the Power
Supply and Port Modules Removed
2
This installation procedure does not require the 4 mounting brackets supplied
with each carrier.
WARNING:
Continue with this procedure only if you have met all of the requirements
discussed earlier in this chapter.
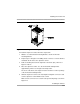
To install the basic carrier, follow the steps below:
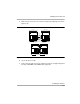
1. Mark the screw-hole locations on the backboard using the basic carrier or
the diagram in Figure 2-9 as a guide.
Make sure the basic carrier is level before marking the holes.
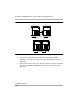
A basic carrier should be mounted on a backboard with 29 inches
(73.66 cm) of empty space to the right. This allows enough room for
system expansion of two additional carriers. There should be at least
12 inches of clearance from the top of the control unit to the ceiling to
allow adequate ventilation for cooling.