
Instruction manual


Installing the Carriers
2-27
Installing the Control Unit
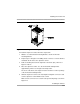
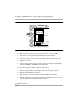
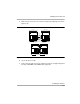
Figure 2-7. Securing the left and right bracket
To Install the expansion carrier, follow the steps below:
1. Abut the second horizontal mounting bracket to the first horizontal
mounting bracket.
2. Repeat steps 1 through 3 for installing a basic carrier to secure the bracket
and attach the mounts to the expansion carrier.
3. Remove the filler plate from the right side of the basic (first) carrier. See
Figure 2-7 above.
4. Place the expansion carrier on to the horizontal mounting bracket
approximately 2 inches to the right of its final position.
The hook on the back of the expansion carrier should rest on the top flange
of the horizontal mounting bracket.
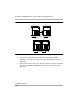
5. Slide the expansion carrier to the left, align the backplane connectors and
seat the expansion carrier with the basic carrier.
Make sure the connectors are seated securely and completely, as shown in
Figure 2-8.