
Instruction manual

Reassigning Business Cordless 905 Line Buttons
5-18
Installation, SPM, Maintenance, and Troubleshooting Supplement
c. Enter the extension number you want to program.
d. Select each line button to remove the factory-set line assignments and
turn off the green (G) LED.
2. Remove the factory-set ICOM Voice button and assign it to
Button 2 on the BC 905 telephone:
a. From the System Programming menu, select Cntr-Prg (
).
b. b.From the Centralized Programming menu, select Program
extension ().
c. Enter the extension number and select Enter (
).
d. Select Start (
).
e. Select Button 2 on the console or PC (maps to Button 3 on the BC 905
telephone).
f. Select Delete (
).
g. Select Button 6 on the console or PC (maps to Button 2 on the BC 905
telephone).
h. Enter *16 to assign an ICOM Ring button. Then select Button 6 on the
console or PC again, and enter *19 to change the attribute to ICOM
Voice.
i. Save your entry by selecting Enter (
).
j. Exit to the System Programming menu.
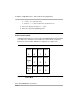
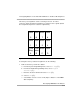
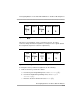
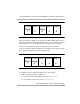
3. Assign the lines to buttons in the order shown in Figure 5-10:
a. From the System Programming menu, select Extensions (
).
b. From the Extensions menu, select Lines/Trunks (
).
c. Enter the extension number you want to program.
d. Assign Line 1 to Button 3 on the BC 905 by selecting
Line 1 on the console or PC (
8+ ). Line 1 is assigned to
Button 3 on the BC 905 telephone.
e. Assign placeholder lines to virtual buttons: