
Instruction manual


MERLIN LEGEND Communications System Release 5.0
System Planning
555-650-112
Issue 1
June 1997
Lines/Trunks
Page 3-56Assigning Telephone Buttons
3
Behind Switch Mode 3
Use the following guidelines to assign buttons for a system in Behind Switch
mode.
NOTE:NOTE:NOTE:
For adjuncts connected using an MFM, you should change the Button 2
assignment to ICOM Orig Only and remove the Button 3 assignment.
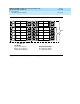
For Behind Switch mode with multiline telephones:
■ You can assign additional lines and any outside lines connected directly to
the control unit, including special-purpose lines.
■ If a loudspeaker paging system is to be connected to the control unit,
include a programmed Loudspeaker Paging button to make
announcements over the loudspeaker system. To make an announcement,
users press the button and speak into the handset. They do not need to
dial the extension of the loudspeaker paging system.
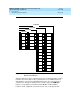
For Behind Switch mode with single-line telephones, answering machines, fax
machines, or any other devices connected to an 012, 016, or 008 OPT module or
an MFM, you can assign additional lines and any outside lines connected directly
to the control unit, including special-purpose lines.
Planning Form Instructions
1. Using the guidelines above for Key and Behind Switch modes, select the
types of buttons to assign to each telephone.
2. Complete the Button Diagram page of each copy of Forms 4b, 4d, 4e, 4f,
and 5c by doing
one
of the following:
■ To keep the factory-set assignments, proceed to Step 3.
■ To change the factory-set assignments, skip to Step 4.
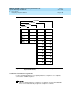
3. To keep the factory-set assignments:
■ For multiline telephones in Key mode, fill in the telephone number
on Buttons 3 through 10. Record the line numbers (see Form 2c).
■ For multiline telephones in Behind Switch mode, fill in the extension
number of the prime line on Button 3.
4. To change the factory-set assignments:
a. On Buttons 1 through 10, indicate the type of intercom button by
circling ICOM for ICOM Voice, ICOM Ring, or ICOM Orig Only,
and writing Ring, Voice, or Orig Only.
b. Fill in the telephone numbers (or prime-line extension numbers) to
be assigned or changed. Start with Button 3 and record the line
numbers on the diagram (see Form 3b).