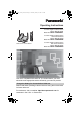
TG5421_5422_5423(e).book Page 1 Thursday, January 13, 2005 1:51 PM Operating Instructions 5.8 GHz Digital Cordless Phone Model No. KX-TG5421 5.8 GHz Digital Cordless Phone with Dual Handsets Model No. Model shown is KX-TG5421. KX-TG5422 5.8 GHz Digital Cordless Phone with Three Handsets Model No. KX-TG5423 This unit is compatible with Caller ID. To use this feature, you must subscribe to the appropriate service offered by your service provider. Charge the battery for 6 hours before initial use.
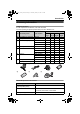
TG5421_5422_5423(e).book Page 2 Thursday, January 13, 2005 1:51 PM Table of Contents Introduction Your phone . . . . . . . . . . . . . . . . . . . . 4 Accessory information . . . . . . . . . . . . . . 5 Important safety instructions . . . . . . . . . 6 For best performance . . . . . . . . . . . . . . . 8 Preparation Connections . . . . . . . . . . . . . . . . . . . . . . 9 Battery installation . . . . . . . . . . . . . . . . 10 Battery charge . . . . . . . . . . . . . . . . . . . 11 Battery replacement .
TG5421_5422_5423(e).book Page 3 Thursday, January 13, 2005 1:51 PM Table of Contents Other options . . . . . . . . . . . . . . . . . . . . 40 Handset key tone . . . . . . . . . . . . . . . 40 Re-registering the handset. . . . . . . . 40 Customer support . . . . . . . . . . . . . . 40 Programming via direct commands . . . 41 Direct commands chart . . . . . . . . . . 41 Useful Information Belt clip. . . . . . . . . . . . . . . . . . . . . . . . . 43 Headset (optional) . . . . . . . . . . . . . . . .
TG5421_5422_5423(e).book Page 4 Thursday, January 13, 2005 1:51 PM Introduction Thank you for purchasing a Panasonic cordless telephone. We recommend keeping a record of the following information for future reference. Serial No. (found on the bottom of the unit) Date of purchase Name and address of dealer Attach your purchase receipt here. Energy Star: As an ENERGY STAR® Participant, Panasonic has determined that this product meets the ENERGY STAR guidelines for energy efficiency. ENERGY STAR is a U.S.
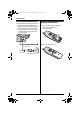
TG5421_5422_5423(e).book Page 5 Thursday, January 13, 2005 1:51 PM Introduction Accessory information Included accessories To order replacement accessories, call 1-800-332-5368. TTY users (hearing or speech impaired users) can call 1-866-605-1277. Quantity No.
TG5421_5422_5423(e).book Page 6 Thursday, January 13, 2005 1:51 PM Introduction Important safety instructions When using this unit, basic safety precautions should always be followed to reduce the risk of fire, electric shock, or personal injury. 1. Read and understand all instructions. 2. Follow all warnings and instructions marked on this unit. 3. Unplug this unit from power outlets before cleaning. Do not use liquid or aerosol cleaners. Use a damp cloth for cleaning. 4.
TG5421_5422_5423(e).book Page 7 Thursday, January 13, 2005 1:51 PM Introduction L Do not touch the plug with wet hands. L The AC adaptor is used as the main disconnect device. Ensure that the AC outlet is installed near the unit and is easily accessible. Battery To reduce the risk of fire or injury to persons, read and follow these instructions. L Use only the battery(ies) specified. L Do not dispose of the battery(ies) in a fire. They may explode.
TG5421_5422_5423(e).book Page 8 Thursday, January 13, 2005 1:51 PM Introduction For best performance Base unit location/noise The base unit and handset use radio waves to communicate with each other. For maximum distance and noise-free operation, we recommend the following: L Placing the unit away from electrical appliances such as a TV, personal computer or another cordless phone. L Placing the base unit in a HIGH and CENTRAL location with no obstructions such as walls. L Raising the antennas vertically.
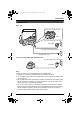
TG5421_5422_5423(e).book Page 9 Thursday, January 13, 2005 1:51 PM Preparation Connections Base unit Fasten the AC adaptor cord. Raise the antennas. Hook To power outlet (120 V AC, 60 Hz) AC adaptor To single-line telephone jack (RJ11C) Telephone line cord Charger unit (KX-TG5422 and KX-TG5423 only) To power outlet (120 V AC, 60 Hz) AC adaptor Note: L Base unit: Use only the included Panasonic AC adaptor PQLV1. L Charger unit: Use only the included Panasonic AC adaptor KX-TCA1.
TG5421_5422_5423(e).book Page 10 Thursday, January 13, 2005 1:51 PM Preparation If you subscribe to an xDSL service L Please attach a noise filter (contact your xDSL provider) to the telephone line between the base unit and the telephone line jack in the event of the following: – Noise is heard during conversations. – Caller ID features (page 25) do not function properly. Battery installation 1 Insert the battery (1), and press it down until it snaps into the compartment (2).
TG5421_5422_5423(e).book Page 11 Thursday, January 13, 2005 1:51 PM Preparation Battery charge Place the handset on the base unit or charger for 6 hours before initial use. L The unit will beep once, the CHARGE indicator will light, and “Charging” will be displayed. L “Charge completed” is displayed when the battery has been fully charged. The CHARGE indicator will remain lit. Base unit Battery strength You can confirm the battery strength on the handset display.
TG5421_5422_5423(e).book Page 12 Thursday, January 13, 2005 1:51 PM Preparation Battery performance After your Panasonic battery is fully charged, you can expect the following performance: Operation Operating time While in use (talking) Up to 5 hours While not in use (standby)*1 Up to 11 days While using the Clarity Booster feature (page 19) Up to 3 hours *1 Handset is off the base unit or charger but not in use.
TG5421_5422_5423(e).book Page 13 Thursday, January 13, 2005 1:51 PM Preparation Controls and displays Controls Base unit A B C KX-TG5423 A B D E F E KX-TG5422 KX-TG5421 G A B C D E F G H H {HANDSET LOCATOR1} {HANDSET LOCATOR2} {HANDSET LOCATOR3} {HANDSET LOCATOR} Antenna IN USE indicator Charge contacts CHARGE indicator For assistance, please call 1-800-211-PANA (7262).
TG5421_5422_5423(e).book Page 14 Thursday, January 13, 2005 1:51 PM Preparation Handset K L A M N B C D N O P Q R {MENU} {OFF} {MUTE} {CLEAR} {HOLD} {HOLD} {INTERCOM} Charger unit (KX-TG5422 and KXTG5423 only) A B O E P F G B H I A Charge contacts B CHARGE indicator J KX-TG5421 HOLD KX-TG5422 and KX-TG5423 HOLD INTERCOM Q R Using the navigator key The handset navigator key can be used to navigate through menus and to select items shown on the display, by pressing {^}, {V}, {<}, or {>}.
TG5421_5422_5423(e).book Page 15 Thursday, January 13, 2005 1:51 PM Preparation Backlit display and handset keypad The handset display and dialing buttons will light for a few seconds after pressing any of the handset’s controls or lifting the handset off the base unit or charger. They will also light when a call is being received. Display Handset display items Displayed Meaning item J Voice enhancer is on. 5 Battery strength Soft keys The handset features 2 soft keys.
TG5421_5422_5423(e).book Page 16 Thursday, January 13, 2005 1:51 PM Making/Answering Calls 4 Making calls Soft keys {OFF} {C} {s} Navigator key {MUTE} {CLEAR} {*} {HOLD} {PAUSE} {REDIAL} Microphone 1 Lift the handset and press {C}. L “Talk” will be displayed. 2 3 Dial the phone number. When finished talking, press {OFF} or place the handset on the base unit or charger. Note: L Talk alternately with the caller in a quiet room.
TG5421_5422_5423(e).book Page 17 Thursday, January 13, 2005 1:51 PM Making/Answering Calls To make a call using the redial list The last 5 phone numbers dialed are stored in the redial list. 1 2 3 Press {REDIAL}. L The last number dialed will be displayed. Press {V} or {^} repeatedly to display the desired number. L To delete the displayed number, press {CLEAR}. L To exit the list, press {OFF}. Press {C}, {s}, or {Call}.
TG5421_5422_5423(e).book Page 18 Thursday, January 13, 2005 1:51 PM Making/Answering Calls Useful features during a call HOLD button This feature allows you to put an outside call on hold. MUTE button You can mute your voice during a conversation. While mute is turned on you will be able to hear the other party, but the other party will not be able to hear you. To mute your voice, press {MUTE}. Example: Talk 00-00-30 KX-TG5421: Press {HOLD} during an outside call. L “Hold” will be displayed.
TG5421_5422_5423(e).book Page 19 Thursday, January 13, 2005 1:51 PM Making/Answering Calls Clarity booster This feature can improve sound clarity when the handset is used in an area where there may be interference. During an outside call, this feature will be turned on automatically when necessary. This feature will turn off when you hang up or put a call on hold. It will not turn off automatically during a call. You can also turn this feature on or off manually. 1 2 Press {MENU} during an outside call.
TG5421_5422_5423(e).book Page 20 Thursday, January 13, 2005 1:51 PM Making/Answering Calls For Call Waiting service users To use Call Waiting, you must subscribe to your telephone company’s Call Waiting service. This feature allows you to receive calls while you are already talking on the phone. If you receive a call while on the phone, you will hear a Call Waiting tone. Press {Flash} to answer the 2nd call. L The 1st call is put on hold while you answer the 2nd call.
TG5421_5422_5423(e).book Page 21 Thursday, January 13, 2005 1:51 PM Phonebook Using the phonebook The handset phonebook allows you to make calls without having to dial manually. You can add 50 names and phone numbers to the handset phonebook and search for phonebook entries by name. Adding items to the phonebook 1 Press {Phonebook}. Rcvd Kcalls 2 Press {Add}. L The display shows the number of items in the phonebook. 8 Press {OFF}.
TG5421_5422_5423(e).book Page 22 Thursday, January 13, 2005 1:51 PM Phonebook Calling someone in the phonebook Phonebook items can be searched for alphabetically by scrolling through the phonebook items. 1 2 Press {Phonebook}. L For quick search, you can skip to step 3. 4 Press {V} or {^} repeatedly to display the desired item. L To exit the phonebook, press {OFF}. To search for a name by initial 2 3 22 Press {Phonebook}, then press {Search}.
TG5421_5422_5423(e).book Page 23 Thursday, January 13, 2005 1:51 PM Phonebook Chain dial feature This feature allows you to dial phone numbers from the phonebook while you are on a call. Example: Using a long distance calling card 1 Dial from the phonebook: 1-800-012-3456 (Calling card access number). 2 When prompted, dial from the phonebook: 1234 (Calling card PIN). 3 When prompted, dial from the phonebook: 1-555-012-3456 (the person you want to call).
TG5421_5422_5423(e).book Page 24 Thursday, January 13, 2005 1:51 PM Phonebook L To copy another item, repeat from step 5. Copying all items 1 2 Press {MENU}. 7 Scroll to “Copy phonebook” by pressing {V} or {^}, then press {>}. Copying all items 3 Scroll to “Copy all items” by pressing {V} or {^}, then press {>}. L When all items have been copied, “Complete” will be displayed. L The destination handset display will show “Phonebook Receiving”, then “Phonebook Received”. 4 1 2 Press {MENU}.
TG5421_5422_5423(e).book Page 25 Thursday, January 13, 2005 1:51 PM Caller ID Service Using Caller ID service This unit is Caller ID compatible. To use Caller ID features, you must subscribe to your telephone company’s Caller ID service. Caller ID features When an outside call is being received, the calling party’s name or telephone number will be displayed. Caller information for the last 50 different callers will be logged in the caller list, allowing you to return missed calls.
TG5421_5422_5423(e).book Page 26 Thursday, January 13, 2005 1:51 PM Caller ID Service L You can also select the ringer tone by pressing {1} to {7}, or {0} (“No Ringer ID”). 6 Press {Save}, then press {OFF}. Light-up ID You can assign a different ringer indicator color to each caller in the phonebook. Select “Color1-Default” (Amber), “Color2” (Green), “Color3” (Red), or “Multicolor”. 1 Press {Phonebook}, then press {Search}. 2 Press {V} or {^} repeatedly to display the desired item.
TG5421_5422_5423(e).book Page 27 Thursday, January 13, 2005 1:51 PM Caller ID Service 3 Press {C} or {s}. Note: L You can also press {Rcvd calls} to enter the caller list. L Calling back will not be possible if the caller information does not include a phone number. L In some cases, you may have to edit the number before dialing. (For example, you may have to delete “1” and the area code.) L KX-TG5422 and KX-TG5423 only: Each handset has its own caller list.
TG5421_5422_5423(e).book Page 28 Thursday, January 13, 2005 1:51 PM Caller ID Service Note: L The handset can remember up to 4 area codes to be edited. Phone numbers from the 4 most recently edited area codes will be automatically edited. L This feature will not be activated until edited numbers are called back. L If you move to another area, you can turn this feature off to erase previously edited area codes. To use this feature again, turn it on and reprogram the area codes you want to edit once again.
TG5421_5422_5423(e).book Page 29 Thursday, January 13, 2005 1:51 PM Intercom Features L The IN USE indicator will flash rapidly. L The handset will beep for 1 minute. Handset locator You can locate a misplaced handset by paging it from the base unit. For KX-TG5421 users 1 Base unit: Press {HANDSET LOCATOR} to page the handset. L The IN USE indicator will flash rapidly. L The handset will beep for 1 minute. 2 Base unit: To stop paging, press {HANDSET LOCATOR}. OR Handset: To stop paging, press {OFF}.
TG5421_5422_5423(e).book Page 30 Thursday, January 13, 2005 1:51 PM Intercom Features Example: When handset 1 calls handset 2. Intercom (KX-TG5422 and KX-TG5423 only) 1 Intercom calls can be made between 2 handsets. Note: L If you have difficulty hearing the other party while using the speaker, decrease the speaker volume. L If you receive a phone call while talking on the intercom, you will hear 2 tones (page 37). To answer the call, press {OFF}, then press {C} or {s}.
TG5421_5422_5423(e).book Page 31 Thursday, January 13, 2005 1:51 PM Intercom Features Transferring a call (KXTG5422 and KX-TG5423 only) call will ring at your handset again. If you still do not answer the call within 4 minutes, the call will be disconnected. Outside calls can be transferred between 2 handsets. 1 During an outside call, press {INTERCOM}. L The call will be put on hold. 2 KX-TG5422 users: To page the other handset, press {handset[1]} or {handset[2]}.
TG5421_5422_5423(e).book Page 32 Thursday, January 13, 2005 1:51 PM Intercom Features Conference calls (KXTG5422 and KX-TG5423 only) A conference call allows 2 handsets to speak together with an outside party. 1 During an outside call, press {INTERCOM}. L The call will be put on hold. 2 KX-TG5422 users: To page the other handset, press {handset[1]} or {handset[2]}. KX-TG5423 users: To page another handset, press {HS[1]}, {HS[2]}, or {HS[3]}.
TG5421_5422_5423(e).book Page 33 Thursday, January 13, 2005 1:51 PM Voice Mail Service Using Voice Mail service Voice Mail is an automatic answering service offered by your telephone company. If you subscribe to this service, your telephone company’s Voice Mail system can answer calls for you when you are unavailable to answer the phone or when your line is busy. Messages are recorded by the telephone company, not your telephone.
TG5421_5422_5423(e).book Page 34 Thursday, January 13, 2005 1:51 PM Voice Mail Service 3 Scroll to “Voice Mail” by pressing {V} or {^}, then press {>}. 4 Scroll to “VM tone detect” by pressing {V} or {^}, then press {>}. 5 Press {V} or {^} repeatedly to select “On” or “Off”. 6 Press {Save}, then press {OFF}. Listening to Voice Mail messages The unit will let you know that you have new Voice Mail messages in the following ways: – “Voice Mail” will be displayed on the handset.
TG5421_5422_5423(e).book Page 35 Thursday, January 13, 2005 1:51 PM Programmable Settings Guide to handset programming For your reference, a chart of all programmable functions is printed below. Details for each item can be found on the corresponding pages. To program, press {MENU}, press {V} or {^} to scroll through the menu, and press {>} or {Select} when the desired menu item or setting is displayed. Important: L Before programming, make sure the handset and base unit are not being used.
TG5421_5422_5423(e).book Page 36 Thursday, January 13, 2005 1:51 PM Programmable Settings Ringer settings Handset ringer volume 4 levels (high/medium/low/off) are available. The default setting is HIGH. 1 2 Press {MENU}. Handset ringer tone You can change the ringer tone heard when an outside call is received. There are 3 tones and 4 melodies. The default setting is “Tone 1”. 1 2 Scroll to “Ringer setting” by pressing {V} or {^}, then press {>}.
TG5421_5422_5423(e).book Page 37 Thursday, January 13, 2005 1:51 PM Programmable Settings Handset interrupt tone (KXTG5422 and KX-TG5423 only) This tone lets you know when you receive a call while you are on an intercom call (page 30). “2” (default): The tone will sound 2 times. “On”: The tone will sound for as long as the line rings. “Off”: Turns this feature off. 1 2 Press {MENU}. Scroll to “Ringer setting” by pressing {V} or {^}, then press {>}.
TG5421_5422_5423(e).book Page 38 Thursday, January 13, 2005 1:51 PM Programmable Settings Voice enhancer You can turn the voice enhancer feature on or off. The default setting is OFF. Display options Handset LCD contrast 1 2 Press {MENU}. 3 Press {V} or {^} repeatedly to select “On” or “Off”. 1 2 Press {MENU}. Press {Save}, then press {OFF}. L When turned on, “J” will be displayed. 3 Scroll to “LCD contrast” by pressing {V} or {^}, then press {>}.
TG5421_5422_5423(e).book Page 39 Thursday, January 13, 2005 1:51 PM Programmable Settings Telephone settings Dialing mode If you cannot make calls, change this setting depending on your telephone line service. “Tone” (default): For tone dial service. “Pulse”: For rotary pulse dial service. 1 2 Press {MENU}. 3 Scroll to “Set tel line” by pressing {V} or {^}, then press {>}. Scroll to “Initial setting” by pressing {V} or {^}, then press {>}.
TG5421_5422_5423(e).book Page 40 Thursday, January 13, 2005 1:51 PM Programmable Settings Other options 3 Scroll to “Registration” by pressing {V} or {^}, then press {>}. 4 KX-TG5421 base unit: Press and hold {HANDSET LOCATOR} until the CHARGE indicator flashes. KX-TG5422 base unit: Press and hold the handset locator button that corresponds to the handset you want to re-register ({HANDSET LOCATOR1} or {HANDSET LOCATOR2}) until the CHARGE indicator flashes.
TG5421_5422_5423(e).book Page 41 Thursday, January 13, 2005 1:51 PM Programmable Settings Programming via direct commands You can also program most features using “direct commands”—special codes that take you directly to the feature you wish to program and allow you to select the desired setting. There is no need to scroll through the unit’s menus. Details of each feature can be found on the corresponding pages. 1 2 3 Press {MENU}. 4 5 Press {Save}. Enter the desired feature code (shown below).
TG5421_5422_5423(e).book Page 42 Thursday, January 13, 2005 1:51 PM Programmable Settings Feature Feature code Setting code Page Set flash time {0} {5} {2} {1}: 700 ms {2}: 600 ms {3}: 400 ms {4}: 300 ms {5}: 250 ms {6}: 110 ms {7}: 100 ms {8}: 90 ms page 39 Set line mode {0} {5} {3} {1}: A {2}: B page 39 Store VM access# {0}{7}{1} Go to step 5 on page 33.
TG5421_5422_5423(e).book Page 43 Thursday, January 13, 2005 1:51 PM Useful Information Belt clip Headset (optional) You can hang the handset on your belt or pocket using the included belt clip. Connecting an optional headset to the handset allows hands-free phone conversations. Please use only a Panasonic headset. See page 5 for compatible headsets and ordering information.
TG5421_5422_5423(e).book Page 44 Thursday, January 13, 2005 1:51 PM Useful Information Wall mounting Base unit The base unit can be mounted on a wall phone plate. 1 Connect the AC adaptor. Fasten the AC adaptor cord. Hook To power outlet 2 Tuck the telephone line cord inside the wall mounting adaptor (1). Connect the telephone line cord (2). 1 2 3 Insert the hooks on the wall mounting adaptor into the holes (A) and (B) on the base unit.
TG5421_5422_5423(e).book Page 45 Thursday, January 13, 2005 1:51 PM Useful Information 4 Adjust the adaptor to hold the base unit, then push it in the direction of the arrow until it clicks into place. 5 Connect the telephone line cord. Mount the unit, then slide it down. L Raise the antennas. To remove the wall mounting adaptor While pushing down the release levers (1), remove the adaptor (2). 2 For assistance, please call 1-800-211-PANA (7262).
TG5421_5422_5423(e).book Page 46 Thursday, January 13, 2005 1:51 PM Useful Information Charger unit (KX-TG5422 and KX-TG5423 only) The charger can be wall mounted, as shown below. 1 2 3 4 Connect the AC adaptor. Drive the screws (not included) into the wall using the wall mount template (see below). Mount the charger (1). Slide it down (2) and to the right (3) until it is secure. 25.4 mm (1") 1 2 Screws To power outlet 25.
TG5421_5422_5423(e).book Page 47 Thursday, January 13, 2005 1:51 PM Useful Information Error messages If the unit detects a problem, one of the following messages will be displayed on the handset. Display message Cause & solution Busy L The called handset is in use.*1 L The handset you tried to copy phonebook items to is in use.*1 L The handset you are calling is too far from the base unit.
TG5421_5422_5423(e).book Page 48 Thursday, January 13, 2005 1:51 PM Useful Information Troubleshooting General use Problem Cause & solution The unit does not work. L Make sure that the battery is installed correctly (page 10). L Check the connections (page 9). L Fully charge the battery (page 11). L Clean the charge contacts and charge again (page 11). L Unplug the base unit’s AC adaptor to reset the unit. Reconnect the adaptor and try again. L Re-install the battery (page 10) and fully charge it.
TG5421_5422_5423(e).book Page 49 Thursday, January 13, 2005 1:51 PM Useful Information Making/answering calls, Intercom Problem Cause & solution Static is heard, sound cuts in and out. Interference from other electrical units. L Move the handset and the base unit away from other electrical appliances. L Move closer to the base unit. L Raise the base unit antennas. L Turn on the clarity booster feature (page 19).
TG5421_5422_5423(e).book Page 50 Thursday, January 13, 2005 1:51 PM Useful Information Problem Cause & solution Copying stopped with an item displayed. L The destination handset may have lost communication with the base unit, or the destination handset user may have pressed {C} or {s}. The displayed phonebook item was not copied to the handset. Press {OFF}. Confirm that the destination handset is in standby mode (i.e., not in use) and try again. The display exits the phonebook while searching.
TG5421_5422_5423(e).book Page 51 Thursday, January 13, 2005 1:51 PM Useful Information Battery charge Problem Cause & solution “Recharge battery” is displayed, 7 flashes or the handset beeps intermittently. L Fully charge the battery (page 11). “Charge for 6h” and 8 are displayed and the handset does not work. L The battery has been discharged. Fully charge the battery (page 11).
TG5421_5422_5423(e).book Page 52 Thursday, January 13, 2005 1:51 PM Useful Information Important information about subscription services In order to use Caller ID, Call Waiting, Call Waiting Caller ID (CWID), or Voice Mail, you must first contact your telephone company and subscribe to the desired service. L For more information, contact your telephone company.
TG5421_5422_5423(e).book Page 53 Thursday, January 13, 2005 1:51 PM Useful Information FCC and other information This equipment complies with Part 68 of the FCC rules and the requirements adopted by the ACTA. On the bottom of this equipment is a label that contains, among other information, a product identifier in the format US:ACJ----------. If requested, this number must be provided to the telephone company. L Registration No ............(found on the bottom of the unit) L Ringer Equivalence No. (REN)..
TG5421_5422_5423(e).book Page 54 Thursday, January 13, 2005 1:51 PM Useful Information When you hold the phone to your ear, noise might be heard in your Hearing Aid. Some Hearing Aids are not adequately shielded from external RF (radio frequency) energy. If noise occurs, use an optional headset accessory or the speakerphone option (if applicable) when using this phone.
TG5421_5422_5423(e).book Page 55 Thursday, January 13, 2005 1:51 PM Useful Information FCC RF Exposure Warning: This product complies with FCC radiation exposure limits set forth for an uncontrolled environment. To comply with FCC RF exposure requirements the base unit must be installed and operated with its antenna located 20 cm or more between antenna and all person’s body (excluding extremities of hands, wrist and feet).
TG5421_5422_5423(e).book Page 56 Thursday, January 13, 2005 1:51 PM Useful Information Technical information Charger unit (KX-TG5422 and KX-TG5423 only) Base unit Operating environment: 5 °C – 40 °C (41 °F – 104 °F) Operating environment: 5 °C – 40 °C (41 °F – 104 °F) Frequency: 5.76 GHz – 5.84 GHz Dimensions: Approx. height 95 mm x width 174 mm x depth 143 mm (33/4" x 627/32" x 55/8") Mass (Weight): KX-TG5421: Approx. 260 g (0.57 lb.) KX-TG5422 and KX-TG5423: Approx. 270 g (0.60 lb.
TG5421_5422_5423(e).book Page 57 Thursday, January 13, 2005 1:51 PM Useful Information Warranty PANASONIC CONSUMER ELECTRONICS COMPANY, DIVISION OF PANASONIC CORPORATION OF NORTH AMERICA One Panasonic Way, Secaucus, New Jersey 07094 PANASONIC PUERTO RICO, INC. San Gabriel Industrial Park, Ave. 65 de Infantería, Km. 9.
TG5421_5422_5423(e).book Page 58 Thursday, January 13, 2005 1:51 PM Useful Information Limited Warranty Limits And Exclusions This Limited Warranty ONLY COVERS failures due to defects in materials or workmanship, and DOES NOT COVER normal wear and tear or cosmetic damage.
TG5421_5422_5423(e).book Page 59 Thursday, January 13, 2005 1:51 PM Useful Information Customer services Customer Services Directory Obtain Product Information and Operating Assistance; locate your nearest Dealer or Servicenter; purchase Parts and Accessories; or make Customer Service and Literature requests by visiting our Web Site at: http://www.panasonic.com/consumersupport or, contact us via the web at: http://www.panasonic.
TG5421_5422_5423(e).
TG5421_5422_5423(e).book Page 61 Thursday, January 13, 2005 1:51 PM Index Troubleshooting Battery charge: 51 Caller ID: 50 General use: 48 Making/answering calls, Intercom: 49 Phonebook: 49 Power failure: 51 Programmable settings: 48 TTY: 5 V VE (voice enhancer): 18 VM (Voice Mail): 33 Voice enhancer: 18, 38 Voice Mail access number: 33 Volume control Handset receiver: 16 Handset speaker: 16 W Wall mounting: 44 Warranty: 57 For assistance, please call 1-800-211-PANA (7262).
TG5421_5422_5423(e).
TG5421_5422_5423(e).
TG5421_5422_5423(e).book Page 64 Thursday, January 13, 2005 1:51 PM If you need assistance with setup or operation; 1 2 3 Visit our website: http://www.panasonic.com/consumersupport Contact us via the web at: http://www.panasonic.com/contactinfo Call us at: 1-800-211-PANA (7262) TTY users (hearing or speech impaired users) can call 1-877-833-8855. When you ship the product; L Carefully pack your unit, preferably in the original carton.