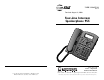
USER’S MANUAL Part 2 Revised: August 3, 2000 Four-Line Intercom Speakerphone 955 Please also read Part 1 – Important Product Information © 2000 Advanced American Telephones. All rights reserved. Printed in Indonesia. 850004037 Issue 1AT&T 8/00 Para recibir este manual en español, por favor llame al 1 800 222-3111. AT&T and the globe symbol are registered trademarks of AT&T Corp. licensed to Advanced American Telephones.
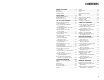
CONTENTS BEFORE YOU BEGIN ........................3 Glossary ................................................4 Features List..........................................6 Audible Signals .....................................7 INSTALLATION.................................8 Table/Desk Installation .........................8 Wall Installation ..................................10 Convenience Ports .............................14 SET UP SYSTEM FEATURES .............15 Change Display Language...................
CONTENTS Answering an Intercom Call...............41 Making a Single-phone Page ...............41 Answering a Single-phone Page ..........41 Switching Between an Intercom Call and a Single-phone Page..........42 Ending an Intercom or Page Call .........42 Paging All Phones ................................42 Answering a System-wide Page ...........42 Making an Intercom Conference Call ..............................43 Room Monitor .....................................
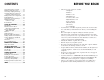
BEFORE YOU BEGIN Glossary CID: This stands for Caller Identification, which is a subscriber service, available from most local telephone companies for a fee. When you subscribe to Caller Identification, you can see who's calling before you answer the phone if you and the caller are both in areas offering Caller ID service with compatible equipment. Caller ID with Call Waiting: This is a single combined subscriber service which may be available from your local telephone company.
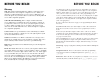
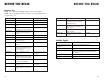
BEFORE YOU BEGIN BEFORE YOU BEGIN Features List NOTE: An * indicates the default setting for each system feature. NOTE: One ring is equal to about six seconds, two rings equals twelve seconds, and so on.
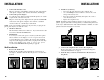
INSTALLATION NOTE: If you are installing multiple phones in your 955 system, you must install and program one set at a time. If more than one extension is assigned the same extension number, a repeating short ring (error ring) will sound at all extensions. Reassign extension numbers, being sure that each extension has a different number from 11 to 22 (see “Assign an Extension Number to Your Phone” in SET UP SYSTEM FEATURES). INSTALLATION 2 Connect the telephone line cords to the telephone.
INSTALLATION 3 Connect the handset cord. Plug one end of the coiled handset cord into the jack on the left side of the phone. Plug the other end into the handset, and hang up. 4 Connect the power adapter. Use only the power adapter provided with this product. To obtain a replacement, call 1 800 222–3111. Plug one end of the power adapter into the jack labeled ADAPTER on the back of the phone. Plug the other end into a standard electrical outlet not controlled by a wall switch.
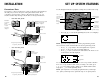
INSTALLATION 5 6 INSTALLATION Connect the handset cord. Plug one end of the coiled handset cord into the jack on the left side of the phone. Plug the other end into the handset, and hang up. Connect the power adapter to the telephone. Use only the power adapter provided with this product. To obtain a replacement, call 1 800 222–3111. Plug one end of the power adapter into the jack labeled ADAPTER on the back of the phone. • Check for dial tone. Lift the handset and listen for a dial tone.
INSTALLATION SET UP SYSTEM FEATURES Use the Navigation buttons to program or change the system features setup. Convenience Ports If you want to connect another device (such as a modem or fax machine) to the wall jack, you can use the jacks on the phone labeled AUX. These convenience ports use Lines 3 and 4; a call picked up on Line 3 or 4 at another extension may interrupt a fax, modem, or message transmission.
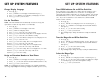
SET UP SYSTEM FEATURES Change Display Language 1 2 3 4 Press G. Press - until the screen displays LANGUAGE, then press >. Press - or + until the screen displays your language selection. Press S to store your selection. Set the Time/Date NOTE: The time and date are automatically set with incoming call information. Follow the steps below to set manually. 1 2 3 4 5 6 7 8 9 10 11 12 13 14 15 Press G. Press - until the screen displays TIME/DATE. Press > until screen displays HOUR.
SET UP SYSTEM FEATURES Set Delay Ring NOTE: This feature is for use with Centrex systems only. NOTE: If you choose to set a delayed ring on a phone with COVM service, the phone may not ring at all before COVM picks up the call. 1 2 3 4 Press G. Press - until the screen displays DELAY RING, then press >. Press - or + to select the desired setting. (One ring is about six seconds.) Press S to store your selection.
SET UP SYSTEM FEATURES Turn Hold Reminder On or Off 1 2 3 4 Press G. Press - until the screen displays HOLD REMINDER, then press >. Press - or + to select the desired setting. Press S to store your selection. Program Home and Local Area Codes One Home and up to five Local Area Codes can be programmed into the unit.
TELEPHONE OPERATION TELEPHONE OPERATION NOTE: When you make a call, the phone selects the Prime Line you programmed. When you answer a call, the phone automatically selects the ringing line. If you have a private line, the phone automatically selects that line. Making or Answering a Call NOTE: This phone will automatically make and answer calls in the mode last used (handset, speakerphone or headset). Follow the directions below to switch modes. Handset To make a call, lift the handset.
TELEPHONE OPERATION TELEPHONE OPERATION To answer a call, press h. Press h again to end the call. Do Not Disturb To switch from handset to headset or speakerphone, press h or K, then replace the handset (for headset, headset must be plugged in). To override automatic line selection, press and release a LINE button (this activates the speakerphone or headset). When your phone is off-hook (i.e., you are on a call) you will hear a low volume ring when you receive an intercom call.
TELEPHONE OPERATION Ringer Volume You can adjust the ringer volume while the phone is ringing. While the line is ringing, press Volume + or Volume - to reach the desired level. This phone has four ringer volume levels. Each time you adjust the ringer, you will hear a sample indicating the volume level. Turning Ringer Off You may turn the ringer for each line on or off. See “Turn the Ringer On/Off for Each Line” in SET UP SYSTEM FEATURES.
TELEPHONE OPERATION TELEPHONE OPERATION Temporary Tone Dialing Transfer a Call If you have dial pulse (rotary) service, you can change from dial pulse to touch tone dialing during a call by pressing t. This is useful if you need to send touch tone signals for access to telephone banking or longdistance services. 1 Dial the number. 2 Press and release t. Buttons pressed after this send touch tone signals. 3 After you hang up, the phone automatically returns to rotary service.
SPEED DIAL OPERATION SPEED DIAL OPERATION This telephone has four Speed Dial locations where you can store phone numbers and names you wish to dial by pressing only two buttons. Names can be up to 16 characters long and numbers can be up to 32 digits long. Storing a Name and a Number in a Speed Dial Location Enter Directory mode 1 2 Press D. The screen displays DIRECTORY. Press S. The screen displays: 3 Use the dial pad keys to enter the letters, digits or symbols you wish to store.
SPEED DIAL OPERATION 6 DIRECTORY OPERATION Press the SPD button where you wish to store this entry. A confirmation tone sounds and the screen displays: Enter Directory mode Reviewing Information Stored in a Speed Dial Location Edit directory entries Press the SPD button for the location you wish to review. The screen displays any information stored in that location.
DIRECTORY OPERATION DIRECTORY OPERATION This phone can store up to 200 names and phone numbers in the directory. Names can be up to 16 characters long and numbers can be 32 digits long. Because directory entries are stored in alphabetical order, you may wish to enter names with the last name first in order to maintain consistency with the information stored automatically through the Caller ID function of this system. NOTE: To store a number without storing a name, press S and go on to Step 5.
DIRECTORY OPERATION Reviewing Information Stored in the Directory 1 2 Enter the Directory mode. Press + or - to scroll through the directory entries — OR — Repeatedly press the dial pad key that has the first character of the entries you wish to review until the character you are looking for is displayed. Then press + or - to move through the entries beginning with this character. For example, to find the entry you stored for Jim in a directory beginning with an entry for “Aaron,” press -.
DIRECTORY OPERATION INTERCOM OPERATION Removing a Name and Number from the Directory 1 2 3 Enter Directory mode and use the dial pad or Navigation buttons to find the entry for the number you wish to remove from the directory (see “Reviewing Information Stored in the Directory”). Press R. The screen prompts REMOVE: remove?. Press R again within three seconds to remove the entry. The screen displays: Removing All Entries from the Directory 1 2 3 Enter Directory mode. Press R.
INTERCOM OPERATION This intercom features both a single-phone page and a system-wide page. A single-phone page alerts only one phone; a system-wide page alerts all phones. Any phone with the Do Not Disturb (DND) feature activated will not receive a page. An intercom call or single-phone page automatically activates the speakerphone on the receiving phone. You can deactivate the speakerphone by lifting the handset.
INTERCOM OPERATION Switching Between an Intercom Call and a Single-phone Page When making an intercom call, press p to switch the call to a singlephone page. When making a single-phone page, press I to switch the call to the intercom. INTERCOM OPERATION Making an Intercom Conference Call 1 2 3 4 Make or answer a call. Press and release I and enter the extension number of the third party. The line is automatically put on hold. After the third party answers, press and release C.
CALLER ID OPERATION CALLER ID OPERATION Access Caller ID information for calls coming in on other lines Enter call history to review calls Dial a number from call history Indicates unreviewed Caller ID information or voice mail messages Scroll through call history Remove records from call history Exit Caller ID mode Store a number from call history in the directory, save directory names and numbers, and save options settings 44 This telephone has a Caller ID feature that works with Caller Identifica
CALLER ID OPERATION Call Waiting If you subscribe to Caller ID with Call Waiting service and you receive a Call Waiting call, the screen will display call information for the call. 1 2 Press F to access the Call Waiting call. To switch back to the original call, press F again.
CALLER ID OPERATION CALLER ID OPERATION Call List Display Messages View Call List Summary Private Name The other party is blocking name information. Private Number The other party is blocking telephone number information. Unknown Name Your phone company is unable to receive information about this caller’s name. Unknown Number Your phone company is unable to receive information about this caller’s number. Error The Caller ID information received from the phone company was not recognizable.
CALLER ID OPERATION Removing All Calls from Call List 1 2 3 Press c. The screen displays the numbers of total calls and new calls in the call history. Press R. The screen prompts REMOVE: all?. Press R again within three seconds to confirm your decision. The screen displays for two seconds: CALLER ID OPERATION Saving a Number from Call List to the Directory 1 2 3 4 5 6 and then displays: 7 Locate the number you wish to store in call history. Press E. Press D. The screen displays DIRECTORY. Press S.
ADDING A FAX MACHINE NOTE: Do not connect a fax machine to Line 1. Doing so will interrupt the system’s intercom data channel. You may wish to use a fax machine with your phone. Choose Line 2, 3 or 4 for the fax machine, and connect it according to the manufacturer’s instructions for installation and use. • • • • That line’s telephone number is your fax number. The same line can be used for outgoing calls (incoming faxes will get a busy signal).
IN CASE OF DIFFICULTY IN CASE OF DIFFICULTY Tone Signals Do Not Activate a Remote Device Screen Displays COVM • • The screen displays COVM when the COVM indicator is turned on for at least one line, whether or not there are messages waiting, and whether or not you have the service. • If you subscribe to Voice Mail service with your local telephone service provider, but prefer not to display COVM on the screen, turn off the COVM indicator for each line.
EXPANDING THE 955 SYSTEM EXPANDING THE 955 SYSTEM When you combine two or more 955 phones you create an interacting system where phones share lines. You can have up to twelve phones and up to 15 telephone lines. The 955 can be expanded with or without Centrex service. NOTE: All 955 features work as described earlier in this manual. Line Groups When phones share lines, Line-in-use lights let users at different extensions know when a specific line is in use.
CENTREX OPERATION CENTREX OPERATION Setup Checklist Setting Ring Delay Duration Before expanding your system or installing for Centrex, review the installation checklist. If you have Centrex, contact your local telephone company for further information about Centrex service. • The phone number for Line 1 must be the same on all phones in order for the Intercom and Page features to work. • Determine the number of phones that will be on the system. • Identify the phone that will be the Console phone.
INDEX INDEX + 5, 15–17, 19, 36, 48 COVM RESET 6, 51 Home Area Code 4, 5, 20, 50 Prime Line 5, 6, 18, 23 - 5, 15–17, 19, 36, 48 CSL DELAY RING 7, 21 HOUR 16 Private Line 3, 23, 57, 58 < 5, 32, 34, 37 DATE 16 ICM 40, 41 Private Name 49 > 5, 15–17, 19, 32, 34, 37 DAY OF WEEK 16 Initializing 10, 13 Private Number 49 All Removed! 38, 50 Default settings 7, 15, 21 I 27, 40–43 G 15–21, 51 AM/PM 16 DELAY RING 6, 18 o 32, 37, 50 Intercom 3, 7, 18, 25, 27, 28, 39–43, 52, 53, 56–59 Redial 22,
INDEX TIME/DATE 6, 16, 51 Timer 24 TONE/PULSE 6, 19 t 29 Transfer 29 Transferred call 7, 29 Unknown Name 49 Unknown Number 49 Voice Mail (see also COVM) 4, 6, 17, 44, 47, 55 Volume + 25, 26 Volume - 25, 26 62
Activate Room Monitor Press and release p, then dial the extension of the phone to be monitored. End Monitoring Press and release K. CALLER ID OPERATION (pages 44-51) Access a Call Waiting Call Press F. Press F again to return to the original call. Alternately Display Caller ID Information for More than One Call Press c. 1 Four-Line Intercom Speakerphone 955 Quick Reference Card TELEPHONE OPERATION (pages 22-29) View the Call List Press i. Use + and - to scroll through call history.
Temporary Tone Dialing Dial the number. Press and release t. Buttons pressed after this send touch tone signals. Make a Conference Call Place the first call on hold, then dial the third party. When this call is answered, press C to begin the conference call. Transfer a Call to Another System Phone Press t, dial the extension where you're transferring the call, then hang up. SPEED DIAL OPERATION (pages 30-32) Store Names/Numbers Press D, S, then follow screen prompts.