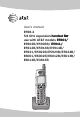
User’s manual E598-2 5.
Congratulations on purchasing your new AT&T product. Before using this AT&T product, please read the Important safety instructions on pages 50 to 53 of this manual Please thoroughly read the user’s manual for all the feature operation and troubleshooting information you need to install and operate your new AT&T product. For customer service or product information, please visit our website at www.telephones.att.com or call 1 (800) 222-3111. In Canada dial 1 (866) 288-4268. Model #: E598-2 Product name: 5.
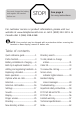
You must charge the battery and register the handset before use. STOP! See page 4 for easy instructions. For customer service or product information, please visit our website at www.telephones.att.com or call 1 (800) 222-3111. In Canada dial 1 (866) 288-4268. NOTE: Your product may be shipped with a protective sticker covering the handset or base display, remove it before use. Table of contents Quick reference guide...........................1 Parts checklist...........................................
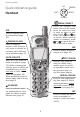
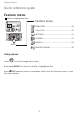
Getting started UP Quick reference guide LEFT Handset CENTER RIGHT DOWN MENU/SELECT Press to display the menu. Once in the menu, press to select an item or save an entry or setting. Press or to scroll up or down while in menus. While entering names or numbers, press or to move the cursor to the left or right. CID Press to display caller ID information (page 33). PHONE/FLASH Press to make or answer a call. During a call, press to receive an incoming call if call waiting is activated (page 11).
Getting started Quick reference guide Feature menu Shows a highlighted item DIRECTORY Feature menu DIRECTORY...................................................................26 CALL LOG......................................................................33 SETTINGS.......................................................................17 SOUNDS.........................................................................21 DISPLAY..........................................................................
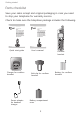
Getting started Parts checklist Save your sales receipt and original packaging in case you need to ship your telephone for warranty service. Check to make sure the telephone package includes the following: Quick start guide User’s manual E598-2 5.8 GHz expansion handset for use with AT&T models E5901/E5902B/E5903B/ E5911/E5912B/E5913B/ E5914B/ E5921/E5922B/ E5923B/E5924B/E6001/ E6002B/E6012B/E6013B/ E6014B/E3813B E598-2 5.
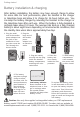
Getting started Battery installation & charging After battery installation, the battery may have enough charge to allow for some calls. For best performance, place the handset in the charger or telephone base and allow it to charge for 16 hours before use. You can keep the battery charged by returning the handset to the charger or the telephone base after each use. When the battery is fully depleted, a recharge takes about 12 hours.
Getting started Belt clip & optional headset Install belt clip as shown below if desired. To release belt clip, pull and unlock one flap from the notch first before detaching the whole belt clip from handset. Snap belt clip into notches on both sides of handset. For hands-free telephone conversations, you can use any industry standard 2.5 mm headset (purchased separately). For best results, use an AT&T 2.5 mm headset. ��������������������������������� To purchase a headset, visit our website at www.
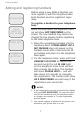
Getting started Adding and registering handsets Before using a new E598-2 handset, you must register it with your E5901/E5902B/E5903B/E5911/E5912B/E5913B/E5914B/ E5921/E5922B/E5923B/E5924B/E6001/E6002B/E6012B/E6013B/ E3813B or E6014B telephone base (purchased separately). The E5901/E5902B/E5903B/E5911/E5912B/E5913B/E5914B/E5921/ E5922B/E5923B/E5924B/���������������������������������� E6001/E6002B/��������������������� E6012B/E6013B/E3813B or E6014B can accommodate up to four cordless handsets.
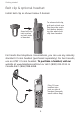
Getting started Adding and registering handsets NOT REGISTERED Before using a new E598-2 handset, you must register it with the telephone base. Each handset must be registered seperately. To register a handset to your telephone base PRESS HNDST LOC 4 SEC ON BASE PLEASE WAIT... HS X REGISTERED 12:00PM When first purchased, the expansion handset will show NOT REGISTERED on the screen. The new handset may need to be charged for five minutes before registering to the main telephone base. 1.
Getting started Replacing a handset You may need to de-register your handsets if: You have the maximum number of registered handsets (four) and you need to replace a handset. - OR You wish to change the designated handset number of your registered handsets. You must first de-register ALL the handsets, and then re-register ALL the handsets you wish to use. Please read carefully through all the instructions on this page before beginning the de-registration process. To de-register all handsets 1.
Telephone operation Basic operation Making and answering calls Elapsed time PHONE 00:00:30 To answer an incoming call, press PHONE/FLASH or SPEAKER, or any dial pad key (0-9, * or #). To make a call, press PHONE/FLASH or SPEAKER, then dial a number. Press OFF/CLEAR to hang up. On-hook dialing Press to make or answer a call.
Telephone operation Basic operation REDIAL 555-1234 ** PAGING ** TONE MUTE REDIAL DELETE PAUSE Last number redial Before pressing PHONE/FLASH, press REDIAL/PAUSE to display the most recently called numbers (up to 32 digits). Press , or REDIAL/PAUSE repeatedly to view up to five recently called numbers. The handset will beep twice at the beginning or end of the list. Press OFF/CLEAR to exit.
Telephone operation Options while on calls Volume control Press VOLUME keys on the side of the handset to adjust listening volume. Each button press increases or decreases the volume by one level. When you change the volume level, the new setting is saved. Press to adjust the volume. Press to switch back and forth between calls. TONE MUTE REDIAL DELETE PAUSE NOTE: A maximum of two handsets can be used on an outside call, and the other two handsets can be used on an intercom call. NOTES: 1.
Telephone operation Options while on calls Mute Press MUTE to silence the microphone. You will be able to hear the caller, but your caller will not be able to hear you until you press MUTE again and resume speaking. Press to switch to touch tone dailing Press to silence the ringer TONE Press to silence the ringer. MUTE REDIAL DELETE PAUSE Temporary ring silencing Press OFF/CLEAR or MUTE/DELETE while the phone is ringing to silence the ringer temporarily.
Telephone operation Options while on calls Press to review the call log Press to review the directory TONE MUTE REDIAL DELETE PAUSE Press to review the most recently called number Last number redial accessing While on a call, you can press REDIAL/PAUSE to review the most recently called number. To return to your call, press REDIAL/PAUSE. To call the most recently called number displayed, wait for two seconds. The number will be dailed out automatically.
Telephone operation Intercom TONE TONE MUTE REDIAL MUTE REDIAL DELETE PAUSE DELETE PAUSE INTERCOM TO: INTERCOM Use the intercom feature for conversations between handsets. 1. Press INT. The screen of the originating handset will show INTERCOM TO. 2. Enter the handset number of the destination handset. The display will show CALLING HANDSET X. The destination handset will ring, and its screen will show HANDSET X IS CALLING.
Telephone operation Intercom Handling incoming calls The telephone will beep if you receive an outside call during an intercom conversation. You can either: • Press PHONE/FLASH to end the intercom call and answer the incoming call. -OR• Press INT or OFF/CLEAR to disconnect the intercom connection without answering the incoming call. The incoming call will continue to ring.
Telephone operation Intercom call transfer TONE TONE MUTE REDIAL MUTE REDIAL DELETE PAUSE DELETE PAUSE TRANSFER TO NOTES 1. Before the intercom call is answered, you can cancel the transfer and return to the external call by pressing OFF/CLEAR, PHONE/FLASH, or INT. Use the intercom feature to transfer an external call from one handset to another. 1. During a conversation with an external call, press INT.
Telephone operation Settings DIRECTORY TONE MUTE REDIAL DELETE PAUSE SETTINGS SETTINGS LANGUAGE DIAL TYPE CLOCK SETTING In the SETTINGS menu, you can change the language, dial type, and clock setting. You can also clear the voice mail indication. 1. Press MENU/SELECT in idle mode to enter the feature menu. 2. Press to highlight SETTINGS, then press MENU/SELECT to enter the SETTINGS menu. 3. Press or to scroll through the SETTINGS menu, then press MENU/SELECT to select the desired option.
Telephone operation Settings Dial type SETTINGS LANGUAGE DIAL TYPE CLOCK SETTING DIAL TYPE TONE PULSE In this menu, you can choose TONE or PULSE (rotary service) dialing. The factory default setting is TONE. Change this to PULSE only if you do not have touchtone dialing service. 1. In the SETTINGS menu, press or to highlight DIAL TYPE, then press MENU/SELECT. 2. Press PULSE. or to highlight TONE or 3. Press MENU/SELECT to save your preference.
Telephone operation Settings SETTINGS LANGUAGE DIAL TYPE CLOCK SETTING CLOCK SETTING 12:00AM CLOCK SETTING 06:00AM 3. Press or to highlight CLOCK SETTING, then press MENU/SELECT. 4. Use the dial pad keys (0-9) to enter two digits for the hour (01-12). You can also press or to set the hour. 5. Press MENU/SELECT. 6. Use the dial pad keys (0-9) to enter two digits for the minute (00-59). You can also press or to set the minute. 7. Press MENU/SELECT. 8. Press CLOCK SETTING 06:45AM or to set AM or PM.
Telephone operation Settings DIRECTORY SETTINGS To manually turn off the NEW VOICE MAIL m e s s a g e , t h e i co n a n d VOICEMAIL light: 1. Press MENU/SELECT in idle mode to enter the feature menu. 2. ����� Press to highlight SETTINGS, then press MENU/SELECT to enter the SETTINGS menu. SETTING DIAL TYPE CLOCK SETTING CLR VOICE MAIL CLR VOICE MAIL TURN INDICATOR OFF? 3. Press MAIL. 4. Press or to highlight CLR VOICE MENU/SELECT. 5.
Telephone operation Sounds In the SOUNDS menu, you can choose one of ten ringer melodies, and turn the key tone on or off. NOTE: Press OFF/CLEAR to cancel an operation, back up to the previous menu, or exit the menu display. Press and hold OFF/CLEAR to return to the idle mode. Ringer melody DIRECTORY To choose a ringer melody: 1. Press MENU/SELECT in idle mode to enter the feature menu. SOUNDS SOUNDS RINGER MELODY KEY TONE RINGER MELODY MELODY MELODY MELODY 0 1 2 2.
Telephone operation Sounds Key tone DIRECTORY SOUNDS The handset is preset to beep with each key press. If you turn off the KEY TONE, there will be no beeps when keys are pressed. To turn the KEY TONE on or off: 1. Press MENU/SELECT in idle mode to enter the feature menu. SOUNDS RINGER MELODY KEY TONE KEY TONE ON OFF 2. Use the , , and/or keys to highlight SOUNDS, then press MENU/SELECT to enter the SOUNDS menu. 3. Press to highlight KEY TONE, then press MENU/SELECT to select KEY TONE. 4.
Telephone operation Display In the DISPLAY menu, you can select an image to be displayed as wallpaper. You can also adjust the contrast to one of five levels to suit different lighting conditions. NOTE: Press OFF/CLEAR to cancel an operation, back up to the previous menu, or exit the menu display. Press and hold OFF/CLEAR to return to the idle mode. Wallpaper To choose a wallpaper for the handset: DIRECTORY DISPLAY DISPLAY WALLPAPER CONTRAST 1. Press MENU/SELECT in idle mode to enter the feature menu.
Telephone operation Display Contrast DIRECTORY To adjust the screen contrast on the handset: 1. Press MENU/SELECT in idle mode to enter the feature menu. DISPLAY DISPLAY WALLPAPER CONTRAST CONTRAST 2. Use the , , and/or keys to highlight DISPLAY, then press MENU/SELECT to enter the DISPLAY menu. 3. Press to highlight CONTRAST, then press MENU/SELECT. 4. Press trast. or to adjust the screen con- 5. Press MENU/SELECT to save your preference.
Telephone operation Ringer volume DIRECTORY RINGER VOLUME RINGER VOLUME In this menu, you can set the ringer volume level (1-6), or turn the ringer off (0). When the ringer is turned off, the will appear on the handset screen. NOTE: Press OFF/CLEAR to cancel an operation, back up to the previous menu, or exit the menu display. Press and hold OFF/CLEAR to return to the idle mode. To adjust the RINGER VOLUME: 1. Press MENU/SELECT in idle mode to enter the feature menu. - OR - 2.
Directory Directory Shared directory DIRECTORY Pat Williams 5551234 The directory is stored in the telephone base, and is shared by all handsets. Changes made to the directory at any one handset will be reflected in all. NOTE: When one handset is offhook and another handset is in idle mode, both hand sets can view caller ID log and directory at the same time. Memory capacity TONE MUTE REDIAL DELETE PAUSE The directory can store up to 50 entries.
Directory New directory entries To create and store a new directory entry DIRECTORY 1. Press MENU/SELECT in idle mode to enter the feature menu. 2. Press MENU/SELECT again to enter the DIRECTORY menu. DIRECTORY REVIEW STORE DIRECTORY ENTER NUMBER 555-1234 to highlight STORE. 3. Press 4. Press MENU/SELECT. 5. Enter the telephone number when prompted. • Use the dial pad to enter up to 32 digits. – Press or to move the cursor to the left or right. – Press bers.
Directory New directory entries 6. Press MENU/ SELECT to save the n u m b e r. T h e d i s p l ay w i l l s h o w ALREADY SAVED if the number is already in the directory. NOTE: Each line can hold 16 digits, so if you enter a number longer than 16 digits, the numbers will be displayed in the following line. 7. Enter the name when prompted. Use the dial pad to enter a name (up to 16 characters). Each time a key is pressed, the character on that key will be displayed.
Directory Directory search To browse through the directory DIRECTORY Andrew 5556789 TONE MUTE REDIAL DELETE PAUSE DIRECTORY Barbara 5559876 1. Press DIR in idle mode to display the first listing in the directory. DIRECTORY EMPTY will be displayed if there are no directory entries. 2. Press or to browse through the directory. Entries will be displayed alphabetically by the first letter in the name. NOTES: 1. Press OFF/CLEAR at anytime to exit the directory. 2.
Directory Directory search 3. To see other names that start with the letters on the dial pad key, keep pressing the key. The names will be shown in alphabetical order. For example, if you have name entries Jennifer, Jessie, Kevin and Linda in your directory: • If you press 5 (JKL) once, you will see Jennifer. • If you press 5 (JKL) twice, you will see Jessie. • If you press 5 (JKL) three times, you will see Kevin. • If you press 5 (JKL) four times, you will see Linda.
Directory To dial, delete or change entries To dial, delete or change a directory entry (name and number), the entry must be displayed on the handset. Use directory search (pages 29-30) to display an entry. To dial a displayed number When a directory entry is displayed, press PHONE/FLASH or SPEAKER to dial the displayed number. To delete an entry When a directory entry is displayed, press MUTE/DELETE to delete the displayed entry from the directory.
Directory To dial, delete or change entries To change an entry DIRECTORY Andrew 5556789 DIRECTORY EDIT NUMBER 555-6789 DIRECTORY EDIT NAME Andy DIRECTORY Andy 5551234 When a directory entry is displayed: 1. Press MENU/SELECT to modify the entry. You will be prompted to EDIT NUMBER. • Press the dial pad keys to add digits. • Press MUTE/DELETE to erase digits. • Press or to move the cursor. • Press and hold REDIAL/PAUSE to add a three-second pause if desired.
Caller ID operation Caller ID Information about caller ID with call waiting This product has a caller ID with call waiting feature that works with service from your local telephone service provider. Caller ID with call waiting lets you see who is calling before answering the phone, even when you’re on another call. CHRISTINE SMITH 908-555-0100 NOV23 10:01AM You may need to change your telephone service to use this feature.
Caller ID operation Caller ID Shared caller ID log The caller ID log is stored in the telephone base, and is shared by all handsets. Changes made at any one handset will be reflected in all. CHRISTINE SMITH 908-555-0100 NOV23 10:01AM TONE MUTE REDIAL DELETE PAUSE NOTE: When one handset is offhook and another handset is in idle mode, both hand sets can view caller ID log and directory at the same time.
Caller ID operation Caller ID Chris 908-555-0100 NOV23 10:01AM TONE MUTE REDIAL DELETE PAUSE Memory match Names of callers will be displayed only if the information is provided by your local telephone company. If the incoming telephone number exactly matches a telephone number in your directory, the name that appears on the screen will match the corresponding name as you entered it into your directory.
Caller ID operation Caller ID HANDSET 1 4 MISSED CALLS 10:01 AM Missed calls When a handset is in idle mode and has calls that have not been reviewed, its screen will show XX MISSED CALLS. Any entries which have not been reviewed will be counted as MISSED CALLS when the phone is idle. Each time a call log entry marked NEW is reviewed, the number of missed calls decreases by one.
Caller ID operation To review the call log To review the call log HANDSET 1 4 MISSED CALLS 4:30 PM CALL LOGNEW Pat Williams 555-1234 NOV 23 10:31AM TONE MUTE REDIAL DELETE PAUSE CALL LOGNEW Chris Thompson 908-555-0100 NOV 23 10:21AM CALL LOGNEW Jeffrey Adams 555-9876 NOV 23 10:11AM Press CID to review the call log. The call log displays the caller ID entries in reverse chronological order. The most recent call is displayed first. Use or to scroll through the list as shown at left.
Caller ID operation To review the call log Other options • Press MUTE/DELETE to delete the displayed entry from the call log. • Press and hold MUTE/DELETE to delete all entries from the call log. When asked to confirm, press MENU/SELECT to clear the call log of all entries, or press OFF/CLEAR to exit and leave all call log entries intact. • Press MENU/SELECT to copy this entry into your directory. If the name or number is not provided, you will be prompted to enter them (page 28).
Appendix Screen icons, indicator lights & tones Screen icons & alert tones Screen icons The handset is in use. The handset speakerphone is in use. HANDSET 1 6 MISSED CALLS 12:45PM The handset headset phone is in use. Microphone is muted. There are new voice mail messages. Ringer off. Battery charging (animated display). Low battery (flashing); place handset in telephone base or charger to recharge. TONE MUTE REDIAL DELETE PAUSE Missed and un-reviewed calls.
Appendix Handset display screen messages Screen display messages PHONE The handset is in use. ENDED You have just ended a call. CALL LOG EMPTY You are accessing an empty call log. DIRECTORY EMPTY You are accessing an empty directory. LIST FULL Trying to save to a full directory. MUTED The call is on mute. Handset speakerphone is in SPEAKER use. LOW BATTERY Battery needs to be recharged. INCOMING CALL There is a call coming in. NEW VOICE MAIL There are new voice mail messages.
Appendix Handset display screen messages Screen display messages WARNING CHECK BATTERY! The battery is not installed or not installed properly in the handset. -OR- The battery needs to be replaced. -OR- TONE MUTE REDIAL DELETE PAUSE An incorrect battery has been installed by mistake. Use only supplied battery (model 27910, part number 89-0099-00-00) or equivalent. The battery is very low. Place PLACE the handset in the telephone IN CHARGER base or charger.
Appendix Troubleshooting If you have difficulty with your phone, please try the suggestions below. For Customer Service, visit our website at www.telephones. att.com or call 1 (800) 222-3111. In Canada dial 1 (866) 288-4268. My phone doesn’t work at all • Make sure the power cord is securely plugged in. • Make sure that the battery pack connector is securely plugged into the cordless handset.
Appendix Troubleshooting I cannot dial out • First try all the suggestions above. • Make sure you have a dial tone before dialing. The cordless handset may take a second or two to find the telephone base and produce a dial tone. This is normal. Wait an extra second before dialing. • Make sure your phone is set to the correct dial mode for the type of service that you have (pulse or touch tone).
Appendix Troubleshooting CONNECTING... displays on my cordless handset • Ensure that the telephone base is powered up. • Place the cordless handset in telephone base for one minute to allow the cordless handset and telephone base to resynchronize channels. • Move the cordless handset closer to the base. You might have moved out of range. • If the cordless handset is in its base and the charging light does not come on, refer to The charge light is off section in this Troubleshooting guide.
Appendix Troubleshooting I get noise, static, or weak signal even when I’m near the telephone base • Other cordless phones and 802.11 wireless routers that are used for home computer networks both use internal radios to communicate. The radios may interfere with one another. You can improve the performance of your cordless phones and your router by: a.
Appendix Troubleshooting • If you subscribe to DSL service and if you hear noise during conversations and/or your caller ID features are not functioning properly, install a DSL filter to the telephone line between the telephone base and the telephone line jack. Contact your DSL provider to obtain a DSL filter. I hear other calls while using my phone • Disconnect the telephone base from the telephone jack, and plug in a different telephone.
Appendix Troubleshooting • Test a working phone at the phone jack. If another phone has the same problem, the problem is the phone jack. Contact your local telephone company (charges may apply). • Other electronic products can cause interference with your cordless phone.
Appendix Troubleshooting • Relocate your telephone base to a higher location. The phone will have better reception when not installed in a low area. • If the other phones in your home are having the same problem, the problem is in your wiring or local service. Contact your local telephone company (charges may apply). My caller ID isn’t working • Caller ID is a subscription service. You must subscribe to this service from your local telephone company for this feature to work on your phone.
Appendix Troubleshooting Common cure for electronic equipment If the unit does not seem to be responding normally, try putting the cordless handset in its base. If it does not seem to respond, do the following (in the order listed): • Disconnect the power to the telephone base. • Disconnect the cordless handset battery, and spare battery, if applicable. • Wait a few minutes. • Connect power to the telephone base. • Re-install the battery pack, and place the cordless handset into the telephone base.
Appendix Important safety instructions This symbol is to alert you to important operating or servicing instructions that may appear in this user’s manual. Always follow basic safety precautions when using this product to reduce the risk of injury, fire, or electric shock. Safety information • Read and understand all instructions in the user’s manual. Observe all markings on the product. • Avoid using a telephone during a thunderstorm. There may be a slight chance of electric shock from lightning.
Appendix Important safety instructions • If this product has user-replaceable batteries, replace batteries only as described in your user’s manual. Do not burn or puncture batteries — they contain caustic chemicals. • If this product has a three-prong (grounding) plug or a polarized plug with one wide prong, it may not fit in nonpolarized outlets. Do not defeat the purpose of these plugs. If they do not fit in your outlet, the outlet should be replaced by an electrician.
Appendix Important safety instructions • Rechargeable batteries: This product contains either nickelcadmium or nickel-metal hydride rechargeable batteries. Exercise care in handling batteries in order not to short the battery with conducting material such as rings, bracelets, and keys. The battery or ��������������������������������������� conductor may overheat and cause harm. Observe proper polarity between the battery and the battery charger.
Appendix Important safety instructions Precautions for users of implanted cardiac pacemakers Cardiac pacemakers (applies only to 900 MHz digital cordless telephones): ������������������������������������������������� Wireless Technology Research, LLC (WTR), an independent research entity, led a multidisciplinary evaluation of the interference between portable wireless telephones and implanted cardiac pacemakers. Supported by the U.S.
Appendix FCC Part 68 and ACTA This equipment complies with Part 68 of the FCC rules and with technical requirements adopted by the Administrative Council for Terminal Attachments (ACTA). The label on the back or bottom of this equipment contains, among other things, a product identifier in the format US: AAAEQ##TXXXX. This identifier must be provided to your local telephone company upon request.
Appendix FCC Part 68 and ACTA If this equipment is causing harm to the telephone network, the telephone company may temporarily discontinue your telephone service. The telephone company is required to notify you before interrupting service. If advance notice is not practical, you will be notified as soon as possible.
Appendix FCC Part 15 This equipment has been tested and found to comply with the requirements for a Class B digital device under Part 15 of the Federal Communications Commission (FCC) rules. These requirements are intended to provide reasonable protection against harmful interference in a residential installation. This equipment generates, uses and can radiate radio frequency energy and, if not installed and used in accordance with the instructions, may cause harmful interference to radio communications.
Appendix Limited warranty Limited warranty The AT&T brand is used under license - any repair, replacement or warranty service, and all questions about this product should be directed to: In the United States of America ������ visit www.telephones.att.com or call ������������������������������������� 1(800) 222-3111. In Canada dial 1 (866) 288-4268. 1.
Appendix Limited warranty 3. How long is the limited warranty period? The limited warranty period for the PRODUCT extends for ONE (1) YEAR from the date of purchase.
Appendix Limited warranty · Charges for installation or setup, adjustment of customer controls, and installation or repair of systems outside the unit. 5. How do you get warranty service? To obtain warranty service in the United States of America, call 1 (800) 222-3111; in Canada, please dial 1 (866) 288-4268. NOTE: Before calling for service, please review the user’s manual - a check of the PRODUCT controls and features may save you a service call.
Appendix Limited warranty 7. Other limitations This warranty is the complete and exclusive agreement between you and the manufacturer of this AT&T branded PRODUCT. It supersedes all other written or oral communications related to this PRODUCT. The manufacturer provides no other warranties for this PRODUCT. The warranty exclusively describes all of the manufacturer’s responsibilities regarding the PRODUCT. There are no other express warranties.
Appendix Technical specifications RF frequency band (handset to base) 2400 MHz — 2483.5 MHz RF frequency band (base to handset) 5725 MHz — 5850 MHz Channels 95 Operating temperature 32°F — 122°F 0°C — 50°C Telephone base voltage (AC voltage, 60Hz) 96 — 130 Vrms Handset voltage 3.2 — 4.7 VDC 600mAh Charger voltage (AC adapter output) 9VDC @200mA Replacement battery 3.6V 600mAh 5.
Appendix Index A AC adapter, 4 Adding new handsets, 6-7 Alert tones, 39 Answering calls, 9 Auto off, 9 E Elapsed time, 9 Ending calls, 9 F Flash (switchhook flash), 11 H Hands-free use, 9 Handset locator, 10 Headset, 5 B Battery charging, 4 Battery installation, 4 Belt clip, 5 I Intercom, 14 Incoming call log, 37 Incoming calls, answering, 9 Indicator lights, 39 C Call waiting, 11 Call transfer, 16 Caller ID, 33 add entries to phone directory, 38 delete entries, 38 dial entries, 38 D L Last number red
Appendix Index Q Quick reference guide, 1-2 R Receiving calls, 9 Recharging, 4 Redial, 10 Replacing a handset, 8 Ring silencing, 12 Ring tone options, 21 Ringer volume, 11, 25 S Search for names, 29 Speakerphone, 9 Switchhook flash, 11 T Technical specifications, 61 Telephone operating range, 61 Troubleshooting, 42-49 V Volume controls, 11 63
www.telephones.att.com Copyright © 2007 Advanced American Telephones. All rights reserved. AT&T and the AT&T logo are trademarks of AT&T Knowledge Ventures, licensed to Advanced American Telephones. Printed in China. Issue 3 AT&T 03/07.