
User Guide
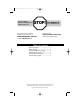

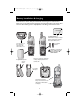
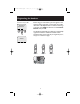


Table Of Contents
- E2525 manual
- Table of contents
- Quick reference guide
- Parts checklist
- Before you begin
- Telephone base installation
- Battery installation & charging
- Wall mounting
- Connect cords as shown, then press and slide down firmly so base is held securely on outlet mounting pegs
- Clip wall-mount bracket securely into notches on underside of base
- Plug short telephone line cord into telephone jack
- Plug power cord transformer into electrical outlet
- Place handset in base to charge for 8 hours before first use.
- Belt clip & optional headset
- Telephone Operation
- Phonebook
- Caller ID Logs
- Answering System Operation
- Appendix
- Display screen status icons
- Alert tones and indicator lights
- Adding new handsets
- Charging spare batteries
- In case of difficulty
- Telephone does not work at all
- Phone does not ring
- If you hear noise or interference during a call
- If you lose a call while using the handset
- Incomplete messages
- Difficulty hearing messages
- System does not answer after correct number of rings
- “CL” appears in message window
- System does not respond to remote commands
- Announcement message is not clear
- Index
- Technical specifications
- Remote access wallet card
- IMAGES
- E250 manual
Table of contents
Copyright © 2003 Advanced American Telephones. All Rights Reserved.
AT&T and the Globe Design are trademarks of AT&T Corporation.,
licensed to Advanced American Telephones.
STOP!
See pages 2-3
for easy instructions
You must charge
batteries and register the
handset before use
For customer service or product
information, visit our web site at
www.telephones.att.com
or call
1-800-222-3111
Please also read
Important Product Information
Enclosed in product package
Before you begin........................................1
Parts checklist.............................................1
Battery installation & charging................2
Registering the handset............................3
Belt clip & optional headset ....................4
Quick reference guide..............................5
ATT-250CIB-d1.qxd 12/30/2003 2:02 PM Page 2