
User`s manual
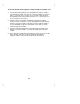
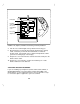

Table Of Contents
- Contents
- Introduction
- Your ISDN 8510T Voice Terminal
- Feature Descriptions
- Voice Features
- Features Accessed with the Display and Softkeys
- ENTERING AND EXITING SOFTKEY MODE (USING THE MENU AND THE EXIT BUTTONS)
- THE VOICE TERMINAL SELF-TEST FEATURE bbbbbbb
- USING THE NEXT, THE PREV, AND THE DIR BUTTONS
- RESPONDING TO ´QUIT´ AND ´DONE´
- A SOFTKEY DISPLAY SCREEN FLOWCHART
- SETTING THE CLOCK
- SETTING THE SPEAKERPHONE
- ADDING, EDITING, AND DELETING A NUMBER AND NAME IN THE DIRECTORY
- VIEWING A DIRECTORY ENTRY (AND PLACING A CALL)
- USING THE DIR BUTTON TO PLACE A CALL
- USING THE CALL LOG
- LOCKING AND UNLOCKING THE DIRECTORY, CALL LOG, AND ALL SOFTKEYS
- CHANGING OR REMOVING YOUR PASSWORD
- SELF-TEST
- CHOOSING THE CONTRAST LEVEL FOR THE DISPLAY
- SELECTING A PERSONALIZED RING
- SETTING THE RATE AT WHICH YOU VIEW THE DISPLAY MESSAGES
- TURNING ON OR OFF SOFTKEY INFORMATION TONES
- SETTING THE NUMBER OF NAMES ON THE DIRECTORY PAGE
- Tones and Their Meanings
- Labeling and Installing the Designation Card and the Telephone Number Card
- Installation
- Technical Description
- Index
1 Place the voice terminal face down on a flat surface.
2 Using the thumb notches beside the kickstand, lift the kickstand from
the desktop stand.
3 Pass the line cord (and adjunct cord, if applicable) under the
kickstand.
4 Snap the adjunct cord into the "ADJUNCT" jack until you hear a click.
See Figure 5 for the location of the "ADJUNCT" jack.
5 Route the adjunct cord through the channel. Refer to the "Desktop
Installation" section for instructions.
6 Connect the free end of the adjunct cord to your speakerphone or
headset adapter.
NOTE: Refer to the adjunct’s installation documentation for its power
requirements.
71