
Technical information


INSTALLATION AND ADMINISTRATION GUIDE
78
2: -dBATCH
3: -q
4: -sDEVICE=tiffg3
5: -IC:\Program Files\VSI-FAX\FaxServer\lib\ghostscript\lib;C:\Program
Files\VSI-FAX\FaxServer\lib\ghostscript\fonts
6: -sOutputFile=C:\Program Files\VSI-FAX\FaxServer\spool\temp\tmp00564aa.tif
7: GV_TOTALRN_99.pdf
So if this command is not working properly, you can try to go into <VSIFAX>\lib\ghostscript\bin and launch
Ghostscript directly (gs.exe) with all these parameters (except -d and -q ones which are only useful within
server integration):
gs -sDEVICE=tiffg3 -I%vsifax%\lib\ghostscript\lib;%vsifax%\lib\ghostscript\fonts -
sOutputFile=c:\ouput.tif c:\inputfile.pdf
If you get an error at this stage, the problem is not in VSI-FAX but in Ghostscript itself. The solution could be to
upgrade Ghostscript and see if a more recent version behaves better. You can access latest builds of
Ghostscript on this website: http://www.cs.wisc.edu/~ghost
. Note that due to Ghostscript licensing, Esker is only
allowed to distribute GPL versions but customers can download AFPL versions on their own.
Updating Ghostscript on a Windows platform
VSI-FAX always looks for the gs.exe in the same place so to upgrade Ghostscript on Windows the idea is to install it
in a new folder; and then replace the current working directory with this new one. Some changes are needed though,
so here is a procedure you can follow (as an example, it is given for the version 8.15 of ghostscript):
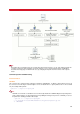
1. Create a new sub-directory in the VSI-FAX lib directory called "GSUpgrade".
2. Save the newer version of the GhostScript converter to this sub-directory.
3. Execute Ghostscript installation and click on Setup.
4. On the GPL Ghostscript Setup dialog box, under "Install to directory", browse to the VSI-FAX lib\GSUpgrade
directory, click OK and then Install.
5. This will create a sub-directory called "gs" and this will contain 2 sub-directories called "fonts" and "gs8.15".
6. Create a new sub-directory in the VSI-FAX lib directory called "Ghostscript_new".
7. Create a new sub-directory in the VSI-FAX lib\Ghostscript_new directory called "fonts".
8. Create a new sub-directory in the VSI-FAX lib\Ghostscript_new directory called "bin".
9. Create a new sub-directory in the VSI-FAX lib\Ghostscript_new directory called "lib".
10. Copy all the files from the VSI-FAX lib\GSUpgrade\fonts directory to the VSI-FAX lib\Ghostscript_new\fonts
directory.
11. Copy all the files from the VSI-FAX lib\GSUpgrade\gs8.15\bin directory to the VSI-FAX
lib\Ghostscript_new\bin directory.
12. Copy all the files from the VSI-FAX lib\GSUpgrade\gs8.15\lib directory to the VSI-FAX lib\Ghostscript_new\lib
directory.
13. In the VSI-FAX lib\Ghostscript_new\bin directory copy and paste the file gswin32c.exe (in the same folder)
and rename the copy to gs.exe.
14. Stop the VSI-FAX scheduler.
15. Rename your VSI-FAX lib\Ghostscript directory to VSI-FAX lib\Ghostscript_old.
16. Rename your VSI-FAX lib\Ghostscript-new directory to VSI-FAX lib\Ghostscript.
17. Start the VSI-FAX scheduler.
Installation note
In recent versions of Ghostscript, the \fonts subfolder doesn't exist anymore. However the procedure is exactly
the same as the one described above except for the parts concerning the \fonts folder.