
Technical information


INSTALLATION AND ADMINISTRATION GUIDE
34
After the installation, when launching Outlook, you will have three new buttons: Fax message, Fax Status and Fax
Profile settings.
Basic installation procedure
1. Load your VSI-FAX CD-ROM into your CD-ROM drive.
If the autorun program does not start automatically, run autorun.exe located in the root directory of your
VSI-FAX CD-ROM.
The VSI-FAX CD browser appears.
2. Select Outlook Client under Desktop Client.
If an existing version of the VSI-FAX Outlook Client is detected, you will be advised that this older version
must be removed before you can proceed with the installation. Click Yes to remove the old VSI-FAX Outlook
Client and proceed with the installation.
3. The Welcome screen appears. Click Next to proceed with the installation.
4. If Microsoft Outlook is currently running on the machine, you will be advised that this client must be closed.
Close Microsoft Outlook and click Retry on the Microsoft Outlook Running advertisement dialog box.
5. Click Next if you agree with the default destination directory for the VSI-FAX Outlook Client program files. To
install the VSI-FAX Outlook Client files in another directory, click Browse and follow the on-screen instructions.
The program files are copied to the your local hard drive. This takes several seconds.
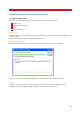
6. Enter the hostname or IP address of your fax server. Enter your VSI-FAX user account login name (client ID).
7. Click Next to proceed with the installation.
8. Select your form publishing option (personal forms library, organizational forms library, or none).
Note
If you want to use the custom fax form provided with the VSI-FAX Outlook Client, you must decide where
you want to publish it. You can either publish to the organizational forms library or your personal forms
library.
9. Click Next to proceed with the installation.
10. When the Setup Complete screen appears, click Finish.
Post-installation notes
You can use the Outlook Client to send faxes directly from Outlook or from another Windows application.
Refer to the VSI-FAX Outlook Client help for additional information.
If you are unable to send faxes after installing VSI-FAX Outlook Client in Windows Server 2003, reboot the
server. This will ensure that installed DLLs get registered.
If you are using the Outlook Client on a system that has other fax products installed, you must control the
order that Microsoft polls the services. To make VSI-FAX the preferred fax product, choose Tools > Services >
Delivery and move the VSI-FAX Outlook Client service closer to the top of the list than any other fax service.
Phone book conversion notes
A conversion utility (PbConvert.exe) that converts phone book and user profile information is part of the
Outlook Client install and is called at the end of the installation. It can also be run separately by users who
want to run the conversion manually.
Command line parameters are available for all of the configuration options the program supports. Invoking the
PbConvert.exe /help displays help for this utility.
During the conversion process, City, State and Zip information is lost. This is primarily because our directory
format uses Address 1/Address 2/Address 3 fields rather than City/State/Zip Code to store this information.