
Technical information


INSTALLATION AND ADMINISTRATION GUIDE
20
To install an imaging server, enter the license provided in Imaging Server Setup and Configuration
(page
137).
Note
If you do not enter a Serial Number and Activation Key, an evaluation license will be installed. This license
allows you to test VSI-FAX and see if the product matches your needs. With such a license, you can use
VSI-FAX for 30 days. After that, you can reactivate it with another time-limited evaluation license or with a
production license.
7. Enter the Cover Page Information and click Next. This information will appear on a typical cover page.
Users can change this information when they send a fax, or they can create other cover pages that show
different information. In most cases however, this will be the information you want most of your fax recipients
to see.
Note
You may want to dedicate a separate email account on your company mail server for fax administration.
8. In the Telephony Information screen, enter your Country code, Area code, Local number length, Long distance
access number, Dial prefix, and Dial suffix. Enter your Called Subscriber ID (CSI) and Transmitting Station ID
(TSI) strings and click Next to accept your dialing properties and proceed with the installation.
For information on the fields to fill in, refer to Dialing properties.
9. In the SMTP/POP3 Information screen, enter your SMTP server name, SMTP from-name, POP3 server name,
POP3 user name, POP3 password, and confirm password. Click Next to continue.
For information on the fields to fill in, refer to Internet email servers.
Note
You only need to create the POP3 user account if the Email-to-Fax gateway integration will be used.
Important
When setting up your POP3 fax routing email account, do not use an email account that receives normal
email. The fax server will try to process all received email on this account as an inbound fax, causing
drastically poor fax routing performance or unexpected application behavior. Furthermore, the fax server
will remove email messages from this inbox. Therefore, Esker strongly suggests setting up an email user
like autofax for your POP3 fax routing, as well as to ensure that this email user is left off distribution lists
at your company.
10. The Add fax modem devices to server screen appears. This screen allows you to add fax modems to the
server. Enter the information for the modem(s) you have installed, if any. Enter a name and a description for
the device queue, and the serial port to use with the modem. Ensure that no other modem is using the same
port. Click Add Device to add a fax modem and Next to proceed with the installation. If you do not have a
modem installed, leave this screen blank and click Next.
Notes
If you have a fax board, its setup is addressed later in the installation process.
If you are testing VSI-FAX with the loopback device or you are only planning to route faxes to email
addresses, you can skip this dialog box.
You can skip this part of the installation and add your fax modem devices later using the vfxadmin
command or the VSI-FAX Server Administration snap-in.
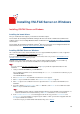
11. When asked if you wish to install/update the Brooktrout TR1034, TruFax or SR140 drivers now, click either
Yes or No depending on the fax solution you are to use. If you click Yes, the driver package will be installed
before proceeding with the VSI-FAX Server installation.
• To use a Booktrout TR1034 or TruFax board with VSI-FAX, you need to install/update the fax
hardware before installing the drivers support from the main setup. If you have already
installed/updated to the Brooktrout Plug and Play driver, click Yes to continue. Otherwise, click No to
cancel the installation, refer to Installing the Brooktrout Plug and Play Driver for TR1034, TruFax
boards in the Fax Boards and Fax Drivers Installation
documentation to install the new plug and play
driver, and relaunch the server installation.
• To use the SR140 Fax Software, you do not need to install or update any hardware. Click Yes to
continue.