Copyright © 1993 All Rights Reserved AT&T 585-321-114 Issue 1 June 1994 Notice Every effort was made to ensure that the information in this book was complete and accurate at the time of printing. However, information is subject to change. Federal Communications Commission (FCC) Interference Notice This equipment has been tested and found to comply with the limits for a Class A digital device, pursuant to Part 15 of the FCC rules.
Table of Contents Preface 5 1. Before you Begin 7 Know Your Phone Commonly Used Keys Know Your Mailbox Getting Into the CLASSIC MAIL System 2. Your Mailbox First-Time Use Recording a Greeting Switching a Greeting 3.
Handling your Messages Deleting and Undeleting a Message Replying to a Message Forwarding a Copy of a Message Listening to Envelope Information Sending a Message Special Delivery Options Group Lists 4.
Preface To streamline your telephone communication, your company has just installed a new round-the-clock voice messaging system, the CLASSIC MAIL™ Voice Messaging System. When you can’t take calls, the CLASSIC MAIL system answers your phone and stores messages in your personal mailbox. You can check your messages whenever and from wherever you like. And, if you are temporarily out of your office, you can have the CLASSIC MAIL system notify you at a phone or pager number each time a new message arrives.
● Chapter 2, “Your Mailbox” discusses how to open and initialize your “voice mailbox. ” ● Chapter 3, “Your Messages” discusses how to listen to your messages. ● Chapter 4, “Off-Site Message Alert” discusses how to use the CLASSIC MAIL system to alert you that you have messages even when you are out of the office. ● Chapter 5, “Transferring Calls into the CLASSIC MAIL System” discusses how to transfer outside callers into the CLASSIC MAIL system.
Before You Begin
1. Before You Begin You probably already have many of the skills necessary to use the CLASSIC MAIL System. Know Your Phone Using the CLASSIC MAIL system is a simple matter of using a touch-tone phone. You press various keys to gain access to your mailbox, use its functions, and move around in the system. Before you use your mailbox, you should know that an operator or receptionist is called an attendant and a phone extension is called an intercom.
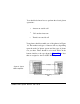
You should also know how to perform these basic phone operations: ● Answer an outside call ● Call another intercom ● Transfer an outside call Your phone should resemble one of the phones in Figure 1A. The number and types of buttons will vary depending upon the model of phone system and the types of phone sets you have. There should be voice mail labels on the buttons similar to the one shown in Figure 1B for lines that are assigned to the CLASSIC MAIL system. Figure 1A: Typical Merlin telephones.
Figure 1B. Voice mail Iables No matter how many additional buttons your phone has, the dial pad and the numbered keys you press to make a call are the same on any phone. You’ll use the dial pad extensively for voice messaging, so you should be familiar with the star the pound keys and with the term enter, which simply means “press a key or keys.
Commonly Used Keys There are certain keys on the dial pad that have a consistent use no matter what you’re doing with voice messaging: ** Returns you to the top-level menu 0 Transfers you to attendant # Accepts an entry OR gives access to company directory * Backs up to previous step or cancels an action Note: If you have a Merlin Plus, a Merlin 1030/3070, or a Merlin with Feature Package 2 installed, you may have to press the pound key twice to generate a tone.
● Your recorded directory name which callers hear when there is no primary or alternate greeting, or when they use the company directorv. ● A mailbox number which is identical to your intercom number (if you have an intercom) or a three-digit number beginning with 9.
You have been assigned either a regular mailbox or a guest mailbox. If your mailbox number is from 0-79, you have a regular mailbox. If your mailbox number is from 901 to 999, you have a guest mailbox. Your mailbox is capable of storing up to 60 minutes of recorded messages, and up to 180 seperate messages.
● From an outside line, call your company and wait for the CLASSIC MAIL. system’s automated answering service to answer. Once you gain access to the CLASSIC MAIL system, you will be instructed to press various keys on your telephone dial pad. These instructions will lead you through the use of the CLASSIC MAIL system’s features. If you don’t hear the instruction you expected, or if you’re not sure what to do, wait and these instructions will repeat.
Your Mailbox
2. Your Mailbox First-Time Use You must create a password the first time you open your mailbox. You will also record your name for the company directory. Finally, you should enter the first four letters of your last name into the company directory so callers who don’t know your mailbox number can still leave messages in your mailbox. To open and use your mailbox the first time: 1. Ask your manager for the CLASSIC MAIL system access code and your mailbox number. 2.
3. Enter your mailbox number. 4. To enter the temporary password, press 0000. Hear an instruction to enter your new password. 5. Enter a new password of four to eight digits. 6. When you are finished press # To accept the password press # OR to start again, press ✱ Hear your password played back to you. 7. Hear an instruction to record your name at the tone. 8. Record your name, then press # Hear a prompt requesting that you spell the first four letters of your name.
9. Using table 2A, enter the first four letters of your last name exactly with two key presses per letter: press ✱ OR to re-enter your name Hear confirmation. 10.
For example, to enter a Y, you would press 9 and then press 3 to specify that Y is the third letter on the 9 key. If your last name consists of fewer than four letters, you just enter the letters needed. For example, if John Simon wants to enter his last name he follows these steps: 1. For the first letter press 7 3 CLASSIC MAIL system’s recorded voice responds “S.” 2. For the second letter press 4 3 CLASSIC MAIL system’s recorded voice responds “I.” 3.
It’s a good idea to write down the sequence of keys corresponding to your last name prior to entering these digits. After you complete the spelling, you will hear a spelling confirmation message and a message telling you about any messages in your mailbox. Note: Because Q and Z don‘t appear on the dial pad, they require a special combination of key presses. See table 2A.
for those times when you’re away from the office (“I’m not in today but please leave a message and I’ll be alerted and return your call immediately”) or out of town (“I’m out of town until Wednesday, but if you leave a message, I’ll get back to you when I retum. Or dial 0 and ask our attendant to connect you to Sue Redford who can help you with your order”). The CLASSIC MAIL system allows callers to “mark” their messages urgent. Urgent messages will be delivered to you before other messages.
4. To record a primary greeting press 1 OR to record an alternate greeting press 2 # 5. Record your greeting at the tone. 6. To end the recording press OR to start over press ✱ To listen to the confirmation press 7. # The greeting is now installed. Each greeting can be up to three minutes long. Switching a Greeting To switch a greeting from alternate or primary: 1. Open your mailbox. 2.
If the alternate greeting is in operation, the CLASSIC MAIL system instructs you: 3. To record mailbox greeting(s) press 1 4. To switch the greeting that is currently in use press 3 A confirmation message plays.
Your Messages
I 3. Your Messages Letting the CLASSIC MAIL System Answer Your Calls The CLASSIC MAIL system will answer your incoming calls if you do not. If the CLASSIC MAIL system answers, callers will be greeted and instructed to leave a message. Knowing When You Have Messages Anytime you have a new message, the CLASSIC MAIL system attempts to let you know. The CLASSIC MAIL system’s normal method of message alert is to call you on your intercom line and announce that anew message has arrived.
The CLASSIC MAIL system allows you to turn this feature off or on, and to set the time interval between alert attempts. You must have your telephone’s Intercom Voice Announcement feature turned on in order to make this feature work. To turn message waiting alert off/on: 1. Open your mailbox. A status message plays. 2. To change your mailbox options press 3 3. To setup message waiting alert press 5 4. To turn message waiting alert off/on press 1 To change the message waiting alert interval: 1.
2. To change your mailbox options press 3 3. To setup message waiting alert press 4. To change the message waiting alert interval press 2 5 5. Enter an interval number between five and two-hundred fifty-five minutes. You can also set up an off-site message alert. If you do, the CLASSIC MAIL system will call you at an outside phone number, or pager when a new message arrives. See Chapter 4.
Listening to Your Messages When you listen to your messages, you’ll hear them in this order: 1. Urgent messages 2. New messages and certified receipts 3. Previously heard messages Urgent messages and certified receipts are discussed later in the section “Special Delivery Options. ” To listen to your messages: 1. Open your mailbox. Hear a status message. 2.
If the message is urgent, hear a prompt. If a certified message that you sent has been received, hear a receipt. 3. To hear the next message press 2 After listening to your messages, if you want the CLASSIC MAIL system to hang up: 4. Return to the top–level menu press ✱ A message telling you to enter your mailbox number and password plays. 5.
Handling Your Messages If you hangup after listening to a message, the CLASSIC MAIL system automatically saves the message for you as an old message. While listening to a message, you have several options. The dial-pad menu in Figure 3A lists these options. Figure 3A.
Deleting and Undeleting Messages You can delete a message by “marking it for deletion” and then hanging up. Prior to hanging up you can “undelete” any message accidentally marked for deletion. To delete a message: 1. Listen to a message. 2. To mark the message for deletion press 3 Hear confirmation. To undelete a message: 1. While listening to messages press ✱ 2. To undelete a message just deleted press 4 Hear confirmation.
Replying to a Message If you receive a message from other mailbox owners, you can reply directly with a call to their intercoms (if the owner has an intercom number) or reply with a message to their mailbox. To call the sender’s intercom: 1. Listen to the message. 2. To reply press 4 3 To call the sender press 1 You’ll be transferred to the sender’s intercom. If the sender does not answer, you can leave a message.
Any message you leave when you’re replying to a message can be marked as urgent or certified or both urgent and certified. To reply directly to the sender’s mailbox: 1. Listen to the message. 2. To reply press 3. To reply with a message press 2 OR to cancel press ✱ Record your message at the tone and press 4. 4 # Note: To reply directly to the sender’s mailbox requires that the sender sent you the message from their mailbox by using the “send message” feature.
Forwarding a Copy of a Message You can forward a copy of a message. The person who receives the message can then save it, delete it, or respond to it. You can mark a message you’re forwarding as either urgent or certified, or as both. To forward a copy of a message: 1. Listen to a message. 2. To forward the message press 5 3. Record an introduction press # 4. To accept the recording press # 5. Enter a destination mailbox or group list number (801 to 805). Hear confirmation.
6. To accept OR to cancel press # press ✱ Hear confirmation. Listening to Envelope Information Messages are “enclosed in envelopes.” Envelopes include information that tells you when the message was sent and (if the message was sent from another mailbox) by whom. To listen to a message envelope: 1. Listen to a message. 2.
Sending a Message To send a message from your mailbox: 1. Open your mailbox. 2. To send a message press 2 3. Record your message at the tone and press # OR to continue the recording press 2 4. To accept the recording press # 5. Enter the destination mailbox or group list number (801 to 805). press # To send the message press # OR to mark the message urgent press 1 OR to use the company directory Hear confirmation. 6.
OR to send the message by certified delivery press 2 OR for both urgent and certified options press 3 OR to cancel press ✱ A confirmation plays. Special Delivery Options The messages that callers leave in your mailbox maybe marked with the “special delivery” options of urgent or certified (or both urgent and certified). An urgent message is preceded by the prompt “urgent message” when you listen to it.
Group Lists To send a message to a group, you first have to create a group list. A group list can be as big as all the mailboxes in your system (this group list is already setup for you by the CLASSIC MAIL system) or as few as two. When you create a group list, you assign and record a name such as “Managers” and the system assigns a number from 802 to 805 (801 is automatically and permanently assigned to the all-mailboxes group list) to the list.
3. For group lists press 3 press 1 press # press # Hear an informational message. (If group lists already exist, you’ll hear their names and numbers). 4. To create a group list 5. Record a name for the list at the tone. 6. To hear confirmation 7. Enter the mailbox number. OR to use the company directory Hear confirmation. 8. Repeat steps 6 and 7 until all the mailboxes you want to enroll are included. 9. To end 10.
Deleting a group list eliminates the group list name and number and removes all associated mailboxes from the list. To delete a group list: 1. Open your mailbox. 2. To change mailbox settings press 3 3. For group lists press 3 4. To delete a group list press 3 5. Enter the number of the group list you wanty to delete. Hear confirmation. 6.
Off-Site Message Alert
4. Off-Site Message Alert How Off-Site Message Alert Works With off-site message alert, you can be notified at an outside phone or at a pager each time a new message arrives in your mailbox. You can setup this feature to call you at either of two numbers. For example, if you’re a realtor showing a house you could tell the CLASSIC MAIL system to dial the phone number of the house first and, if you don’t answer after a specified number of attempts, the CLASSIC MAIL system will dial a car phone or a pager.
Off-site message alert works this way: ● Set up off-site message alert by entering the phone or pager numbers at which you want to be contacted. (You can list up to two phone numbers to be called in succession or up to two pager numbers or one of each.) ● Turn on the feature when you leave your office and indicate whether you want to be alerted to all new messages or only those marked urgent.
● If the CLASSIC MAIL system reaches your pager, it displays the number you’ve specified to call to check your messages. If the CLASSIC MAIL system reaches you at a phone number, a recorded voice says there is a new message for you and you press any key and open your mailbox to listen to the message. After listening, you can proceed with regular message disposition. ● If another message arrives, the CLASSIC MAIL system alerts you again.
In addition, some pagers may require a pause to allow them to answer the page and display the number (or mailbox) you should call, or an extra code such as the star or the pound key. If a pause or a special code is required, you embed them in the sequence of numbers by first entering the star key.
Once all the codes are entered, you press # twice to tell the CLASSIC MAIL system that the operation is finished and to accept the entry. The CLASSIC MAIL system allows you to enter a total of up to 32 digits and accepts the several keys as special codes to cover various paging circumstances. The special key codes are shown in Table 4A. ✱✱ ✱0 ✱# ✱ (1-9) Insert Pause insert Pause a “star” into the dialing sequence dialing until dial toner then continue a ‘bound” into the dialing sequence for 1-9 sec.
Setting Up Off-Site Message Alert to a Phone To set up off-site message alert to an off-site phone: 1. Open your mailbox. 2. To change mailbox settings press 3 3. To setup off-site message alert press 2 4. To setup the first number OR to set up the second number press press 1 2 5. To tell the CLASSIC MAIL system to dial an outside phone press 1 press # press ✱ 6. Enter the off-site phone number (including any extra digits or codes) If you make a mistake Hear confirmation.
7. To accept OR to re-enter the number press # press ✱ Repeat steps 4 through 7 to set up a second off-site phone or go through the steps that follow for setting up a pager. Setting Up Off-Site Message Alert to a Pager To setup off-site message alert for a pager: 1. Open your mailbox. 2. To change mailbox settings press 3 3. To setup off-site message alert press 2 4. To setup the first number press 1 press 2 press 2 OR to set up the second number 5.
6. Enter the pager number (including any extra digits or codes) If you make a mistake press # press ✱ press # press ✱ Hear confirmation. 7. To accept OR to re-enter the number Repeat steps 4 through 7 to set up a second off-site pager. Turning Off-Site Message Alert On or Off To turn off-site message alert on or off: 1. Open your mailbox. 2. To change mailbox settings press 3 3.
To turn off-site message alert off/on for the first number press 3 OR to turn it off/on for a second number press 4 press 5 2. To change mailbox settings press 3 3. To setup off-site message alert press 2 4. Hear confirmation. 5. To be alerted to new urgent messages only, OR, if off-site message alert is already set up for urgent messages only, and you want of be alerted of all new messages Hear confirmation. Setting the Number of Attempts To set the number of ring attempts: 1.
4. To select level 1 press 1 5. To change the number of attempts press 3 Hear a message about the number of attempts. 6. Enter a number from 1 to 9 Hear confirmation. Determining How Often You’re Alerted To specify the number of times the CLASSIC MAIL system will alert you at a given phone or pager number: 1. Open your mailbox. 2. To change mailbox settings press 3 3. To setup off-site message alert press 2 4.
5. To change the interval and hear how alert is currently set up press 4 6. To signify the number of minutes between alerts, enter a number between 5 and 999. Hear confirmation. Reviewing the Settings for Off-Site Message Alert To review the off-site message alert settings: 1. Open your mailbox. 2. To change mailbox settings press 3 3. To setup off-site message alert press 2 4.
The CLASSIC MAIL system will confirm: the level of offsite message alert, the phone or pager number it’s calling, the number of attempts it will make, the interval between attempts, and whether you’ll be alerted on all new messages or only just the urgent ones, for each of the two numbers you may have specified.
Transferring Calls into the CLASSIC MAIL System
5. Transferring Calls Into the CLASSIC MAIL System The procedure you use to transfer incoming callers into the CLASSIC MAIL system will depend upon the type of Merlin telephone system you have. If you have a Merlin . 206, 410, 820, or Merlin Plus, use the procedure, “Transferring Outside Callers, ” that immediately follows.
Transferring Outside Callers To transfer a caller to the CLASSIC MAIL system: 1. Ask the caller to hold. 2. Press the hold button. 3. Select a CLASSIC MAIL system access line, then press ✱ CLASSIC MAIL system access lines are the lines with the “Voice Mail” labels on your telephone line buttons. You should now be connected to the CLASSIC MAIL system. 4. To transfer a caller press ✱ An instruction to enter the outside line number to be answered plays. 5.
Figure 5A shows the typical line numbering method used by Merlin 206, 410, 820, and Merlin Plus telephone systems. Figure 5A: Line numbering for Merlin 206, 410, 820 and Plus telephones. If the caller wants to be transferred into the CLASSIC MAIL system in order to retrieve messages from their own mailbox, hang up now. If the caller wants to leave a message for someone else, continue with steps 6 through 8. 6. Enter the intercom or mailbox number of the destination party.
7. If you know the destination party is not available, or if you want to place the calling party directly into the mailbox without ringing the intercom press # 8. Hang up. Note: There may be situations where you are notable to transfer callers into the CLASSIC MAIL system because you lack the necessary line appearances on your telephone. In these situations, we recommend that you transfer the caller back to the attendant, who can then transfer the caller into the CLASSIC MAIL system.
2. Press the hold button. 3. Select a CLASSIC MAIL system access line then press ✱ CLASSIC MAIL system access lines are the lines with the “Voice Mail” labels on your telephone line buttons. You should now be connected to the CLASSIC MAIL system. 4. To transfer a caller press ✱ An instruction to enter the outside line number to be answered plays. 5. Enter the line number of the outside line the call is on.
Figure 5B: Line numbering for Merlin 1030/3070 Attendant telephones If the caller wants to leave a message for someone else, continue with steps 6 through 8. 6. Enter the intercom or mailbox number of the destination party.
7. If you know the destination party is not available, or if you want to place the calling party directly into the mailbox without ringing the intercom press # 8. Hang up. Merlin 1030/3070 Transfer Procedures for NonAttendants If you have a Merlin 1030/3070 system and your telephone has “line pool” keys, you will not be able to transfer callers into the CLASSIC MAIL system using the previously described procedure because you will not know the line number of the outside line to transfer.
● Tell the caller that you will transfer them to the CLASSIC MAIL system. Transfer the caller to intercom 11 and hang up. The CLASSIC MAIL system will prompt the caller to enter the intercom number of the party they want to reach. After they enter it, the CLASSIC MAIL system will transfer them. You will not be able to dial the desired intercom number for them because your Merlin telephone does not generate Touch Tone signals during intercom calls.