MERLIN LEGEND MAIL Voice Messaging System for the MERLIN LEGEND® Communications System Installation and Upgrade Lucent Technologies formerly the communications systems and technology units of AT&T Document 555-600-100 Comcode 107734709 Issue 1 November 1996
Copyright 1996, Lucent Technologies All Rights Reserved Printed in U.S.A. Document 555-600-100 Comcode 107734709 Issue 1 November 1996 Notice Every effort was made to ensure that the information in this book was complete and accurate at the time of printing. However, information is subject to change.
! WARNING: This book is intended for trained technicians only. ONLY an authorized Lucent Technologies technician or authorized dealer shall install, set hardware options, or repair this product. DO NOT attempt to install or remove this product. DO NOT open the cover of the MERLIN LEGEND MAIL module.
Contents 1 Introduction Overview of the MERLIN LEGEND MAIL System Using This Guide Related Documents 2 Installing the MERLIN LEGEND MAIL System Overview Prepare for Installation Installation 3 Upgrading the MERLIN LEGEND MAIL System Overview Installing a Voice-Port Card Replacing the Disk Drive Replacing a Two-Port or Four-Port Voice-Port Card Replacing a MERLIN LEGEND MAIL Module Replacing an existing MERLIN MAIL VMS with a MERLIN LEGEND MAIL Module 4 Acceptance Tests and Troubleshooting Overview P
Contents B Busying Out/Restoring the Module Overview Busying Out the Module Restoring the Module C Installing/Removing the Module Overview Installing the Module Removing the Module D Using the Serial Number Utility Overview Re-Serializing the Disk Drive E Resetting the System Overview Resetting the MERLIN LEGEND MAIL Module Resetting the Remote Maintenance Device F Changing the Far-End Disconnect Setting and Adding a 3 db Boost Overview Changing the Far-End Disconnect Setting Adding a 3 db Boost
Figures 1 3 Introduction 1-1 1-1. MERLIN LEGEND MAIL Module with a Four-Port Expansion Voice-Port Card 1-2. Two-Port Voice-Port Expansion Card 1-3. Four-Port Voice-Port Expansion Card 1-3 1-5 1-6 Upgrading the MERLIN LEGEND MAIL System 3-1. Sliding Voice-Port Card into Module 3-2. Removing Disk Drive Assembly 3-3. Disk Drive Assembly F Changing the Far-End Disconnect Setting and Adding a 3 db Boost F-1. Removing Disk Drive Assembly F-2.
Introduction 1 Overview of the MERLIN LEGEND MAIL System The MERLIN LEGEND® MAIL Voice Messaging System provides the same features and functionality as the MERLIN MAIL® Voice Messaging System Release 3.0. However, itsintegrated design houses both the station port and the voice mail functionality in a single module that plugs into the MERLIN LEGEND backplane.
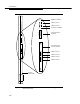
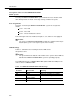
Introduction RMD Reset Button 6 Internal Voice Mail Ports 1 Internal Modem Port (5 Unused Ports) RMD Reset VM1 LEDs for Port 1 VM2 LEDs for Port 2 007 MLM VM Reset System Reset Button C O M M RMD Reset VM1 VM2 9-Pin Serial Port (Female) VM Reset C O M M 4-Port Expansion Voice-Port Card VM3 VM4 VM5 VM3 LEDs for Port 3 VM4 LEDs for Port 4 VM5 LEDs for Port 5 VM6 LEDs for Port 6 VM6 Status System Status LED Figure 1-1.
Introduction System Components The MERLIN LEGEND MAIL system consists of one module that resembles a MERLIN LEGEND system 012 module with no modular jacks and resides in the MERLIN LEGEND system carrier.
Introduction Description of the Two-Port MERLIN LEGEND MAIL System The two-port MERLIN LEGEND MAIL system includes the base module, hard disk, which provides 21 hours of message storage, and two voice ports. Port Assignments The ports on the two-port MERLIN LEGEND MAIL system are assigned as follows: port 1 - voice mail port 2 - voice mail port 7 - remote maintenance device Ports 8 through 12 are not installed, and ports 3, 4, 5, and 6 are not equipped.
Introduction Description of the Four-Port MERLIN LEGEND MAIL System The four-port MERLIN LEGEND MAIL system includes the base module, hard disk, which provides 21 hours of message storage, and four voice ports. The two-port voice-port card required for this system is shown in Figure 1-2. VM3 VM4 Figure 1-2.
Introduction Description of the Six-Port MERLIN LEGEND MAIL System The six-port MERLIN LEGEND MAIL system includes the base module, hard disk, which provides 21 hours of message storage, and voice ports. The fourport expansion voice-port card required for this system is shown in Figure 1-3. VM3 VM4 VM5 VM6 Figure 1-3.
Introduction LED Meanings On the six-port MERLIN LEGEND MAIL system, the four-port expansion voiceport card has four pairs of LEDs (labeled VM3, VM4, VM5, and VM6). The meaning of these LEDs is the same as for the LEDs labeled VM1 and VM2. (See Table 1-1.) The MERLIN LEGEND MAIL System Advantages The new integrated design of the MERLIN LEGEND MAIL system offers several advantages.
Introduction MERLIN LEGEND MAIL System Specifications Before installing the MERLIN LEGEND MAIL module, be sure that your installation site meets the environmental requirements provided in Table 1-2. Table 1-2.
Introduction Using This Guide This guide provides the installation, upgrade, troubleshooting, and ordering information for the MERLIN LEGEND MAIL system. The information in this guide replaces the existing installation, upgrade, and ordering information in Chapter 2, Chapter 7, and Appendix G of theMERLIN MAIL® Voice Messaging System Release 3 Planning, Installation, and Use (AT&T 585-320-142) .
Introduction Appendix A: Ordering Information This appendix provides the ordering codes for the MERLIN LEGEND MAIL system. This appendix replaces the information in Appendix G of the MERLIN MAIL® Voice Messaging System Release 3 Planning, Installation, and Use (AT&T 585-320-142) . Appendix B: Busying Out/Restoring the Module This appendix provides the step-by-step instructions for busying out and restoring the MERLIN LEGEND MAIL module.
Introduction Related Documents The documents listed below are MERLIN MAIL Voice Messaging System documents or part of the MERLIN LEGEND Communications System documentation set. These documents can be ordered from the Lucent Technologies Publications Center by calling 1-800-457-1235. Table 1-3. MERLIN MAIL Voice Messaging System Release 3 and MERLIN LEGEND Communications System Release 3.1 and Release 4.1 Documentation Set Document No.
Introduction AT&T 555-640-134 AT&T 555-640-132 AT&T 555-640-136 AT&T 555-640-130 AT&T 555-640-140 1-12 Release 3.1 and Release 4.0 Operator Support MLX Direct-Line Console Operator's Guide Analog Direct-Line Console Operator's Guide MLX Queued Call Console Operator's Guide MERLIN LEGEND Communications System Release 3.1 and Release 4.0 Miscellaneous User Support Calling Group Supervisor's Guide MERLIN LEGEND Communications System Release 3.1 and Release 4.
Installing the MERLIN LEGEND MAIL System 2 Overview This chapter describes how to install a new MERLIN LEGEND MAIL module. ! WARNING: The procedures in this chapter are intended for qualified technicians only.
Installing the MERLIN LEGEND MAIL System The MERLIN LEGEND system treats the MERLIN LEGEND MAIL module like an 012 module. When installed, the module has a default of 12 extension numbers that are based on the carrier slot in which the module is located. Though the MERLIN LEGEND MAIL module provides 12 ports, only ports 1 through 7 are used by the MERLIN MAIL system. See Chapter 1 for a description of the port assignments.
Installing the MERLIN LEGEND MAIL System Installation When installing the MERLIN LEGEND MAIL module, keep in mind the following: Make sure the MERLIN LEGEND system has a 391A3 or newer power supply module. MERLIN LEGEND MAIL does not support the 391A1 and 391A2 power supply modules. Install the MERLIN LEGEND MAIL module in the first available slot following the installation of other modules in the MERLIN LEGEND system carrier to avoid gaps in the customer's extension dial plan.
Installing the MERLIN LEGEND MAIL System 5. Perform the acceptance tests in Chapter 4 of this document and also the acceptance tests in Chapter 6 of theMERLIN MAIL® Voice Messaging System Release 3 Planning, Installation, and Use (AT&T 585-320-142) .
Upgrading the MERLIN LEGEND MAIL System 3 Overview This chapter describes how to upgrade the number of voice mail ports in the MERLIN LEGEND MAIL module replace the disk drive in the MERLIN LEGEND MAIL module replace the voice-port card in the MERLIN LEGEND MAIL module replace the MERLIN LEGEND MAIL module replace an existing MERLIN MAIL Voice Messaging System with a MERLIN LEGEND MAIL module ! WARNING: The procedures in this chapter are intended for qualified technicians only.
Upgrading the MERLIN LEGEND MAIL System Installing a Voice-Port Card Customers with a two-port or four-port configuration may want to upgrade to a four-port or six-port configuration to support more subscribers or a greater volume of calls. The MERLIN LEGEND MAIL system can have a maximum of six ports.
Upgrading the MERLIN LEGEND MAIL System 6. Unplug the voice-port card by sliding it out all of the way. 7. Install the upgrade voice-port card by sliding the card into the card slots, and seating it in the MERLIN LEGEND MAIL module (Figure 3-1). Do not push on the two handles; instead, push on the center of the plastic cover.
Upgrading the MERLIN LEGEND MAIL System This section describes how to replace the disk drive in the MERLIN LEGEND MAIL module. ! CAUTION: Before touching leads, connectors, pins, and other components when handling the disk drive, use a properly grounded wrist strap to prevent damage from electrostatic discharge (ESD). To replace the disk drive: 1. Busy out the slot in which the MERLIN LEGEND MAIL module is installed. See Appendix B. 2. Remove the MERLIN LEGEND MAIL module. See Appendix C. 3.
Upgrading the MERLIN LEGEND MAIL System Figure 3-3. Disk Drive Assembly 5. Plug the new disk drive assembly into the MERLIN LEGEND MAIL module. 6. Reinstall the MERLIN LEGEND MAIL module. See Appendix C. 7. Restore the slot. See Appendix B. 8. Using the Serial Number Utility, re-serialize the disk drive to match the serial number that is listed on the bar code label on the top of the MERLIN LEGEND MAIL module. See Appendix D. 9. Reprogram the voice mail system.
Upgrading the MERLIN LEGEND MAIL System Replacing a Two-Port or Four-Port Voice-Port Card This section describes how to replace a two-port or four-port voice-port card (if it is defective) in a MERLIN LEGEND MAIL module. ! CAUTION: To prevent damage from electrostatic discharge (ESD), avoid touching leads, connectors, pins, and other components. Use a properly grounded wrist strap. To replace a defective two-port or four-port voice-port card: 1. Determine which voice port is defective.
Upgrading the MERLIN LEGEND MAIL System Replacing a MERLIN LEGEND MAIL Module This section describes how to replace a MERLIN LEGEND MAIL module that is defective (for example, port 1 or port 2 is defective or the clock battery is bad). You will want to retain the disk drive from the defective unit so that the customer's messages, greetings, and programming are not lost.
Upgrading the MERLIN LEGEND MAIL System 6. Take the replacement MERLIN LEGEND MAIL module out of its bag. If you are not installing a voice-port card, proceed to Step 7. If you are installing a voice-port card (that is, either a new voice-port card or the voice-port card from the old MERLIN LEGEND MAIL module), perform the following steps: a. Pull out both pushpin-like "handles" on the voice-port card cover approximately 1/8 of an inch to the next position. b.
Upgrading the MERLIN LEGEND MAIL System Replacing an existing MERLIN MAIL VMS with a MERLIN LEGEND MAIL Module To replace an existing MERLIN MAIL Voice Messaging System with a MERLIN LEGEND MAIL module: 1. Install a completely configured MERLIN LEGEND MAIL module (that is, the correct number of ports physically installed) into the first empty slot in the MERLIN LEGEND system carrier. See Appendix C. 2.
Upgrading the MERLIN LEGEND MAIL System b. Restrict the RMD from making outside calls. To do this, enter MERLIN LEGEND System Programming, selectExtensions then Restriction and follow the prompts. For Restriction Type, choose Outward Restrict . ! Security Alert : This step must be followed to limit the possibility of toll fraud abuse. 9.
Acceptance Tests and Troubleshooting 4 Overview This chapter describes how to perform the acceptance test to verify proper operation of the Remote Maintenance Device (RMD). This test is intended only to supplement the instructions for performing acceptance tests detailed in Chapter 6 of the MERLIN MAIL® Voice Messaging System Release 3 Planning, Installation, and Use (AT&T 585-320-142) . Instructions for troubleshooting problems with the MERLIN LEGEND MAIL system are also included in this chapter.
Acceptance Tests and Troubleshooting Performing Acceptance Tests After you finish programming the MERLIN LEGEND MAIL system, perform the following acceptance test. You should also perform the acceptance tests detailed in Chapter 6 of the MERLIN MAIL® Voice Messaging System Release 3 Planning, Installation, and Use (AT&T 585-320-142) to verify proper operation of each applicable service, including voice mail, automated attendant, and call answer service.
Acceptance Tests and Troubleshooting Troubleshooting This section provides procedures for troubleshooting the MERLIN LEGEND MAIL module. You should also perform the troubleshooting procedures detailed in Chapter 6 of the MERLIN MAIL® Voice Messaging System Release 3 Planning, Installation, and Use (AT&T 585-320-142) . MERLIN LEGEND MAIL does not answer Verify whether the voice ports on the MERLIN LEGEND MAIL are operating properly: 1. Look at the LED at the bottom of the module.
Acceptance Tests and Troubleshooting The Disk Drive is not Working Properly To verify whether the disk drive is working properly: 1. From the Merlin Mail administration menu, typeb to shut down the system. When the shut down is complete, the following message appears: Merlin Mail is down. 2. Type g to perform a disk drive test. The following message appears: Do you want to continue? (Y/N) 3. Type y. The disk test is performed. When the test is completed, the results are displayed. 4.
Ordering Codes A Overview This appendix provides the ordering codes for the MERLIN LEGEND MAIL system. This appendix replaces the information in Appendix G of the MERLIN MAIL® Voice Messaging System Release 3 Planning, Installation, and Use (AT&T 585-320-142). Ordering Codes Table A-1 provides the ordering codes for the MERLIN LEGEND MAIL System. Table A-1.
Ordering Codes Upgrade 4-port MERLIN MAIL R3 system to 6-port MERLIN LEGEND MAIL system MERLIN LEGEND MAIL 2-port voiceport card MERLIN LEGEND MAIL 4-port voiceport card MERLIN LEGEND MAIL Base Module (without disk drive) MERLIN LEGEND MAIL Disk Drive A-2 7107-313/A 107831893 107831901 107831851 107831885
Busying Out/Restoring the Module B Overview This appendix provides the step-by-step instructions for busying out and restoring the MERLIN LEGEND MAIL module. These instructions are crossreferenced in the procedures provided in Chapter 3 of this guide.
Busying Out/Restoring the Module Restoring the Module After installing the MERLIN LEGEND MAIL module, you must restore it to terminate the busy-out condition. To restore the module: 1. At the SPM Main Menu, selectMaintenance . 2. At the Maintenance menu, selectSlot . 3. Type the slot number and selectEnter . 4. Select Restore . 5. Select Yes. When the module is restored successfully, the message “Restore Complete” appears.
Installing/Removing the Module C Overview This appendix provides the step-by-step instructions for installing and removing the MERLIN LEGEND MAIL module. These instructions are cross-referenced throughout upgrade procedures provided in Chapter 3 of this guide. ! CAUTION: To avoid damage, do not force the module. If the module does not insert easily, press the bottom-rear locking tab, remove the module, and inspect the module and carrier for damage or obstruction.
Installing/Removing the Module Installing the Module To install the MERLIN LEGEND MAIL module: 1. Lower the module onto the rod on the top of the carrier in the appropriate slot. 2. Be sure that the connector on the module mates properly with the connector on the carrier. 3. Swing the module into the slot and firmly push the module into the carrier until it locks into place. ! CAUTION: To avoid damage, do not force the module.
Using the Serial Number Utility D Overview This appendix provides the step-by-step instructions for re-serializing the disk drive in the MERLIN LEGEND MAIL module. These instructions are crossreferenced in the upgrade procedures provided in Chapter 3 of this guide. ! WARNING: This procedure should be performed by qualified technicians only.
Using the Serial Number Utility Re-Serializing the Disk Drive To re-serialize the disk drive: 1. At the MERLIN LEGEND MAIL administration menu, typeb. 2. Enter the password to shut down the MERLIN LEGEND MAIL system. 3. When prompted, type y to verify that you want to shut down the system. 4. When the MERLIN LEGEND MAIL administration menu reappears, press the ESC key. 5.
Resetting the System E Overview This appendix provides the instructions for resetting the MERLIN LEGEND MAIL module and RMD. Resetting the MERLIN LEGEND MAIL Module You should perform a system reset when any of the following conditions occur: the MERLIN LEGEND MAIL ports are “locked up” (that is, not answering calls on specific ports). the MERLIN LEGEND MAIL system answers calls but does not respond in any other way as it should.
Resetting the System Resetting the Remote Maintenance Device You should reset the RMD only if instructed by the BCS National Service Assistance Center (NSAC). Typically, you will be asked to reset the RMD if the modem does not answer. ! WARNING: This procedure should be performed by qualified technicians only. To reset the RMD, press the RMD Reset button located on the MERLIN LEGEND MAIL module. You can use a straightened paper clip or pen point to press the RMD Reset button.
Changing the Far-End Disconnect Setting and Adding a 3 db Boost F Overview This appendix provides the step-by-step instructions for changing the far-end disconnect setting and adding a 3 db boost. NOTE: These settings should not have to be modified. These settings may only need to be changed if the system is operating in countries other than the United States and Canada. Changing the Far-End Disconnect Setting NOTE: This setting should not have to be modified.
Changing the Far-End Disconnect Setting and Adding a 3 db Boost ! CAUTION: Before touching leads, connectors, pins, and other components when handling the disk drive, use a properly grounded wrist strap to prevent damage from electrostatic discharge (ESD). 1. Busy out the slot in which the MERLIN LEGEND MAIL module is installed. See Appendix B. 2. Remove the MERLIN LEGEND MAIL module. See Appendix C. 3.
Changing the Far-End Disconnect Setting and Adding a 3 db Boost Figure F-2 shows the location of the switch for changing the far-end disconnect signal. Figure F-2. Location of Switches for Far-End Disconnect and 3 db Boost 5. Set Switch 1 to the appropriate setting: ON: the CO sends busy tone to signal far-end disconnect. OFF: the CO sends a reliable forward disconnect signal. (This is the default.) 6. Plug the disk drive assembly into the MERLIN LEGEND MAIL module. 7.
Changing the Far-End Disconnect Setting and Adding a 3 db Boost Adding a 3 db Boost Switch 2, which is located inside the MERLIN LEGEND MAIL base module, specifies whether a 3 db boost is applied. If Switch 2 is set to OFF, a 3 db boost is not applied. If Switch 2 is set to ON, a 3 db boost is applied. By default, Switch 2 is set to OFF.
Index A Acceptance tests overview, 4-1, 4-2 verifying the Remote Maintenance Device, 4-2 B Base module busy out, B-1 description, 1-3 installation, C-2 remove, C-2 replacing, 3-7 resetting, E-1 restore, B-2 troubleshooting, 4-3 Busy out module, B-1 Busy tone signal, F-1 C COM port, 1-3 D db boost, F-4 Disk drive installation, 3-4 overview, 1-3 replacing, 3-4 re-serializing, D-1 troubleshooting, 4-4 E Expansion card description of four-port card, 1-6 description of two-port card, 1-5 installing a four-po
Index Modem default settings, 1-3 overview, 1-3 Reset button, 1-3 resetting, E-2 verifying, 4-2 O Ordering codes, A-1 P Port assignments four-port system, 1-5 six-port system, 1-6 two-port system, 1-4 R Related documentation, 1-11 Reliable forward disconnect signal, F-1 Remote Maintenance Device default settings, 1-3 overview, 1-3 Reset button, 1-3 resetting, E-2 verifying, 4-2 Removal base module, C-2 Re-serializing the disk drive, D-1 Reset buttons, 1-3 Resetting modem, E-2 Remote Maintenance Device,
Index IN-3