
User`s manual


5
Battery installation & charging
Install the battery as shown below. After installing the battery, you can make
and receive short calls. Place the handset in the charger when not in use. For
optimal performance, charge the handset battery for at least 16 hours before
use. See the table on the Technical specifications page in the user’s manual
for battery operating times.
If the battery is depleted, it may take approximately 10 minutes to charge
the handset before it shows LOW BATTERY. The screen continues to display
LOW BATTERY until the battery has charged for approximately one hour; the
backlight on the handset disables when in LOW BATTERY mode. Refer to the
table below for details.
Battery indicators Battery status Action
The screen is blank. Battery has no charge and
the handset cannot be used.
Charge until the screen shows
LOW BATTERY (about 10
minutes).
The screen shows PLACE IN
CHARGER and flashes.
Battery has very little charge
and the handset cannot be
used.
Charge until the screen shows
LOW BATTERY (about four
minutes).
The screen shows LOW
BATTERY, flashes, and
the handset beeps.
Battery has enough charge
to be used for a short time.
Charge until the screen shows
HANDSET X (about one hour).
The screen shows
HANDSET X.
Battery is charged. To keep the battery charged,
place it in the charger when not
in use.
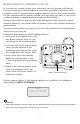
Step 1
Plug the battery connector
securely into the socket
inside the handset battery
compartment, matching the
color-coded label. Insert
the supplied battery with
the label THIS SIDE UP
facing up as indicated.
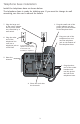
Step 2
Align the cover flat against
the battery compartment,
then slide it upwards until it
clicks into place.