
User Manual
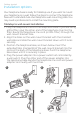
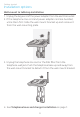
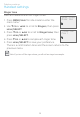

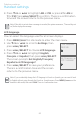
Table Of Contents
- Getting started
- Installation options
- Initial setups
- Battery installation and charging
- Telephone base and charger installation
- Quick reference guide - telephone base
- Quick reference guide - handset
- Telephone settings
- Telephone operation
- Directory
- Caller ID
- Smart call blocker
- Answering system
- Answering system settings
- Announcement
- Answer on/off
- Voice guide
- Call screening
- Number of rings
- Remote access code
- Message alert tone
- Message recording time
- Answering system and voicemail indicators
- Using the answering machine and voicemail together
- Message capacity
- Voice prompts
- Call screening
- Call intercept
- Base ringer
- Temporarily turning off the message alert tone
- Message playback
- Recording and playing memos
- Base message counter displays
- Remote access
- Answering system settings
- Appendix
- Adding and registering handsets/headsets/speakerphones
- Deregistering handsets
- Alert tones and lights
- Screen display messages
- Troubleshooting
- Maintenance
- Important safety information
- FCC Part 68 and ACTA
- FCC Part 15
- California Energy Commission battery charging testing instructions
- Limited warranty
- Technical specifications
- Index

Getting started
15
Installation options
Wall-mount to tabletop installation
1. Unplug the large end of the power adapter from the electrical outlet.
2. If the telephone line cord and power adapter cord are bundled,
from the wall-mounting plate.
telephone wall jack. Push the telephone base up and away from
the wall-mount bracket to detach it from the wall-mount bracket.
4. See Telephone base and charger installation on page 7.