
User Manual
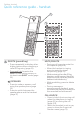
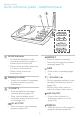
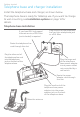
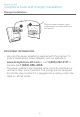


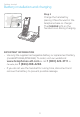
Table Of Contents
- Getting started
- Installation options
- Initial setups
- Battery installation and charging
- Telephone base and charger installation
- Quick reference guide - telephone base
- Quick reference guide - handset
- Telephone settings
- Telephone operation
- Directory
- Caller ID
- Smart call blocker
- Answering system
- Answering system settings
- Announcement
- Answer on/off
- Voice guide
- Call screening
- Number of rings
- Remote access code
- Message alert tone
- Message recording time
- Answering system and voicemail indicators
- Using the answering machine and voicemail together
- Message capacity
- Voice prompts
- Call screening
- Call intercept
- Base ringer
- Temporarily turning off the message alert tone
- Message playback
- Recording and playing memos
- Base message counter displays
- Remote access
- Answering system settings
- Appendix
- Adding and registering handsets/headsets/speakerphones
- Deregistering handsets
- Alert tones and lights
- Screen display messages
- Troubleshooting
- Maintenance
- Important safety information
- FCC Part 68 and ACTA
- FCC Part 15
- California Energy Commission battery charging testing instructions
- Limited warranty
- Technical specifications
- Index

10
Getting started
Step 1
Plug the battery connector securely into the socket inside the
handset battery compartment. Insert the supplied battery with the
label THIS SIDE UP facing up, as indicated.
Step 2
upwards until it clicks into place.
Battery installation and charging
THIS SIDE UP / CE CÔTÉ VERS LE HAUT
Battery Pack / Bloc-piles :
BT183342/BT283342 (2.4V 400mAh Ni-MH)
WARNING / AVERTISSEMENT :
DO NOT BURN OR PUNCTURE BATTERIES.
NE PAS INCINÉRER OU PERCER LES PILES.
Made in China / Fabriqué en chine CR1349
THIS SIDE UP
ÔTÉ VERS LE HAUT
:
2.4V 400mAh Ni-MH)
MENT :
URE BATTERIES.
CER LES PILES.
ine CR1349