Quick start guide CL81101/CL81201/CL81211/ CL81301 DECT 6.
Installation You must install and charge the battery before using the telephone. STOP! See page 3 for easy instructions. Install the telephone base close to a telephone jack and a power outlet not controlled by a wall switch. The telephone base can be placed on a flat surface or vertically mounted on the wall. For optimum range and better reception, place the telephone base in a central and open location.
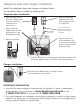
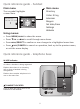
Telephone base and charger installation Install the telephone base and charger as shown below. The telephone base is ready for tabletop use. Telephone base installation • Plug the large end of the power adapter into a power outlet not controlled by a wall switch. • Route the power adapter cord and the telephone line cord through these slots. • • If you have DSL highspeed Internet service, a DSL filter (not included) is required. Telephone line cord • Raise the antenna.
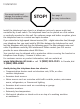
Battery installation and charging Once you have installed the battery, the screen indicates the battery status. For best performance, keep the handset in the telephone base or charger when not in use. The battery is fully charged after 10 hours of continuous charging. BT183342/BT283342 BY 1021 NOTE: If you are on a phone call in low battery mode, you hear four short beeps every minute.
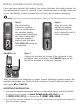
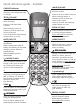
Quick reference guide - handset pDIR/VOLUME CHARGE indicator Press pDIR to show directory entries. Press to scroll up while in menus. While entering names or numbers, press to move the cursor to the right. Press to increase the listening volume when on a call. On when the handset is charging in the telephone base or charger. qCID/VOLUME Press qCID to show caller ID history. Press to scroll down while in menus. While entering names or numbers, press to move the cursor to the left.
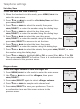
Quick reference guide - handset Main menu Main menu The > symbol highlights a menu item. Directory Caller ID log Intercom Ringers Set date/time Settings Website >Directory Caller ID log p q Using menus: • • • • Press MENU/SELECT to show the menu. Press qCID or pDIR to scroll through menu items. Press MENU/SELECT to confirm or save changes to a highlighted menu item. Press OFF/CANCEL to cancel an operation, back up to the previous menu, or exit the menu display.
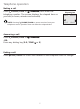
Telephone settings Set date/time To set the date and time manually: Ringers 1. When the handset is in idle mode, press MENU/SELECT to >Set date/time enter the main menu. p q 2. Press qCID or pDIR to scroll to >Set date/time and then press MENU/SELECT. SET DATE 3. Press qCID or pDIR to select the month, then press MM/DD/YY MENU/SELECT, or enter the number using the dialing keys. p q 4. Press qCID or pDIR to select the day, then press MENU/SELECT, or enter the number using the dialing keys. 5.
Telephone operation Making a call Press PHONE/FLASH or /������� SPEAKER, then enter the telephone number. The screen displays the elapsed time as you talk (in hours, minutes and seconds). NOTE: Pressing PHONE/FLASH to access services from your telephone service provider does not affect the elapsed time. Elapsed time Phone 0:00:30 10/15 10:01 Answering a call Press PHONE/FLASH or /������� SPEAKER. -ORPress any dialing key (0-9, TONE or #).
www.telephones.att.com © 2010-2011 Advanced American Telephones. All Rights Reserved. AT&T and the AT&T logo are trademarks of AT&T Intellectual Property licensed to Advanced American Telephones, San Antonio, TX 78219. Printed in China. Issue 3 AT&T 01/11.