
User guide

Task 7: Install the Terminals
Issue 1 September 1995
2-17
c. Plug the modem power cord into a wall outlet and power on the
modem.
d. Set the modem options. Refer to Appendix B, ‘‘Option Settings’’, for
a complete list of option settings for all supported modems.
3. Connect a modem to the terminal.
a. If you are installing a new terminal, unpack it according to the
instructions supplied with the terminal.
b. Place the terminal on a suitable table and connect the keyboard.
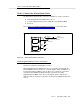
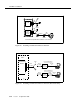
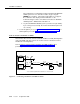
c. Attach one end of an RS-232 cable to a serial RS-232 port on the
terminal (the DTE port on a 715 BCT), and attach the other end to
the modem (if it is not already connected).
NOTE:
If you connect the modem to the DCE port on a 715 BCT, you
must also connect a null modem cable between the modem
and the 715 BCT.
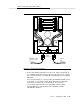
d. Attach the connector on one end of a modular cord to the modem,
and attach the other end to a telephone outlet.
e. Plug the modem power cord into a wall outlet.
f. Plug the terminal power cord into a wall outlet.
g. Power on the terminal and modem.
h. Set the options on the terminal and modem. Refer to Appendix B,
‘‘Option Settings’’, for a complete list of option settings for all
supported terminals and modems.
NOTE:
When installing a serial printer on all but a 610 or 615 BCT, set
the options on the printer as described in the manual supplied
with the printer, then set the corresponding options on the
terminal to match. On the 610/615, set the terminal options
first, then set the printer options.
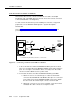
i. At the terminal, enter AT.
If the modem is installed correctly, it responds with “OK” (written on
the terminal screen).
j. Enter ATDT and the telephone number of the modem connected to
the DEFINITY AUDIX system
ADMIN
port (listed on the
Terminals
worksheet).
If the terminal is installed correctly (and the DEFINITY AUDIX
system is in either
ADX
,
OAM
,
OS
or
AINIT
state), the screen
displays the login prompt.