Indoor Analog Wireless Camera with Receiver Model A-575 USER'S MANUAL
©2010 Lehigh Consumer Products, LLC All rights reserved. Distributed by Lehigh Consumer Products, LLC, Macungie, PA 18062. Due to continuing product development, the product inside the packaging may look slightly different than the one on the package. Lehigh Consumer Products, LLC is a subsidiary of Jarden Corporation (NYSE: JAH). To obtain warranty service, contact the Consumer Affairs Division at 1-800-323-9005, Monday through Friday, 7:30 a.m. - 5:00 p.m., Central Standard Time.
Safety ............................................................................................................................... 1 Safety Precautions ........................................................................................................................... 1 FCC Compliance ............................................................................................................................. 1 Getting to Know Your A-575 System .....................................................
Safety Model A-575 User's Manual Safety SAFETY PRECAUTIONS Do not drop, puncture, or disassemble the camera. Never tug on the power adapter. Use the plug to remove it from the wall. Do not expose the camera to high temperatures. For your own safety, avoid using the camera when there is a storm or lightening. Use the device with care. Avoid pressing hard on the camera body. Do not crush or damage the power cable. FCC COMPLIANCE This device complies with Part 15 of the FCC Rules.
Getting to Know Your A-575 System Congratulations on purchasing your First Alert Security Camera product. First Alert has been helping families and businesses stay safe for over 50 years. By having a First Alert Security Camera, you’re taking the first step in protecting your home or business from damage or theft. We’re watching, even when you’re not. CHECK PACKAGE CONTENTS After unpacking the carton, check the contents for damage.
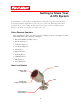
Getting to Know Your A-575 Model A-575 User's Manual ABOUT THE RECEIVER/RECORDER CH1, CH2, CH3, CH4 Displays which channel the wireless DVR is configured to receive. The DVR receives images from one camera at a time. To change the channel, press the SW button. SW Press to change the wireless channel. MODE Press to change mode: Recording or Playback. REC In Recording Mode: Press to record a still image or video. In Playback Mode: Press to Play/Pause video.
Installing the Camera and DVR SAFETY AND INSTALLATION TIPS Do not attempt to open the camera. There are no user serviceable parts inside. Refer servicing to qualified service personnel. When installing this camera, follow manufacturer’s advice when using power tools, steps, ladders, etc. and wear suitable protective equipment (e.g., safety goggles) when drilling holes. Before drilling holes through a ceiling, check for hidden electricity cables and water pipes.
Installing the Camera and DVR Model A-575 User's Manual DEVICE OPERATING RANGE This wireless camera is capable of transmitting up to 330 ft in open field conditions. However, when installed around your property, any solid objects (e.g., walls, ceiling, reinforced PVC doors, etc.) placed between the camera and receiver will reduce the range. For best transmission, avoid installations where there are very thick walls or major obstructions between the wireless camera and receiver.
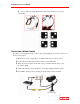
Installing the Camera and DVR Model A-575 User's Manual 6 Use a toothpick or similar implement to flip the dip switches to the desired configuration. CONNECTING A WIRED CAMERA In addition to the supplied wireless camera, the system DVR also can monitor and record from a wired camera. 1 Make sure you have enough cable to install the camera in the desired location. 2 Connect the Video-Out cable from the camera to the A/V-In cable.
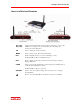
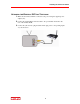
Installing the Camera and DVR Model A-575 User's Manual ATTACHING THE WIRELESS DVR TO A TELEVISION 1 Make sure the wireless DVR is connected to the power using the supplied power adapter (9V). 2 Connect the supplied RCA A/V-Out cable to the port marked AV OUT on the rear of the wireless DVR. 3 Connect the yellow Video plug and white Audio plug to the corresponding inputs on your television.
Setting Up Your A-575 System MOTION DETECTION To save storage space, the wireless DVR is designed to record short videos (5 or 10 seconds in length) or take a series of still images whenever something moves in view of the camera. To turn motion detection On or Off: 1 Press to enter the Main Menu. 2 Use the arrows to navigate to the Motion Detection menu. 3 Press to toggle motion detection to ON or OFF. The motion detection icon displays when the feature is enabled.
Setting Up Your A-575 System Model A-575 User's Manual To view PIP mode: 1 Press DISP once to switch between the wired and wireless cameras. 2 Press DISP again to activate PIP Mode. 3 Press DISP a third time to swap the positions of the main and miniature images. Although the DVR can display two images at once, it can only record one at a time. When the DVR is recording, the channel being shown full-screen is the one being recorded. You may experience a drop in frame-rate when using PIP mode.
Setting Up Your A-575 System Model A-575 User's Manual ADVANCED SETTINGS Advanced Settings offers ability to adjust camera quality, TV Output Standard and the File Overwrite option. PHOTO QUALITY Three photo quality settings can be selected: Low, Standard, or High. Low quality conserves SD card space at the expense of image quality. High quality provides crisper images at the expense of storage space. Standard quality offers a balance between the two.
Setting Up Your A-575 System Model A-575 User's Manual MOVIE QUALITY Two movie quality settings can be selected: D1 or QVGA. D1 quality records a full-frame analog TV signal at 720 x 480 pixels (NTSC) or 720 x 576 pixels (PAL). QVGA quality records an image with half the vertical and horizontal resolution. TV OUTPUT STANDARD Always have your TV Output Standard set to NTSC, the U.S. television standard. PAL can only be used in Europe.
Setting Up Your A-575 System Model A-575 User's Manual SET TIME/DATE Set Time/Date allows you to adjust the recording time and date as well as the Photo and Movie Timestamp. Wireless Cameras and Interference The wireless camera transmits its images on a radio frequency of 2.4 GHz. Although above the range of the average radio, some devices (e.g., wireless computer networks, cordless phones, baby monitors, car alarms, and Bluetooth) transmit signals at or around this frequency. Other devices (e.g.
Setting Up Your A-575 System Model A-575 User's Manual MOTION DETECTION SETTINGS Motion detection is a process undertaken by the wireless DVR based solely on the image it receives from the camera. There are no external sensors to connect, nor does the camera send a signal to the wireless DVR telling it to record. The DVR "watches" the image from the camera, and detects differences between frames. A frame is one still image. A series of frame, played quickly, one after another, gives the illusion of motion.
Setting Up Your A-575 System Model A-575 User's Manual ENABLING / DISABLING MOTION DETECTION The first setting in the Motion Detection menu is to turn detection On or Off. When motion detection is Off, the wireless DVR will only record when the REC button is pressed. DETECTION AREA If you have some continual motion in view of the camera, such as a busy road or a tree blowing in the wind, then you will need to define which part of the screen you want to be sensitive to motion.
Setting Up Your A-575 System Model A-575 User's Manual SENSITIVITY The amount of motion that the wireless DVR requires to trigger a recording can be customized. There are 16 levels of sensitivity: 1 = most sensitive; 16 = least sensitive. Typically, a value somewhere in the middle of the range is a good choice. This is usually sensitive enough to pick up the majority of significant events, but not so sensitive that your SD card will fill up with numerous false alarms.
Setting Up Your A-575 System Model A-575 User's Manual To change folders: 1 Press the MODE button to access Playback Mode. 2 Press the ZOOM button to access the thumbnail view to see folders listed by date. 3 Use the arrow buttons to navigate to the date that you want. 4 Press to select the desired date. To delete unwanted images/videos: 1 Press the MODE button to access Playback Mode. 2 Use the arrow buttons to navigate to the video/photo you want to delete.
Setting Up Your A-575 System Model A-575 User's Manual ACCESSING IMAGES/VIDEOS VIA A COMPUTER It is not possible to connect the wireless DVR directly to a computer. One of the most convenient aspects of recording to an SD card is that you can put the card into a SD card reader on your computer and open the images/videos directly. To format the SD Card: Note: Formatting the SD Card will erase all data, and re-write the file allocation table (FAT).
Troubleshooting Problem Solution I can’t record images from two cameras simultaneously. This is not a malfunction. The DVR can only record one camera at a time. The wireless DVR will only pick up one of my wireless cameras. Although the wireless DVR can be tuned to four wireless channels, it can only monitor one of them at a time. Manually change the channel by pressing the SW button. You can monitor two cameras at once (one wired, one wireless) using PIP (Picture-in-Picture) Mode.
Troubleshooting Model A-575 User's Manual Problem Solution All I see is a blank screen. Check the connections between the wireless DVR and TV. Check the RCA connection on the TV with the VIDEO OUT cable attached to it. Some TVs have A/V OUTPUT channels and connecting the VIDEO OUT cable into an A/V OUTPUT will produce undesired results. The wireless DVR isn’t showing images from my camera. The wireless DVR might be monitoring the wrong input. Press the DISP button. Make sure the camera has power.
Technical Information WIRELESS DVR Video Video Format NTSC or PAL *Always set to NTSC in the United States* Video Input 1 Composite Input Video Output 1 Composite Output Display Resolution NTSC: 720 x 480 PAL: 720 x 576 Display Frame Rate NTSC: Up to 30 fps* PAL: Up to 25 fps* * While monitoring two cameras (PIP MODE) the monitoring and recording frame rates are reduced.
Technical Information Model A-575 User's Manual WIRELESS CAMERA Video Image Sensor 1/4” CMOS Video Quality 380 TV Lines No.
Warranty Model A-575 User's Manual \Warranty PRODUCT LIMITED WARRANTY BRK Brands, Inc., (“BRK”) the maker of First Alert® brand products warrants that for a period of one year from the date of purchase (the “Warranty Period”), this product will be free from defects in material and workmanship. BRK, at its sole option, will repair or replace this product or any component of the product found to be defective during the Warranty Period.
Technical Information Model A-575 User's Manual other software that may be or may become resident on the users system as a result of installing the software provided. This warranty is in lieu of other warranties, expressed or implied, and BRK neither assumes nor authorizes any person to assume for it any other obligation or liability in connection with the sale or service of the product.