Wireless Mini DVR Kit User Manual 1
Table of Contents 1. Package Contents………………………………………… 3 2. Overview…………………………………………………… 4 3. Layout of the DVR…..…………………………………….. 5 4. About the Camera.………………………………………… 6 - 7 5. Connecting Power and Cameras……………….…………8 6. Attaching the DVR to a Television…………….….……… 8 7. Motion Detection…………………………………………… 9 8. Viewing Live Images………………………………………. 9 9. Capture Format and Quality Settings……………………. 10 10. Wireless Cameras and Interference……………..………11 11. Motion Detection Settings…………………..…………….12 - 13 12.
1. Package Contents INCLUDED: → Wireless DVR Receiver/Recorder → Instruction Manual → DVR Power Supply (5V) → Video In Cable → Video Out Cable → Wireless Camera → Camera Power Supply (12V) → SD Card (2GB) 2. Overview Congratulations on your purchase of the wireless DVR! This single channel video recorder is a terrific value for money security solution, as well as being easy to install, use and transport from location to location.
card, and it can be configured to do this whenever it detects motion in the view of its camera. It is an ideal monitoring solution for guarding specific security vulnerabilities around the home or small office. Some suggested applications include monitoring the front or back door, a main hallway, or a courtyard or balcony. If there is a single, specific location that you wish to safeguard, the wireless DVR is the perfect solution.
really work that well in real life, anyway). Bear this is mind when placing your camera(s): the closer the camera is to the action you want to capture, the more detail you’re going to get. For example, if you want to capture a vehicle registration tag, you’ll have to have the camera within about a dozen feet (about 4 meters) from the vehicle to capture the required detail. → The Wireless DVR is a single channel recorder. It will only record one video/ image at a time.
CH1, CH2, CH3, CH4: Displays which wireless channel the wireless DVR is configured to receive. This is in no way automated, and the wireless DVR will only receive images from one wireless camera at a time. To change the channel that the wireless DVR is monitoring, press the SW button. SW: Changes the wireless channel that the Wireless DVR 2 will monitor.
(Enter): Used to enter the MENU, and to select items whilst in the MENU. SD CARD SLOT: Where you put the SD cards you want to record to. The wireless DVR can record to cards conforming to the SD and SDHC standards. Be sure that the write protection tab on the SD card inserted is set to off. 4. About the Camera The camera supplied with your DVR is a miniature yet versatile camera. It is a weather resistant, analog wireless camera which can be used indoors or outdoors.
The wireless camera is weather resistent, not weatherproof. Long term exposure to moisture (rain or condensation) or direct sunlight will have a negative impact on the cameras performance, and may stop it working altogether. The power adaptor and power cables, however, are not weather resistant at all. Do not expose these to moisture of any kind. We recommend installing the camera in sheltered locations only, where it will be protected from the majority of moisture and sunlight, such as under an awning. 3.
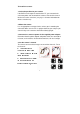
To Install the camera: 1. Select the position for your camera If the DVR has already been attached to a TV, you can attach the camera to power and check both the cameras view and the level of interference at the same time (see page 11 for more information on wireless interference). 2. Mount the camera Use an appropriate screw type for the surface you’re mounting the camera to. Make sure the lens is upright relative to your subject -you can tell easily as the antenna should be relatively upright. 3.
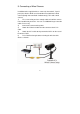
5. Connecting a Wired Camera In addition to the supplied wireless camera (or instead of it, if you’d prefer) the wireless DVR can also monitor and record from a wired camera (though not record both simultaneously). To install a wired camera: 1) First, ensure that you have enough cable to install the camera in the location that you desire. You can use additional longer extension cables if necessary. 2) Connect the camera to the power. 3) Attach the Video Out cable from the camera to the A/V In cable.
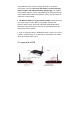
6. Attaching the wireless DVR to a Television To connect the wireless DVR to a television: 1) Be sure you’ve already connected the wireless DVR to power using the supplied power adaptor (9V). 2) Using the supplied RCA A/V out cable, attach the AV OUT on the back of the wireless DVR to the Yellow (Video) and White (Audio) plugs on the back of your television. Make sure the the plugs and the inputs are the same color.
7.
8. Viewing Live Images By default, the wireless DVR will boot up straight into LIVE VIEWING MODE. The DISP button will cycle between displaying a WIRED and a WIRELESS camera connected to the wireless DVR. The wireless DVR is capable of displaying images from two cameras at a time. To achieve this, one of the cameras must be wired, the other wireless. As the picture from one camera is displayed in miniature within the other camera’s picture, this is referred to as Picture In Picture mode (PIP MODE) .
9. Capture Format and Quality Settings The wireless DVR can record in one of two formats: it can either record still images (in JPEG format) or 5 or 10 second video recordings (as AVI files). To change the CAPTURE FORMAT: 1) Press to enter the menu, and press LEFT or RIGHT to navigate to the Motion Detection menu. 2) Use UP or DOWN to select Capture Mode, and press . 3) Choose the format you would like, and press to confirm. 4) Select EXIT to leave the menu.
and even video game consoles). AVI is an acronym for Audio Video Interleave, and has been a popular video ‘container’ for many years. The term ‘container’ means that it is a type of file which holds video data, rather than specifying exactly what kind of video data it should hold. Quality Settings The wireless DVR has selectable quality settings. You can record still images in HIGH, STANDARD or LOW QUALITY. You can record movies in D1 or QVGA QUALITY.
10. Wireless Cameras and Interference If the image coming from your wireless camera is distorted, you’ve probably discovered the bane of analog wireless technologies: interference. To help you get as much out of your wireless DVR system as it’s capable of delivering, here’s a brief rundown of what interference is, and how you can try to minimise it. The Wireless Camera transmits its images on a radio frequency of 2.4GHz.
could be the culprit, and other than asking neighbors politely to turn it off, there’s little that can be done about this problem. If you are experiencing interference or poor image quality try the following steps: 1) Try moving the camera to a different location, or, if it really is exactly where you want it, changing the orientation of the antenna on the camera and the wireless DVR. 2) Adjust or aim the receiver antenna - a single inch can make all the difference.
11. Motion Detection Settings Say you’re monitoring your yard, and right next to the gate you want to watch there’s a tree blowing in the wind, which constantly triggers the motion detection. Perhaps you’re watching a hallway, and your pet cat continually sets off the motion detection, and you only want to record humans.
lighting conditions (such as turning a light on or off, a moving object throwing a shadow into the field of view or the sun being swiftly covered by clouds) can trigger the wireless DVR to record. However, if you follow the subsequent instructions on customising your Motion Detection settings, you should be able to avoid a good many false alarms. Enabling / Disabling Motion Detection: As covered earlier, the first setting in the MOTION DETECTION menu is whether or not it is enabled.
Typically, a value somewhere in the middle of the range is a good choice (somewhere between 5 and 10 is suggested). This is usually sensitive enough to pick up the majority of significant events but not so sensitive that your SD card will fill up with numerous false alarms! The best way to tweak the sensitivity is by trial and error. Set the value to somewhere near 8, and then walk in front of your camera, impersonating the path of a potential security risk.
12. Playing Back Images and Videos There are two ways to view images and videos captured by the wireless DVR. One way is to view them through the wireless DVR (and the TV that the wireless DVR is connected to) and the other is to simply take the SD card out of the wireless DVR, and insert it into an SD card reader attached to your computer. To Playback images/videos using the wireless DVR: To access PLAYBACK MODE, press the MODE button. You will be taken to the most recently recorded video/picture.
To change folder: Press ZOOM whilst in the thumbnail view. You will see a series of folders listed by date. Simply use the arrow buttons to navigate to the date that you want, and select it by pressing . . To DELETE unwanted images/videos: 1) Whilst in PLAYBACK mode, navigate to the video/photo you want to delete. have open when you pressed 2) While it is selected but not playing, press . 3) You will be taken to the PLAYBACK menu. 4) Select FILE DELETE.
To Format the SD Card: 1) Formatting the SD Card will erase all data, and re-write the file allocation table (FAT). This is especially useful if your SD card is not detecting the correct amount of free space. 2) Select FORMAT from the playback menu and press . When asked to confirm, choose “Yes” and press .The wireless DVR will take a few moments to process this. Afterwards, your SD card will be completely free of data, ready to continue recording in the wireless DVR.
Note: It is not possible to directly connect the wireless DVR to a computer. However, with the ease of transfer of data via the SD card, there really isn’t a reason to.
14. Troubleshooting Problem: I can’t record images from two cameras simultaneously! Solution: This is not a malfunction -the wireless DVR can only record one camera at a time. While it is possible to monitor two cameras at once (one wired, one wireless) it is not possible to record both at once. If using PIP (Picture in Picture) MODE, the wireless DVR will automatically switch between cameras to record whichever one detects motion. Problem: The wireless DVR will only pick up one of my wireless cameras.
the sun) shining directly into the lens of the camera. This is simple to remedy: face your camera away from light sources, or use a lens hood for the camera to stop light entering the lens directly. Problem: The foreground is too dark, whilst the background is too bright. Solution: The wireless DVR uses automatic exposure adjustment to keep the majority of the image correctly lit up, without you having to adjust anything.
outside, the camera has to be outside as well. Problem: The wireless DVR is not capturing pictures/videos when it should, or it captures pictures/videos too often! Solution: Your MOTION DETECTION SETTINGS need adjusting. Basically, you can define how the wireless DVR will look for motion, and how much motion it must detect before it initiates recording.
Problem: I can’t find right channel for the wireless DVR on my television. Solution: This can be a little tricky. First, make sure you’ve got the wireless DVR plugged into an INPUT on the television. The plug should be colour-coded yellow, the same as the connector from the wireless DVR. If this is the case, look for a button on the TV or remote called AV, TV/AV, AUX, Auxilary, Channel 0, Video, DVD or something similar. Some TVs have multiple AV channels.
15. Tips and Tricks Cable Placement (Optional: applies to wired cameras only) If you are installing any cables directly into your walls or ceiling, beware of placing them too close to electrical cabling. AC power operates at a certain frequency (50 or 60 hertz, depending on your locale) and this frequency generates a rather intense electromagnetic field. Running cables too close to a AC cable will cause noticeable distortion of your images.
16.
General Operating Power Dimensions Weight Backup Method DC 9V 5.25” x 3.33” x 0.75” 133mm x 85mm x 20mm 5.
Audio Microphone Audio Range Night Vision Number of Infra-Red LEDs Infra-Red Wavelength Night Vision Distance Infra-Red LED Life General Operating Power Operating Temperature Body Construction Dimensions – Camera Dimensions – Stand Weight – Camera & Stand Wireless Digital or Analog Max. Transmission Range Typical Range Frequency Transmission Channels Yes 9ft /3m (typical) 11 850nm Up to 26ft / 8m 10,000 hours DC 12V -10°C ~ 50°C / 14°F ~ 122°F Aluminium 5.5” x 2.8” x 2.8” / 140mm x 70mm x 70mm 4.5” x 2.