Quick Start Guide Model AT5872 5.
STEP 1 Check Package Contents Save your sales receipt and original packaging in case you need to ship your telephone for warranty service.
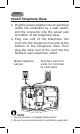
STEP 2 Install Telephone Base 1. Plug the power adapter into an electrical outlet not controlled by a wall switch, and the connector into the power jack at bottom of the telephone base. 2. Plug one end of the telephone line cord into the telephone line jack at the bottom of the telephone base. Then plug the other end of the cord into the modular wall telephone outlet. Modular telephone wall jack NOTES: Standard electrical outlet not controlled by a wall switch 1.
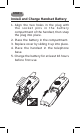
STEP 3 Install and Charge Handset Battery 1. Align the two holes in the plug with the socket pins in the bat ter y compartment of the handset, then snap the plug into place. 2. Place the battery in the compartment. 3. Replace cover by sliding it up into place. 4. Place the handset in the telephone base. 5. Charge the battery for at least 16 hours before first use.
STEP 4 Making and Answering Calls Making Calls 1. Press ON on the handset or SPEAKER on the telephone base and listen for dial tone. 2. Dial the telephone number. Answering Calls Press ON on the handset or SPEAKER the telephone base. on Ending Calls Press OFF on the handset or SPEAKER the telephone base to end calls. on NOTE: For more information, please refer to user’s manual.
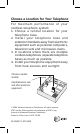
Choose a Location for Your Telephone For maximum performance of your cordless telephone system: 1. Choose a central location for your telephone base. 2. Install your telephone base and extension handsets away from electronic equipment such as personal computers, television sets and microwave ovens. 3. In locations where there are multiple cordless telephones, separate telephone bases as much as possible. 4. Install your telephone equipment away from heat sources and sunlight.