AT&T Unified Communications Voice IP Communicator Installation Guide For Customer’s System Administrator V1.0 – June, 2013 Disclaimer The contents of the document may be revised by AT&T at any time without notice. Please consult the Service Guide for details of the service and features available with the product. “The AT&T UC Service Guide” can be found at http://serviceguidenew.att.com. This document is provided as a reference document only and is not intended to modify the agreement between the parties.
© 2013 AT&T Intellectual Property Published by: AT&T Intellectual Property Product: AT&T Unified Communications Voice Title: IP Communicator Installation Guide Product version: 8.6.2 Publication date: June, 2013 Reference number: <0613> Revision number: 01 NOTE: All screen captures in this document have been reproduced by AT&T with the permission of Cisco Systems Inc. The date of the screen captures was June, 2013. COPYRIGHT ©2013 CISCO SYSTEMS, INC. ALL RIGHTS RESERVED.
Welcome This manual explains how to install Cisco IP (Internet Protocol) Communicator for AT&T Unified Communications (UC) Voice. It includes: • Hardware and software requirements • Installation instructions • Basic configuration instructions © 2013 AT&T Intellectual Property. All rights reserved. AT&T and the AT&T logo are trademarks of AT&T Intellectual Property.
Table of Contents 1. Hardware and Software Requirements ...........................................................................................1 2. Installation .......................................................................................................................................4 3. Basic Configuration ..........................................................................................................................8 iv © 2013 AT&T Intellectual Property. All rights reserved.
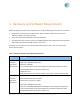
1. Hardware and Software Requirements Before installing IP Communicator for AT&T UC Voice, verify the following on the end users’ computers: • Full network connectivity to the AT&T UC Voice TFTP (Trivial File Transfer Protocol) server at 206.19.41.1 (USA) or 32.42.46.
Item Description • SVGA video card • 800 x 600 x16-bit screen resolution (1024 x 768 x 16-bit or better recommended) Internal Hardware (Microsoft Windows Vista®) • Microsoft Windows Vista Business Edition, Enterprise Edition, or Ultimate • Windows Vista Service Packs 1 (SP1) and 2 (SP2) • IP Communicator supports x86-based processors running a 32-bit OS; 64-bit OSs are only supported on Windows 7 (WoW64). All other supported operating systems are 32-bit only.
Table 2.
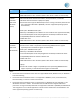
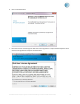
2. Installation Perform the following steps to install IP Communicator for AT&T UC Voice on the end user’s PC: 1. Log into the end user’s computer using an account with administrator privileges. 2. Extract the downloaded file into a directory on the end user’s disk drive. The extracted file need not be in a permanent location – it can be deleted after the software has successfully been installed. The user’s desktop is an acceptable location. 3.
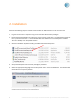
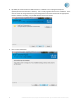
6. Click on the Next button. 7. Have the end user read through the End User License agreement. She/he should accept the terms of the license agreement and press the Next button. © 2013 AT&T Intellectual Property. All rights reserved. AT&T and the AT&T logo are trademarks of AT&T Intellectual Property.
8. By default, IP Communicator for AT&T UC Voice is installed in the “C:\Program Files\Cisco Systems\Cisco IP Communicator” directory. This is usually a good location for the installation. If the end user needs to change the directory, the Change button should be clicked and the appropriate location selected. Generally, only the Next button needs to be clicked. 9. Click on the Install button. 6 © 2013 AT&T Intellectual Property. All rights reserved.
10. The installation of the software proceeds. The installation may take several minutes. 11. Once the installation has completed, select the “Launch Cisco IP Communicator” checkbox and click on the Finish button. If the end user has not connected the computer’s headset, it should be connected prior to clicking on the Finish button. Also, the end user must have IP connectivity to the AT&T UC Voice IP PBX (Private Branch eXchange) servers prior to clicking on the Finish button.
3. Basic Configuration When end users launch IP Communicator for AT&T UC Voice for the first time, the Audio Tuning Wizard automatically opens. 1. Generally, the software runs through the speaker and microphone audio settings using the Audio Tuning Wizard during the initial configuration. Close all other programs that play or record sound. Also make sure all audio sources are connected (such as the computer’s headset, the various speakers, and microphones). Press the Next button. 2.
3. For each unique audio device, the following two screens are displayed. 3a. Have the end user press the Play button and listen or speak into the microphone. During the speaker test, the end user should hear tones through the selected device (after pressing the Play button). Have the end user move the Wave Volume selector to adjust the sound to the appropriate volume. If the end user does not hear anything, the device’s volume setting and connection should be verified.
3b. Each audio device’s microphone must also be set. Have the end user press the Test button and speak naturally and consistently. Adjust the volume until most of the words the end user are saying are hitting the top of the green and lower yellow bars. It is acceptable if the volume sometimes reaches the red bar. The fine volume controls should be adjusted to tune the microphone sensitivity. When the sensitivity is just right, the end user should press the Next button.
5. IP Communicator for AT&T UC Voice will now attempt to register. If the DHCP server is not configured to set the IP address of the PBX’s TFTP server, the following screen may display. For these cases, press the OK button and the Network Preferences screen should display. If the Network Preferences screen does not display, IP Communicator for AT&T UC Voice will load, but will probably not be able to register. Completely close the application and launch it again as an administrator.
7. Assuming these settings are correct and the PC has IP access to AT&T UC Voice, IP Communicator for AT&T UC Voice should register and become functional. The first time it registers, it downloads telephony locale information showing the progress of the downloads on the end user’s computer. Once completed, the registered IP Communicator for AT&T UC Voice should look similar to the following. 12 © 2013 AT&T Intellectual Property. All rights reserved.