9370_to make pdf_1ATT 6/12/00 2:06 PM Page ii USER’S MANUAL Part 2 900 MHz Cordless Answering System Speakerphone 9370 with Caller ID/Call Waiting REVISED 6/12/00 Please also read Part 1 — Important Product Information AT&T and the globe symbol are registered trademarks of AT&T Corp. licensed to Advanced American Telephones.
9370_to make pdf_1ATT 6/12/00 2:06 PM Page iii © 2000 Advanced American Telephones. All rights reserved. Printed in Mexico.
9370_to make pdf_1ATT 6/12/00 2:06 PM Page 1 CONTENTS BEFORE YOU BEGIN ........................3 About Caller ID with Call Waiting............3 About Home and Local Area Codes........3 INSTALLATION.................................4 Before You Install...........................................4 Installing Your Phone.....................................5 FEATURE SETUP ..............................7 Softkeys............................................................
9370_to make pdf_1ATT 6/12/00 2:06 PM Page 2
9370_to make pdf_1ATT 6/12/00 2:06 PM Page 3 BEFORE YOU BEGIN About Caller ID with Call Waiting This product has a Caller ID with Call Waiting feature that lets you see who’s calling while you’re on another call. To use this feature, you may need to change your phone service.
9370_to make pdf_1ATT 6/12/00 2:06 PM Page 4 INSTALLATION Before You Install Choose a location for the base near an electrical outlet and a telephone jack. This phone requires a modular telephone jack and a standard electrical outlet (110v AC) not controlled by a wall switch. For optimum performance, install the base on the highest floor of your home.
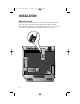
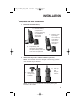
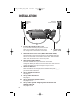
9370_to make pdf_1ATT 6/12/00 2:06 PM Page 5 INSTALLATION Table/Desk and Wall Installation 1 Install the handset battery. a) Remove battery compartment cover by pressing on indentation and sliding downward. c) Replace cover by sliding it on its track up over battery case until it snaps firmly into place. b) Plug battery pack connector into handset, and place battery pack and wires into compartment. 2 Attach belt clip to the cordless handset (optional).
9370_to make pdf_1ATT 6/12/00 2:06 PM Page 6 INSTALLATION Modular telephone jack 3 5 6 7 8 9 10 11 6 Connect the telephone line cord. If you are wall mounting the phone, use the short line cord and press the excess cord into the groove on the bottom of the base. Standard electrical outlet 4 Connect the power cord. Mount the base on the wall. (WALL MOUNTING ONLY) Hold the base so the mounting knobs on the standard wall jack will fit into the holes on the bottom of the base.
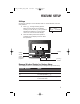
370_to make pdf_1ATT 6/12/00 2:06 PM Page 7 FEATURE SETUP Softkeys Use the two “softkeys” on the handset, shown in the illustration, to access many features. 1 Press U to begin viewing options. When you see arrows on the display MENU SETUP INTERCOM screen, you can use the < and > buttons beneath the softkeys to scroll through choices or move to the next display. 2 Press the softkey below the operation indicated on the display screen to select that operation.
9370_to make pdf_1ATT 6/12/00 2:06 PM Page 8 FEATURE SETUP Telephone Feature Setup At the handset, you can set up one feature at a time, or you can set up a feature and then move on to set up another feature. 1 2 3 4 Make sure the phone is off ( is not displayed). Press U, then >, and use the softkey to select SETUP. Select DONE if needed to reach the feature you want to set, then use the CHANGE softkey to scroll through the options for that feature.
9370_to make pdf_1ATT 6/12/00 2:06 PM Page 9 FEATURE SETUP Caller ID Feature Setup You can set up Caller ID features at the handset right after setting up the final Telephone feature (Handset Ringer), by programming your Home Area Code. Otherwise, follow Steps 1-4 in “Telephone Feature Setup” on page 8 to begin setting up Caller ID features. Program Home and Local Area Codes Your “home area code” is usually the area code from which you are dialing.
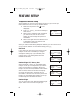
9370_to make pdf_1ATT 6/12/00 2:06 PM Page 10 FEATURE SETUP Answering System Feature Setup Stop recording; Exit Answering System Feature Setup Delete selected announcement Scroll through screen options Record/review outgoing announcement Use with other buttons to change settings Scroll through screen options Set/review answering system features Set/review day and time At the base, you can set up one feature at a time, or you can set up a feature, and then move on to set up another feature.
9370_to make pdf_1ATT 6/12/00 2:06 PM Page 11 FEATURE SETUP Select Your Announcement NOTE: For information about how to record your announcements, see page 13. • • • You can record up to three different announcements — A, B, and AO. Announcements A and B are used when you want the system to record callers’ messages. Announcement AO (Announce Only) is used when you want to give information to callers without accepting messages.
9370_to make pdf_1ATT 6/12/00 2:06 PM Page 12 FEATURE SETUP Change Remote Access Code Access features and functions of the answering system from a touch tone phone. The Remote Access Code is preset to 500. NOTE: Do not use the same code as the Priority Calling Code. 1 2 3 Press 9 (SETUP) until the system announces “Remote access code is…” Press 4 (REPEAT) or 6 (SKIP) to change the first digit, then press 9 (SETUP) to move to the next digit. Repeat for second and third digits.
9370_to make pdf_1ATT 6/12/00 2:06 PM Page 13 FEATURE SETUP Review Feature Settings Check the status of the answering system feature settings by pressing 9 (SETUP) on the base. Record Your Announcement from the Base • • • • You can record up to three different announcements — A, B, and AO — that callers will hear when the system answers a call. Each announcement can be up to three minutes long. Announcements A and B are used when you want the system to record callers’ messages.
9370_to make pdf_1ATT 6/12/00 2:06 PM Page 14 FEATURE SETUP Delete an Announcement 1 2 3 If the announcement you want to delete is the currently selected announcement (A, B, or AO) go to Step 2. If not, select the announcement by following the instructions in “Select Your Announcement” on page 11, then go to Step 2 below. Press 7 (ANNC) on the base. Press D while the announcement is playing. The system beeps once when the announcement is deleted. Set the Clock 1 2 3 4 8 Press * (CHANGE).
9370_to make pdf_1ATT 6/12/00 2:06 PM Page 15 FEATURE SETUP Caller Specific Outgoing Announcement Feature Setup Record personalized announcements — Caller Specific Outgoing Announcements — that can be played to select callers. You can program Caller Specific Outgoing Announcements to match: • • specific telephone numbers, or callers who choose to block their name and number when calling (private calls), or • callers from areas in which Caller ID information is not transmitted (unknown calls).
9370_to make pdf_1ATT 6/12/00 2:06 PM Page 16 FEATURE SETUP 5 6 7 8 9 10 11 16 To record a Caller Specific Outgoing Announcement, select OUTGOING — OR — To record a Talking Caller ID Announcement, select LOCAL. Select ADD. The screen displays ENTER NUMBER:. Use the keypad to enter the digits (up to 24) of the incoming phone number, then select DONE — OR — Press >, then select DONE to match incoming PRIVATE CALL information — OR — Press > >, then select DONE to match UNKNOWN CALL information.
9370_to make pdf_1ATT 6/12/00 2:06 PM Page 17 FEATURE SETUP Review Caller Specific Outgoing and Talking Caller ID Announcements 1 2 3 Make sure the phone is off ( is not displayed). Press U. Use the softkey to select DIR. MENU CALL ID 4 Select ANS SYS. MEM 5 6 7 8 9 To review a Caller Specific Outgoing Announcement, select OUTGOING — OR — To review a Talking Caller ID Announcement, select LOCAL. Select REVIEW. The screen displays the first announcement.
9370_to make pdf_1ATT 6/12/00 2:07 PM Page 18 FEATURE SETUP Delete Caller Specific Outgoing and Talking Caller ID Announcements 1 2 3 Make sure the phone is off ( is not displayed). Press U. Use the softkey to select DIR. MENU CALL ID 4 Select ANS SYS. MEM 5 6 7 8 9 10 18 DIR To delete a Caller Specific Outgoing Announcement, select OUTGOING — OR — To delete a Talking Caller ID Announcement, select LOCAL. Select REVIEW. The screen displays the first announcement.
9370_to make pdf_1ATT 6/12/00 2:07 PM Page 19 TELEPHONE OPERATION AT THE HANDSET See the TELEPHONE MEMORY/DIRECTORY and CALLER ID OPERATION sections of this manual for more calling options. Screen remains lit for 30 seconds after you press any key Scroll through screen displays Make, Answer, or End a Call Flash Access subscriber services while on a call Press P. The screen displays when connected, and may display SEARCHING...
9370_to make pdf_1ATT 6/12/00 2:07 PM Page 20 TELEPHONE OPERATION AT THE HANDSET Redial The last number dialed at the handset or base (up to 24 digits) is stored in redial memory until you dial another number. 1 Press P. Wait for the dial tone and for the to appear. 2 Use the softkey to select REDIAL. 5550123 (REDIAL does not appear on the screen if MEM REDIAL there is no number in redial memory.) NOTE: MEM on the screen display refers to telephone memory.
9370_to make pdf_1ATT 6/12/00 2:07 PM Page 21 TELEPHONE OPERATION AT THE HANDSET Hold When you put a call on hold, you cannot hear your caller and your caller cannot hear you. 1 Press > while on a call, until the screen displays HOLD; select HOLD. The screen MUTE HOLD displays CALL HELD. 2 To return to the call, select UNHOLD — OR — Lift the handset of an extension on the same line. CALL HELD UNHOLD Intercom 1 Press U, then >; select INTERCOM. 2 Using the handset, speak to someone at the base.
9370_to make pdf_1ATT 6/12/00 2:07 PM Page 22 TELEPHONE OPERATION AT THE HANDSET Changing Channels This cordless telephone has an advanced AutoSelect feature that minimizes the chance of interference. When the phone is looking for a clear channel, the screen displays SEARCHING.... If it is unable to locate a clear channel, the screen displays TRY AGAIN. Hang up and try your call again. In the unlikely event that you notice noise or interference while using the handset: 1 Press L.
9370_to make pdf_1ATT 6/12/00 2:07 PM Page 23 TELEPHONE OPERATION AT THE BASE Redial Flash Press to call the last number dialed at base or handset (up to 24 digits). Access subscriber services while on a call. Speaker/ Base Ringer Volume Use to adjust how loudly the phone rings. While on a call, use to adjust the volume of what you hear. When Base Ringer Volume is set to 0, Ringer is off and BASE RINGER OFF light goes on.
9370_to make pdf_1ATT 6/12/00 2:07 PM Page 24 TELEPHONE OPERATION AT THE BASE Page/Intercom 1 2 Press and release to signal someone at the handset. A three-part paging tone sounds. When the person at the handset selects INTERCOM, the handset and base can communicate without tying up the phone line. PAGE FROM BASE INTERCOM Handset Locator Press and hold to locate the handset. The handset will beep for up to three minutes or until you turn it off by pressing any button on the handset or base.
9370_to make pdf_1ATT 6/12/00 2:07 PM Page 25 TELEPHONE MEMORY/DIRECTORY You can store up to 10 telephone numbers and names in memory using the handset. Your entries will be saved in the event of a power failure. You can dial memory/directory numbers from the handset or from the base.
9370_to make pdf_1ATT 6/12/00 2:07 PM Page 26 TELEPHONE MEMORY/DIRECTORY Store a Pause in a Memory Number While storing a memory number (see “Store a Number in Memory” on page 26) use the softkey to select PAUSE where you want dialing to pause for two seconds. Store a Name with a Memory Number 1 2 Follow Steps 1 through 7 under “Store a Number in Memory.” Use the keypad and the chart below to enter a name.
9370_to make pdf_1ATT 6/12/00 2:07 PM Page 27 TELEPHONE MEMORY/DIRECTORY Store a Number and Name from Call History You can store information received from Caller ID in the telephone memory (see “Review Call History” on page 39 in CALLER ID OPERATION.) 1 Use < or > to scroll to the phone number you want to store. 2 Press U. 3 Use the softkey to select STORE. 4 Enter a memory location from 01–10. 5 Select DONE. View Memory Numbers 1 2 Press U. Use the softkey to select DIR.
9370_to make pdf_1ATT 6/12/00 2:07 PM Page 28 TELEPHONE MEMORY/DIRECTORY Delete Memory Numbers 1 2 3 Follow Steps 1 through 5 in “View Memory Numbers.” Press U. Use the softkey to select DELETE. 4 Use the softkey to select YES. 5 The screen displays DELETED. Remaining memory locations are not renumbered. 05 5550123 DELETE EDIT 1 DELETE LOC.? YES NO DELETED Edit Memory Numbers 1 2 3 4 5 6 7 8 28 Follow Steps 1 through 5 in “View Memory Numbers.” Press U. Use the softkey to select EDIT.
9370_to make pdf_1ATT 6/12/00 2:07 PM Page 29 TELEPHONE MEMORY/DIRECTORY Priority Ring Numbers Numbers stored in memory can be labeled so that when a call is received from that number, the handset alerts you with a special ring. The special ring begins after the first normal ring. 1 While viewing numbers in memory, use < or > to scroll to the desired location. 2 Press * to activate Priority Ring for the displayed number (the screen displays !). To deactivate, press #. 3 Press U twice.
9370_to make pdf_1ATT 6/12/00 2:07 PM Page 30 ANSWERING SYSTEM OPERATION AT THE BASE Mailbox 2/Stop message playback Mailbox 1/Stop message playback Delete all or some messages Adjust message playback volume Set/review day and time Repeat all or part of message Record/review outgoing announcement Use with other buttons to change settings Turn answering system on or off Skip all or part of message Set/review answering system features Record a memo Audible Indicators This system will give you voice pr
9370_to make pdf_1ATT 6/12/00 2:07 PM Page 31 ANSWERING SYSTEM OPERATION AT THE BASE Answering Calls NOTE: See descriptions of Announcements A, B, and AO on page 11. • If you select Announcement A or B, callers can press 1 or 2 during the announcement to select a mailbox, or they can wait for the beep to leave a message in Mailbox 1.
9370_to make pdf_1ATT 6/12/00 2:07 PM Page 32 ANSWERING SYSTEM OPERATION AT THE BASE Listen To, Save & Delete Messages The system automatically saves your messages until you delete them, and can store approximately 12 minutes of messages, memos, and announcements (up to a maximum of 99 messages). Before playing a message, the system announces the day and time it was received. While the message plays, the Message Window displays the number of the message.
9370_to make pdf_1ATT 6/12/00 2:07 PM Page 33 ANSWERING SYSTEM OPERATION AT THE BASE Message Window Display Window Displays: When: 0 – 98 You have messages waiting, or message is playing AO System is set to Announce Only –– System is taking a call or Intercom is on CL ↔ 0 – 98 CL ↔ AO You need to reset the clock, and there are messages waiting You need to reset the clock, and the system is set to Announce Only F, flashing Answering system memory is full Counting 0 to 59 Shows time elapsed w
9370_to make pdf_1ATT 6/12/00 2:07 PM Page 34 ANSWERING SYSTEM OPERATION AT CORDLESS HANDSET OR TOUCH TONE PHONE Call Screening You can use the cordless handset to listen to callers as they leave messages, even when you are away from the base. 1 Press a on the handset. 2 To end monitoring without taking the call, press a or put the handset in the base — OR— Press P to speak to a caller.
9370_to make pdf_1ATT 6/12/00 2:07 PM Page 35 ANSWERING SYSTEM OPERATION AT CORDLESS HANDSET OR TOUCH TONE PHONE Remote Access Commands Function: Command: Play all messages in a mailbox Press 1, then mailbox number (1 or 2) Play new messages in a mailbox Press 2, then mailbox number (1 or 2) Repeat a message Press 4 while message is playing; each press backs up another message Skip a message Press 6 while message is playing; each press advances another message Stop Press 5 Save messages Han
9370_to make pdf_1ATT 6/12/00 2:07 PM Page 36 ANSWERING SYSTEM OPERATION AT CORDLESS HANDSET OR TOUCH TONE PHONE Remote Access Commands Function: Command: End remote access call Hang up, or if you are using the handset, press a Select an Outgoing Announcement Press * 9, then press 9; system announces current selection. Press 6 or 4 to hear other selections, press 9 to save, press 5 to exit Set the Clock Press * 8; system announces day setting, followed by,“To change, press 6 or 4.
9370_to make pdf_1ATT 6/12/00 2:07 PM Page 37 ANSWERING SYSTEM OPERATION AT CORDLESS HANDSET OR TOUCH TONE PHONE Voice Help Menu Use the Voice Help Menu to access the answering system from your cordless handset or from a remote touch tone telephone, even if you do not know or remember the command codes. 1 Connect with the answering system. 2 Press 5. The system announces a list of operations and the buttons you need to press.
9370_to make pdf_1ATT 6/12/00 2:07 PM Page 38 CALLER ID OPERATION Answering system message Unreviewed call information Priority Call Phone in use L1 Ringer is off Speakerphone/ Intercom Battery status indicator L2 Time Call number Caller’s phone number Date Caller’s name Call Waiting If you have Call Waiting with Caller ID service, the screen will display information about your Call Waiting call when you hear the call signal. Press on the handset or F on the base to access the call.
9370_to make pdf_1ATT 6/12/00 2:07 PM Page 39 CALLER ID OPERATION Review Call History Review information in the call history at any time. 1 2 3 4 5 Press < or >, or press U and select CALL-ID. The screen displays the number of calls in the call history and how many, if any, are new. Use < or > to scroll through the call history. The screen displays the name (if your service provides this), number, date, and time of the call simultaneously, beginning with the most recent call.
9370_to make pdf_1ATT 6/12/00 2:07 PM Page 40 CALLER ID OPERATION When you receive a call from an area code not programmed in the phone, the screen displays 10 digits (the area code plus the phone number). The phone automatically dials “1” before the displayed number when you press . If you try to use the Display Dial feature, but your call cannot be completed unless you dial “1” before the number, follow the steps below: 1 Press < or > to locate the number you want to call. 2 Press U.
9370_to make pdf_1ATT 6/12/00 2:07 PM Page 41 CALLER ID OPERATION Delete All Call Records 1 2 3 4 Press < or > to display the number of calls in the call history. While the number of calls is displayed, press U. The screen displays DELETE ALL?. Select YES to remove all calls. The screen displays ARE YOU SURE?. Select YES to remove all calls. The screen displays NO CALLS, and the information is permanently deleted.
9370_to make pdf_1ATT 6/12/00 2:07 PM Page 42 OPERATING RANGE This cordless telephone operates within the maximum power allowed by the Federal Communications Commission (FCC). Even so, this handset and base can communicate over only a certain distance — which can vary with the locations of the base and handset, the weather, and the construction of your home or office. For best performance, keep the base antenna fully upright.
9370_to make pdf_1ATT 6/12/00 2:07 PM Page 43 BATTERIES Battery Life Battery life depends on how far the handset is from the base, and other environmental conditions. NOTE: For optimum battery performance, charge your handset on the base every night.
9370_to make pdf_1ATT 6/12/00 2:07 PM Page 44 BATTERIES CAUTION: To reduce the risk of fire or injury to persons or damage to the telephone, read and follow these instructions carefully: • • • • • • Use only Replacement Battery 3500 (SKU# 90817). Do not dispose of the battery in a fire. The cell might explode. Check with local codes for special disposal instructions. Do not open or mutilate the battery. Released electrolyte is corrosive and may cause damage to the eyes or skin.
9370_to make pdf_1ATT 6/12/00 2:07 PM Page 45 BATTERIES Replace the Handset Battery Pack 1 2 3 4 5 Remove the battery compartment cover on the handset by pressing on the indentation and sliding the cover downward. Lift out the old battery pack. Hold the new battery pack and plug the connector into the handset. Place the battery pack into the compartment. Replace the cover by sliding it on its track up over the battery case until it snaps firmly into place.
9370_to make pdf_1ATT 6/12/00 2:07 PM Page 46 IN CASE OF DIFFICULTY If you have difficulty operating this phone, try the suggestions below. For Customer Service, visit our website at www.telephones.att.com or call 1 800 222–3111. Please retain your receipt as your proof of purchase. If the phone does not work at all, check these items first: • Make sure the power cord is plugged into the base and an electrical outlet not controlled by a wall switch.
9370_to make pdf_1ATT 6/12/00 2:07 PM Page 47 IN CASE OF DIFFICULTY If you hear noise or interference when using the phone: • • • • Make sure the base antenna is fully upright. You may be out of range. Move closer to the base. Household appliances plugged into the same circuit as the base can sometimes cause interference. Try moving the appliance or the base to another outlet. The layout of your home or office may be limiting the operating range.
9370_to make pdf_1ATT 6/12/00 2:07 PM Page 48 IN CASE OF DIFFICULTY If the caller’s name or phone number is not displayed during Call Waiting: • • • • • You should call your service provider to confirm that you subscribe to a combined Caller ID with Call Waiting service. The screen may not display the call information if someone is on an extension phone. The Caller ID with Call Waiting feature is inactive during a power interruption. Make sure the battery is charged.
9370_to make pdf_1ATT 6/12/00 2:07 PM Page 49 IN CASE OF DIFFICULTY If CL appears in the Message Window: You need to reset the clock. If the system does not respond to commands from a remote touch tone phone: • • • • Make sure you are calling from a touch tone phone. When you dial a number, you should hear tones. If you hear clicks instead, the phone is not a touch tone telephone. The answering system may not detect the Remote Access Code while your announcement is playing.
9370_to make pdf_1ATT 6/12/00 2:07 PM Page 50 INDEX Index to Come 50
9370_to make pdf_1ATT 6/12/00 2:07 PM Page 51 INDEX Index to Come 51
Remote Commands To connect with your answering system: 1 Dial your telephone number from a touch tone phone. 2 When the system answers, enter your Remote Access Code (preset to 500). The system announces the number of messages and beeps twice. 3 Wait four seconds for the system to play back all messages — OR — Enter a remote command from inside this card. Remote Commands To connect with your answering system: 1 Dial your telephone number from a touch tone phone.
Play messages in another After “End of Messages,” system mailbox beeps twice, enter 1 (all) or 2 (new), then mailbox number Delete message 3 Delete all messages After “End of Messages,” press 3, then mailbox number Review announcement 7 Record announcement * 7, speak after beep, press 5 to stop Turn system off/on *0 Record memo #, speak after beep Review settings 9 Change settings *9 End remote access call Hang up PERF.