9345_book_1ATT 6/5/01 11:33 AM Page ii USER’S MANUAL Part 2 900 MHz Cordless Telephone with Caller ID/Call Waiting 9345 DRAFT 6/5/01 Please also read Part 1 — Important Product Information AT&T and the globe symbol are registered trademarks of AT&T Corp. licensed to Advanced American Telephones.
9345_book_1ATT 6/5/01 11:33 AM Page iii © 2001 Advanced American Telephones. All rights reserved. Printed in China.
9345_book_1ATT 6/5/01 11:33 AM Page iv CONTENTS BEFORE YOU BEGIN . . . . . . . . . . . . . . 1 TELEPHONE MEMORY . . . . . . . . . 10 About Caller Identification .......... 1 Store Memory Numbers.............. 10 Edit Numbers Stored in Memory ............................... 11 Delete Numbers Stored in Memory ............................... 12 Dial Memory Numbers ............... 12 INSTALLATION . . . . . . . . . . . . . . . . . . . . . . . 2 Before You Install ..........................
9345_book_1ATT 6/5/01 11:33 AM Page 1 BEFORE YOU BEGIN About Caller Identification (Caller ID) This product has a Caller ID with Call Waiting feature that works with service from your local phone service provider. Caller ID with Call Waiting lets you see who’s calling before you answer the phone, even when you’re on another call. You may need to change your phone service to use this feature.
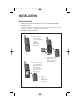
9345_book_1ATT 6/5/01 11:33 AM Page 2 INSTALLATION Before You Install 1 2 Choose a location for the base near an electrical outlet and a telephone jack. This phone requires a modular telephone jack and a standard electrical outlet (110v AC) not controlled by a wall switch. Install the handset battery. a) Remove battery compartment cover by pressing on the indentation and sliding downward. b) Align two holes in plug with socket pins, and snap the plug into place.
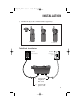
9345_book_1ATT 6/5/01 11:33 AM Page 3 INSTALLATION 3 Attach belt clip to the cordless handset (optional). To attach To remove Table/Desk Installation Standard electrical outlet Modular telephone jack 1 Connect the telephone line cord. 2 Connect the power cord.
9345_book_1ATT 6/5/01 11:33 AM Page 4 INSTALLATION 3 4 5 4 Charge the handset battery. Place the handset in the base. Charge the battery for at least 16 hours the first time. Check for dial tone. After the batteries are charged, pick up the handset and press P; you should hear a dial tone. Set the dial mode. If you have touch tone service, the phone is ready to use as soon as the batteries are charged. If you have dial pulse (rotary) service, you’ll need to change the dial mode.
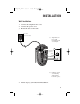
9345_book_1ATT 6/5/01 11:33 AM Page 5 INSTALLATION Wall Installation 1 Connect the telephone line cord. 2 Connect the power cord. 3 Mount the base on the wall. Standard electrical outlet a) Align holes on base with mounting studs on wall jack. Modular telephone jack b) Pull base down on mounting studs until it locks into place. 4 Follow Steps 3–5 in Table/Desk Installation.
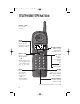
345_book_1ATT 6/5/01 11:34 AM Page 6 TELEPHONE OPERATION HEADLINE LEFT HEADLINE L-SUB Answer a Call Press any key except O. Flash/ Call Waiting Access special telephone company subscriber services. Handset Volume While on a call, adjust volume of what you hear. Make a Call Press P, then dial the number — OR — Dial the number (use < to backspace and correct digits), then press P to call. End a Call Press O — OR — Place handset in base. Exit programming. Cancel a page.
9345_book_1ATT 6/5/01 11:34 AM Page 7 TELEPHONE OPERATION If you subscribe to telephone company voice mail with a visual message waiting signal, light flashes when you have voice mail waiting. Flashes when you have unreviewed call information. On steadily when handset is in use or is charging in base. Page/Handset Locator Press to page the handset for up to 90 seconds. Press again to cancel, or press O on handset.
9345_book_1ATT 6/5/01 11:34 AM Page 8 TELEPHONE OPERATION Handset Ringer Style/Battery Save You can select from four different handset ringer styles, or turn the ringer off and extend the battery life. 1 Make sure the handset is off. 2 Press G to enter programming mode. 3 Press > until the screen displays RINGER:. 4 Press s. The screen displays the current setting. 5 Press > to select 1, 2, 3, 4, or OFF. You will hear a sample of each ring. 6 Press s to choose the displayed ringer setting.
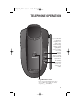
9345_book_1ATT 6/5/01 11:34 AM Page 9 TELEPHONE OPERATION Operating Range This cordless telephone operates within the maximum power allowed by the Federal Communications Commission (FCC). Even so, this handset and base can communicate over only a certain distance — which can vary with the locations of the base and handset, the weather, and the construction of your home or office. For best performance, keep the base antenna fully upright.
9345_book_1ATT 6/5/01 11:34 AM Page 10 TELEPHONE MEMORY This cordless phone can store 20 telephone numbers with names, each up to 16 digits long. Entries are stored alphabetically. For consistency with Caller ID entries, you may wish to enter last names first. Note: Press O at any time to exit memory. Store Memory Numbers 1 2 3 Press G. The screen displays DIRECTORY. Press s. The screen displays ENTER NAME. Using the chart below, enter up to 16 characters for the name you’re storing with the number.
9345_book_1ATT 6/5/01 11:34 AM Page 11 TELEPHONE MEMORY 4 5 6 When you finish entering the name, press s. The screen displays ENTER NUMBER. Enter the telephone number. Use < to backspace and make a correction. Press r to store a pause in the dialing sequence. Press s to store your entry. The screen displays SAVING… and you’ll hear a series of beeps confirming the entry.
9345_book_1ATT 6/5/01 11:34 AM Page 12 TELEPHONE MEMORY Delete Numbers Stored in Memory 1 2 3 Press > (DIR). The screen displays DIRECTORY. Press < or > to scroll alphabetically through numbers stored in memory —OR— Press the dial pad key for the first letter of the entry you want to delete. When the screen displays the number you want to delete, press s. Then press < or > until ERASE flashes. DIAL EDIT ERASE 973-555-0123 5/01 5:40PM 4 5 6 28 OLD Press s.
9345_book_1ATT 6/5/01 11:34 AM Page 13 CALLER ID OPERATION Indicates repeat call Caller’s name Caller’s telephone number Date of call Time of call Position of call in call history About Call History This phone assigns each incoming call a number from 1 to 50. The most recent call will have the highest number. When the memory is full, the oldest call information is deleted to make room for new incoming call information.
9345_book_1ATT 6/5/01 11:34 AM Page 14 CALLER ID OPERATION Delete Records from Call History Delete a Specific Call 1 2 Locate the record you want to delete from call history. Press s, then press < or > until ERASE flashes. DIAL PGM ERASE 973-555-0123 5/01 5:40PM 3 4 5 28 OLD Press s. The screen displays ERASE NO YES ALL and the phone number. The current choice flashes. Press < or > until YES flashes. Press s. You’ll hear a series of beeps confirming the deletion.
9345_book_1ATT 6/5/01 11:34 AM Page 15 CALLER ID OPERATION Store a Call History Record in Memory 1 2 Locate the record in call history you want to store in memory. Press s, then press < or > until PGM flashes. DIAL PGM ERASE 973-555-0123 5/01 5:40PM 3 4 5 6 28 OLD The phone number will be displayed in the format it was received. If you wish to change how the number is stored, press #.
9345_book_1ATT 6/5/01 11:34 AM Page 16 CALLER ID OPERATION Display Screen Messages Screen Displays: When: PRIVATE NAME The other party is blocking name information. PPP The other party is blocking number information. PRIVATE CALLER The other party is blocking name and number information. UNKNOWN NAME Your phone company is unable to receive information about this caller’s name. UUU Your phone company is unable to receive information about this caller’s number.
9345_book_1ATT 6/5/01 11:34 AM Page 17 BATTERIES Charging the Handset Battery Pack This battery should remain charged up to six days with the ringer turned on and up to 12 days with the ringer off. A fully charged battery provides an average talk time of about five hours. The battery pack needs charging when: • A new battery is installed in the handset. • The phone beeps twice every 16 seconds. • The screen displays LOW BATTERY and the low battery icon.
9345_book_1ATT 6/5/01 11:34 AM Page 18 BATTERIES Nickel-Cadmium Rechargeable Batteries must be recycled or disposed of properly. Do not dispose of in household garbage. If burned, it could explode. If punctured, it could release caustic material which could injure the skin or eyes. If swallowed, it may be toxic.
9345_book_1ATT 6/5/01 11:34 AM Page 19 IN CASE OF DIFFICULTY If you have difficulty operating this phone, try the suggestions below. For Customer Service, visit our website at www.telephones.att.com or call 1 800 222–3111. Please retain your receipt as your proof of purchase. If the phone doesn’t work at all, check these items first: • • • • • • Make sure the AC adapter is plugged into an outlet not controlled by a wall switch.
9345_book_1ATT 6/5/01 11:34 AM Page 20 IN CASE OF DIFFICULTY If you hear noise or interference when using the phone: • • • • • • Make sure the base antenna is fully upright. You may be out of range. Move closer to the base. Press and release G to change to another of the 30 channels available. If noise is exceptionally loud, move closer to the base before changing channels. Household appliances plugged into the same circuit as the base can sometimes cause interference.