REVISED 11/3/98 1 User’s Manual for 900 MHz Cordless Caller ID/ Call Waiting 9340 Part 2 Please read Part 1 — Important Product Information, included in your package.
© 1998 Philips Consumer Communications L.P. All rights reserved. Printed in Mexico.
CONTENTS INSTALLATION................................. 3 TELEPHONE MEMORY .................... 14 Belt Clip ................................................ 5 Memory Guard .................................... 14 Storing Numbers In Memory .............. 14 Storing a Name with a Number ........... 14 Replacing a Stored Number ................ 15 Storing a Pause in a Memory Number .. 15 Storing a Number and Name from Call History in Telephone Memory ... 15 Viewing Numbers in Memory .............
2 AT&T 9340 book_1ATT 2 11/3/98, 12:39 PM
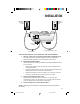
INSTALLATION Modular telephone jack Standard electrical outlet Strain-relief groove Power cord Long telephone line cord The instructions below are for both table and wall installation. 1 Choose a spot near an electrical outlet and a telephone jack. This phone requires a modular telephone jack and a standard electrical outlet (110v AC) not controlled by a wall switch. 2 Install the handset battery. (For an illustration of battery installation, see the BATTERIES section in this manual.
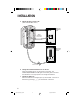
INSTALLATION 5 Mount the base on the wall. (WALL MOUNTING ONLY) Modular telephone jack Short telephone line cord Standard electrical outlet Power cord 6 7 Charge the handset batteries for six hours. Place the handset face up or face down in the base. The CHARGING/HANDSET IN USE light on the base goes on to show the handset is in the right position to charge the batteries. Check for dial tone. After the batteries are charged, pick up the handset.
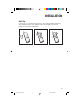
INSTALLATION Belt Clip If you wish, you can attach the belt clip to the cordless handset, following the illustrations below. (The handset cannot be charged in the face-up position if the belt clip is attached.
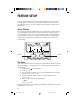
FEATURE SETUP You can set up one feature at a time as described below, or you can set up a feature, and then move on to set up another feature. After you change one feature, press U to exit, or select the DONE softkey to move to the next feature. About Softkeys This telephone has been designed with your convenience in mind, offering you many features which you can access using the two “softkeys” shown in the illustration. Press U to begin viewing options.
FEATURE SETUP Ringer Off / Battery Save When the Ringer is set to OFF, the handset stays ready to use for up to 30 days in the standby mode before you have to return it to the base for recharging. When the Ringer is off, the Page/Handset Locator feature does not work, and the screen does not display incoming call information. However, the call information is stored in the call history. The Ringer Off , is displayed only when the phone is on.
FEATURE SETUP Programming Home and Local Area Codes Your “home area code” is the area code from which you are dialing. Numbers called within your home area code do not require you to dial a “1” or the area code before dialing the telephone number. “Local area codes” are area codes that require no “1” before dialing the telephone number; however, the area code must be dialed. Always program your home area code, and, if you need them, your local area codes (up to four).
FEATURE SETUP Call List Options You can customize how the phone stores call information. Select whether the system stores information about ALL CALLS received, or for NO CALLS. The system comes set to ALL CALLS. is not displayed. 1 Make sure the 2 Press U >. 3 Use the softkey to select SETUP. 4 Select DONE until the screen displays LIST:ALL CALLS. 5 Select CHANGE to display ALL CALLS or NO CALLS. 6 Select DONE to move to the next feature — OR — Press U to exit.
TELEPHONE OPERATION Antenna L1 L2 Softkey Softkey Access special programming features Scroll through screen information Make or answer a call Dial number displayed on screen Access subscriber services Temporary Tone Change channel Adjust handset volume Making a Call 1 2 3 Press P, and wait for to appear on the display. As the phone is selecting a channel, the screen may display SEARCHING.... When you hear a dial tone, dial the number.
TELEPHONE OPERATION Answering a Call Press P on the handset. The appears and the call is connected. Ending a Call Press P on the handset. The — OR — Place the handset in the cradle. disappears. Redial The last number dialed on this phone (up to 24 digits) is stored in redial memory until you dial another number. 1 Press P. 2 Wait for the dial tone and for the to appear. 3 When you hear a dial tone, use the softkey to select REDIAL.
TELEPHONE OPERATION most special services; however, some services may actually require a touch tone line. To be sure, ask the company that provides the special service. 1 Dial the call, then press *. Any buttons pressed after this send tone signals. 2 When you hang up or press F, the phone automatically returns to dial pulse (rotary) dialing. Mute Mute allows you to hear your caller, but prevents the caller from hearing you. 1 Press > while on a call, until the screen displays MUTE; select MUTE.
TELEPHONE OPERATION Changing Channels This cordless telephone has an advanced AutoSelect feature that minimizes the chance of interference. When the phone is looking for a clear channel, the screen displays SEARCHING.... If it is unable to locate a clear channel, the screen displays TRY AGAIN. Hang up and try your call again. In the unlikely event that you notice noise or interference while using the handset: 1 Press h.
TELEPHONE MEMORY You can store up to 10 telephone numbers and names in memory. The telephone memory works with the Memory Match and Priority Ring features. When you receive a call from a number you’ve stored in memory, the screen displays the name information as you’ve stored it, not as the service sends it (for example, “MOM AND DAD”). Additionally, the phone alerts you to calls from priority numbers you’ve stored in memory with a special Priority Ring.
TELEPHONE MEMORY Replacing a Stored Number You can replace a stored number by storing a new number in its place. Follow the directions for “Storing Numbers in Memory.” Storing a Pause in a Memory Number While storing a memory number (see “Storing Numbers in Memory”) use the softkey to select PAUSE where you want dialing to pause for two seconds. Storing a Number and Name from call history in Telephone Memory You can store information received from Caller ID in the telephone memory.
TELEPHONE MEMORY Priority Ring Numbers When you view a number stored in memory, you can label it so that when a call is received from that number, the handset alerts you with a special ring that this is a priority call. The special ring begins after the first normal ring on the line. 1 While viewing numbers in memory, use < or > to scroll to the desired location. 2 Press * to activate Priority Ring for the displayed number (the screen displays ! ). To deactivate Priority Ring, press #.
CALLER ID OPERATION Unreviewed Call information Repeat Call information Phone in use Priority Call L1 Voice Mail Ringer is off Battery status indicator L2 Date Call Number Time Caller’s Number Caller’s Name About Caller Identification This telephone has a Caller ID feature that works with Caller Identification service provided by your local telephone company. There is a fee for this service, and it may not be available in all areas.
CALLER ID OPERATION Incoming Call History This telephone assigns each incoming call a number from 1 to 99. The most recent call will have the highest number (for example, if 10 calls have been received, call number 10 is the most recent, and call number 1 is the oldest). When the call history is full, the oldest call information is deleted to make room for new incoming call information.
CALLER ID OPERATION If you try to use the Display Dial feature, but your call cannot be completed unless you dial “1” before the number, follow the steps below: 1 Press < or > to locate the number you want to call. 2 Press M. 3 Press > until the screen displays DIAL 1+. (Select DIAL 1+ to dial the number.) Deleting Call Records from call history NOTE: Once you delete a call from call history, you cannot retrieve the call information.
BATTERIES Charging the Handset Battery Pack This battery should remain charged up to 15 days with the Ringer turned on and up to 30 days with the Ringer off. A fully charged battery provides an average talk time of about 12 hours. The battery pack needs charging when: • A new battery is installed in the handset. • The phone beeps four times when you press P. • The battery status symbol on the screen is only partly displayed. • The phone does not respond when you press P.
BATTERIES Replacing the Handset Battery Pack 1 2 3 4 5 Remove the battery compartment cover on the handset by pressing on the indentation and sliding the cover downward. Lift out the old battery pack. Hold the new battery pack and plug the connector into the handset. Place the battery pack into the case. Replace the cover by sliding it on its track up over the battery case until it snaps firmly into place. The new battery pack must be charged before using the phone.
OPERATING RANGE This cordless telephone operates within the maximum power allowed by the Federal Communications Commission (FCC). Even so, the handset and base can communicate over only a certain distance — which can vary with the locations of the base and handset, the weather, and the construction of your home or office. If the handset is moved to a point where the base and handset can no longer communicate, the handset will sound two short beeps when you make a call, indicating that you are out of range.
IN CASE OF DIFFICULTY If you have difficulty operating this phone, try the suggestions below. If you still have trouble, call 1 800 722–9125. If the phone does not work at all, check these items first: • • • • • Make sure the power cord is plugged into the base and an electrical outlet not controlled by a wall switch. Make sure the telephone line cord is plugged firmly into the base unit and the telephone jack.
IN CASE OF DIFFICULTY If you hear a two-beep signal when you try to use the handset: • • You might be out of range. Move closer to the base and try again. If moving closer to the base doesn’t help, try following the directions above for re-initializing the handset and base. If you hear noise or interference when using the phone: • • • • • Make sure the base antenna is fully upright. You may be out of range. Move closer to the base. Press and release h to change to another channel.
IN CASE OF DIFFICULTY If the caller’s name or phone number is not displayed: • • • • • Make sure you subscribe to Caller ID service or Caller Name service from your local telephone company. Make sure the Ringer is on. Make sure the battery is charged. Caller ID and Visual Message Waiting service might not work when the phone is connected to a Private Branch Exchange (PBX). Press < or >.