2 User's Manual for Cordless Digital Answering System Speakerphone 7630 © 1998 Philips Consumer Communications L.P. All rights reserved. Printed in Mexico. 848232849 Issue 1AT&T Part 2 Please read Part 1 — Important Product Information, included in your package.
CONTENTS INSTALLATION ........................................... 2 Recording Your Announcement .............. 16 Table/Desk Installation ............................. 5 Announcement Play/Silent ..................... 17 For Wall Installation ................................. 6 Feature Set-Up ........................................ 17 Ring Select and Toll Saver ..................... 17 TELEPHONE OPERATION At the Handset ........................................ 8 Audible Message Alert .......................
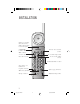
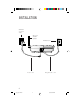
INSTALLATION Light goes on when intercom is in use; flashes when battery needs recharging Set RINGER to ON or OFF Activate Voice Security feature Make, answer or end a call Access answering system Access custom-calling services Put caller on hold Redial last number called Store and access numbers in telephone memory Answer page from base Memory location M1 Change channel Adjust listening volume 2 7630_book.
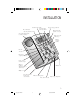
INSTALLATION Set/hear day & time Set answering system features Record/review outgoing announcement Stop message playback Use with other buttons to change settings Turn answering system on or off Skip all or part of message Adjust speaker volume Record a memo Repeat all or part of message Delete all or some messages Message Counter displays number of messages Mailbox 2 Mailbox 1 Page the handset for two-way conversation Mute the microphone Put caller on hold Activate speakerphone 3 7630_book.
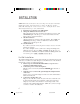
INSTALLATION Standard electrical outlet Keep base antenna upright. Modular jack ! Power cord Telephone line cord 4 7630_book.
INSTALLATION Table/Desk Installation 1 Choose a spot near an electrical outlet and a telephone jack. This phone requires a modular telephone jack and a standard electrical outlet (110v AC) not controlled by a wall switch. 2 Install the handset battery. • Remove the battery compartment cover on the handset by pressing on the indentation and sliding the cover downward. • Plug the battery pack connector into the handset and place the battery pack in the case. (See figure in section on "Handset Batteries.
INSTALLATION NOTE: When the system is first connected to AC power, it begins an automatic initialization routine. After this routine is complete, the Message Counter flashes CL, indicating the clock needs to be set. See “Setting the Clock” in the Answering System Set-up section of this manual. 7 Rotate the base antenna so it is fully upright. 8 Charge the handset batteries before use. Place the handset in the base and charge the batteries for 4 hours.
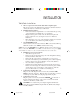
INSTALLATION 5 6 7 8 9 Feed the free end of the line cord through the rectangular opening in the center of the bracket. Replace the bracket. Place the bracket back on the base so that the thicker end will be at the bottom of the base when wall-mounted. Connect the line cord to the wall jack. Make sure it snaps firmly into place. Mount the base on the wall. Hold the base so the mounting knobs on the wall plate fit the keyhole slots on the base. Slide the base down onto the knobs until it locks into place.
TELEPHONE OPERATION At the Handset Making a Call 1 2 Press P on the handset (the PHONE light goes on). When you hear a dial tone, dial the number. Answering a Call If the handset is in the base, lift the handset. The PHONE light goes on and the call is connected. — OR — If the handset is away from the base, press P on the handset. The PHONE light goes on and the call is connected.
TELEPHONE OPERATION At the Handset Hold Press H to put a call on hold. The PHONE light on the handset flashes. To return to the call, press H again — OR — Press P on the handset — OR — Press K on the base — OR — Lift the handset of an extension phone on the same line. Temporary Tone NOTE: If you have touch tone service, you do not need to use the Temporary Tone feature.
TELEPHONE OPERATION At the Handset Handset Locator This feature is useful if you misplace the handset. To locate the handset using this feature, press and hold the INTERCOM/HANDSET LOCATOR button on the base for approximately four seconds. A repeating paging tone is sounded in the handset. To cancel the handset locator feature, press h on the handset or the INTERCOM/HANDSET LOCATOR button on the base.
TELEPHONE MEMORY At the Handset This cordless answering system can store 20 different phone numbers that you dial by pressing p and two of the number buttons. The cordless answering system can also store a telephone number that you dial by pressing only M. Storing Memory Numbers 1 2 3 4 5 6 Make sure the handset is off. Press p. Enter the phone number (up to 16 digits). Press p. Press two number buttons (01 to 20) for the memory location where the number is to be stored —OR— Press M.
TELEPHONE MEMORY At the Handset Storing a Number Just Dialed Whenever you make a telephone call, you can store the number you dialed in memory. Press R instead of entering the telephone number when storing memory numbers. Dialing Memory Numbers 1 2 3 Press P. Press p. Press the number buttons (01 to 20) you assigned to the number you’re calling. For example, to dial the number you assigned to location 6, press P, p, 0, 6. Dialing Number Stored in M1 1 2 Press P. Press M.
TELEPHONE OPERATION At the Base Answering a Call To answer using the Speakerphone, press K on the base. The SPEAKER light goes on, and the call is connected. To end the call, press K again. Conecting to a Call With the Speakerphone You can make a call at the handset, and then switch to using the speakerphone. 1 Make a call at the handset. 2 Press K on the base to connect to the call. 3 Press P on the handset to disconnect the handset. 4 To end the call, press K on the base.
OPERATING RANGE This cordless telephone answering system operates at the maximum power allowed by the Federal Communications Commission (FCC). Even so, the handset and base can communicate over only a certain distance — which can vary with the locations of the base and handset, the weather, and the construction of your home or office. For best performance, make sure the base antenna is fully upright, as shown in the Installation section of this manual.
ANSWERING SYSTEM SET-UP Turning the System On/Off The answering system must be on in order to use any answering system functions. When the answering system is on, the Message Counter is on (a steady or flashing display). To turn the answering system on, press O on the base. The system announces “The machine is on.” To turn the system off, press O again. The system announces “The machine is off.” Speaker Volume Control Press + or - on the base to adjust speaker volume, from 0 (lowest) to 7 (highest).
ANSWERING SYSTEM SET-UP Announcement Options Before using this answering system, you can record an announcement (up to 3 minutes long) that callers will hear when the system answers a call. When you record your announcement, make sure you indicate who has been assigned each mailbox, and that callers should press 1 or 2 to access the appropriate mailbox. For example, “Hello. You’ve reached Meadowlark Nursery. To leave a message for Ms. Arbor, press 1. To leave a message for Mr. Cardinal, press 2.
ANSWERING SYSTEM SET-UP 5 When you are finished, press S. The system plays back the announcement, and the Message Counter displays AP (Announcement Play). If the announcement did not record successfully, you’ll hear an error tone indicating you need to record again. To review the announcement at any time, press A. Deleting an Announcement 1 2 3 Select the announcement you want to delete. Press A. Press D while the announcement is playing. The system beeps once when the announcement is deleted.
ANSWERING SYSTEM SET-UP Audible Message Alert If you want the base to beep once every 15 seconds to notify you that new messages have been received, set the Message Alert to on (the Message Counter displays + for on and – for off. 1 Press C. 2 Press and release u until you hear "Message Alert is...". The Message Counter displays the current Message Alert setting. 3 Press n or N to change the setting.
ANSWERING SYSTEM SET-UP Changing the Priority Calling Code The priority calling code comes set to 999, but you can change it to any three-digit number from 500 to 999 following the directions below. NOTE: Do not use the same code as the Remote Access Code. If you set the Remote Access Code and the Priority Calling Code to the same number, the phone will always interpret that number as the Remote Access Code. 1 2 3 4 5 Press C. Press and release u until you hear "Priority Call Code is...".
ANSWERING SYSTEM OPERATION At the Base Answering Calls When you’ve selected Announcement A or B and turned the system on, the caller hears the announcement you recorded, followed by a beep. During the announcement, callers can press 1 or 2 to select a mailbox, or they can wait for the beep to leave a message in Mailbox 1. A caller can leave a message up to 3 minutes long.
ANSWERING SYSTEM OPERATION At the Base Listening to Your Messages As the system plays back messages in a mailbox, the Message Counter displays the number of the message playing. Before playing each message, the system announces the day and time the message was received. After playing the last message, the system announces “End of messages.” Play all messages in a mailbox Press and release the appropriate l button. If you have no messages in that mailbox, the system announces “No messages.
ANSWERING SYSTEM OPERATION At the Base Deleting Messages Delete all messages in a mailbox Press and release D, then press the l button of the mailbox you want to clear. The system announces “Messages deleted.” The Message Counter displays the number of messages in the other mailbox. If you haven’t listened to all of the messages, the system sounds an error tone, and does not delete messages. Delete selected messages Press and release D while the message you want to delete is playing.
ANSWERING SYSTEM OPERATION At Cordless Handset or Touch Tone Phone This cordless answering system allows you to retrieve messages and access other features even when you are away from your home or office. Additionally, you can use the cordless handset to access answering system features when you are within range of the base. Whether you are using the cordless handset or calling from a touch tone phone, you press the same buttons. The only difference is the way you connect with the answering system.
ANSWERING SYSTEM OPERATION At Cordless Handset or Touch Tone Phone Remote Access Commands Playing Messages 1 2 3 Connect with the answering system. After the two beeps, wait 4 seconds. The system plays back messages in Mailbox 1 — OR— Press and release 1, then enter a Mailbox number (1 or 2), to play all messages in that mailbox — OR — Press and release 2, then enter a Mailbox number (1 or 2) to play only new messages in that mailbox. To repeat a message, press and release 4 while the message is playing.
ANSWERING SYSTEM OPERATION At Cordless Handset or Touch Tone Phone Call Screening You can uses the cordless handset to listen to callers as they leave messages. You can speak to a caller by pressing P. To monitor a call: 1 If the handset is away from the base, press a. 2 To end monitoring without taking the call, press a or put the handset in the base. Recording Outgoing Announcement 1 2 3 4 Connect with the answering system. Press * 7. The system beeps to signal that it's ready to accept a command.
ANSWERING SYSTEM OPERATION At Cordless Handset or Touch Tone Phone Remote ON/OFF Review ON/OFF Status Connect with the answering system. Press ). The system announces the current status, then beeps twice and is ready to accept a command. Turning System Off 1 2 Connect with the answering system. Press * 0. The system announces "The machine is off," then beeps twice to indicate it is ready to accept a command.
ANSWERING SYSTEM OPERATION At Cordless Handset or Touch Tone Phone 11 The system announces the Priority Calling Code, followed by "To select the first digit, press 6 or 4, then press 9." 12 Follow Step 10 to change the Priority Calling Code. 13 The system announces the current base ringer setting, followed by "To turn on or off, press 6 or 4." 14 Press 6 or 4 to change the setting. Press 9 to save the setting. 15 Press 5 to exit the set-up menu. Reviewing Settings 1 2 Connect with the answering system.
HANDSET BATTERIES The handset batteries need charging when: • The phone beeps four times when you press P. • The INTERCOM/LOW BATT light on the handset is on when the phone is off. • The INTERCOM/LOW BATT light on the handset flashes when the phone is on. • The phone does not respond when you press P, and no lights go on. Place the handset in the base so the CHARGING light goes on. The batteries will be fully charged in 4 hours.
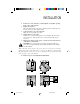
HANDSET BATTERIES Replacing the Handset Battery Pack 1 2 3 4 5 Remove the battery compartment cover on the handset by pressing on the indentation and sliding the cover downward. Lift out the old battery pack and unplug it from the handset. Hold the new battery pack and plug the cord into the handset. Place the battery pack and wires in the compartment, as shown below. Replace the cover by sliding it on its track up over the battery compartment until it snaps firmly in place.
IN CASE OF DIFFICULTY If you have difficulty operating this telephone answering system, try the suggestions below. If you still have trouble, call 1 800 722-9125. If the phone does not work at all • • • • • • • Make sure the power cord is plugged into the base and an electrical outlet. Make sure the telephone line cord is plugged firmly into the base unit and the telephone jack. If the phone does not beep or beeps four times when you press P, the batteries might need recharging.
IN CASE OF DIFFICULTY If you hear noise or interference when using the phone • • • • You may be out of range. Move closer to the base. Press h to change to another of the 25 channels available. If the noise is exceptionally loud, move closer to the base before changing channels. Household appliances plugged into the same circuit as the base can sometimes cause interference. Try moving the appliance or the base to another outlet. The layout of your home or office may be limiting the operating range.
IN CASE OF DIFFICULTY If messages are incomplete • • • If a caller leaves a very long message, part of it may be lost when the system disconnects the call after 3 minutes. If the caller pauses for more that seven seconds, the system stops recording and disconnects the call. If the system’s memory becomes full during a message, the system stops recording and disconnects the call. If you have difficulty hearing messages Check the volume setting.
2 Cordless Digital Answering System Speakerphone 7630 ANSWERING SYSTEM OPERATION 1 Dial telephone number and wait for system to answer. 2 Enter Remote Access Code. 3 After the system beeps twice, enter a command from the other side of this card. Your Remote Access Code ______ (The preset code is 500) © 1998 Philips Consumer Communications L.P. All rights reserved. Printed in Mexico.
Play all messages in mailbox 1, then mailbox number Play new messages in mailbox 2, then mailbox number Save messages Hang up Delete message being played 3 Delete all messages in mailbox 3, then mailbox Repeat 4 5 6 * 7, after beep, press 5 to end 8 *8 9 *9 0 *0 5 any time you hear Stop playback Skip message Change announcement Review day/time settting Change day/time setting Review settings Change settings Review on/off status Change on/off status Voice Help Menu number after you hear "End of me