Table of Contents .................................................................................1 Introduction ..........................................................................................3 Main features ....................................................................................3 Package contents .............................................................................4 Product Overview .................................................................................
EN Voice Mail ............................................................................................18 Programming voice mail access number ........................................18 Message waiting .............................................................................19 Handset Settings ................................................................................20 Using handset keys to enter text ....................................................20 Navigate handset menus ...............
Thank you for selecting the AT&T ID-2820 Digital Cordless Telephone with Touch Sensitive Keypad. This stylish cordless phone provides the freedom to communicate from anywhere in your home. It has been designed to provide a clear and crisp calling experience and incorporates features that make phone company services like Caller ID, Call Waiting and Voice Mail easier to use. Start using your AT&T ID-2820 Cordless Phone quickly by reading the Getting Started section in the following pages.
EN PACKAGE CONTENTS Make sure you have received the following items in the package. If any items are missing, contact the AT&T Customer Service Center at 800-667-2118. • One handset • One base unit • One rechargeable handset battery pack (pre-installed inside the handset) • One base unit AC power adapter • One base unit phone line cord • One handset belt clip • One user manual • One quick start guide NOTE: Keep this manual handy as you use your new product.
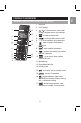
HANDSET WITH TOUCH SENSITIVE KEYPAD 1. Receiver 1 2 3 4 5 2. LCD Display 12 13 14 15 6 7 8 9 10 11 3. 4. : answer and dial calls : view and dial previous calls 5. 6. 1 - 9: enter numbers and characters 7. : enter numbers and special characters 8. : enter special characters 9. : answer call waiting call; delete text; exit submenu 10. : go to menu; enter setting; manual key lock. 16 17 / : volume control; view caller ID log; navigate menus and settings 11. Microphone 12.
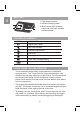
EN BASE UNIT 1. Page: pages handset 2. Handset charging cradle 1 2 3. Blue indicator light: charging status and voice mail message waiting indicator 3 LCD DISPLAY SYMBOLS SYMBOL DESCRIPTION Signal within range Key Lock activated Handset ring silenced Alarm set Lower-case letters activated Voice mail message waiting Battery full - icon does not flash TOUCH PHONE USE AND HANDLING • The touch panel handset offers a new experience in telephone communication.
backlight will be off. • To turn keypad backlight on and activate the keypad, touch any of the number keys, wait for the backlight to come on and then dial normally. NOTE: If more than one key area is touched, the keypad may not activate. • During a call, the keypad will automatically disable and the backlight will turn off.
NOTE: Before using the handset, and to prolong battery life, place the handset in the base handset cradle and charge for at least 15 hours. WARNING: You must replace handset in charger base for periodic charging. Failure to keep the battery fully charged could result in decreased battery life. If the handset is removed from the base unit for long periods of time, remove the battery. ACTIVATING AND CHARGING THE HANDSET BATTERY PACK To activate and charge the handset battery pack: 1.
EN EN LOW BATTERY WARNING The battery icon indicates the battery status: FULL EMPTY When the battery is low, there will be an audible signal and ‘LOW BATTERY’ will appear on the screen. Removing and replacing handset battery pack After years of use, all NiMH rechargeable batteries loose the ability to hold a full charge and may need to be replaced. The handset uses 1 NiMH 650 mAh 3.6V (AAA) rechargeable battery pack. Only replace with an approved ID-2820 battery pack available through AT&T.
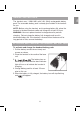
EN ATTACHING THE BELT CLIP Attach the belt clip as shown: To detach, spread the “arms” of the belt clip and remove. TIP: If you cannot remove the clip using your hand, use a thin blunt object such as a screwdriver (not supplied), taking care not to scratch the handset surface. BASIC FUNCTIONS MAKING AND RECEIVING CALLS To make a call: • Touch and wait for a dial tone. • Enter destination phone number using numbers 0 - 9. If you make an error, touch to cancel.
To activate speakerphone during a call: • While in Talk mode, touch . ‘SPKR’ will appear on the handset display to indicate the speakerphone is activated. • Touch again to deactivate speakerphone and return to Talk mode during a call. ‘TALK’ will appear on the handset display to indicate talk mode is activated. To end a call: • Touch . OR • Place the handset back into the base cradle. To redial a call: • To redial the last number dialed, touch then touch .
EN STANDBY MODE AND SLEEP MODE When the handset has been inactive for a while, it will enter sleep mode and the LCD backlight and key lights will switch off. Press any key to return to standby mode. The LCD backlight and key lights will activate to indicate standby mode. To adjust the time from standby to sleep mode, please refer to the section in this manual titled CHANGE DISPLAY SETTINGS to alter BACKLIGHT TIME Page 23. NOTE: If Key Lock is on, you will need to unlock the phone to enter standby mode.
3. Press the number 1 key to enter a space between characters 4. Repeat steps 1 and 2 until the name is entered. NOTE: For a full list of characters and their assigned numbers see the section in this manual titled HANDSET SETTINGS on Page 20. DELETING PHONEBOOK RECORD To delete 1 record: 1. Touch 2. Touch delete. . or 3. Touch 4. Use or alphabetic search to select the record you wish to . or to select ‘DELETE RECORD’. 5. Touch to confirm selection. 6. Touch to confirm delete. OR . 1. Touch 2.
EN EDITING RECORDS 1. Touch . or 2. Touch edit. 3. Touch 4. Use or alphabetic search to select the record you wish to . or to select ‘EDIT RECORD’. to confirm. 5. Touch 6. Press the key to delete any characters or numbers in the name you wish to edit. 7. Use 0 - 9 keys to edit the name, touch does not need to be modified, press 8. Use 0 - 9 keys to edit the number or press the number before saving.Touch to confirm. If the name to edit the number.
If you subscribe to Caller ID service through your local phone company, the handset will display details in accordance with your Caller ID service. If the number of the incoming call is stored in the Phonebook, the name as it is entered will also be displayed. VIEWING AND CALLING CALLER ID RECORDS The call log records the caller name, number, date and time for the previous 40 calls. To view the call log: 1. Touch or to enter the call log during standby mode.
EN FORMATTING CALLER ID NUMBERS The number stored in call log can be reformatted prior to dialing. To edit the number: or 1. Touch memory. to select the number you wish to dial from call log 2. Touch . The number you selected can now be reformatted by touching again to choose the format you prefer, and also touch 0-9 to edit prefix while reformatting. For example: The caller ID number 206-123-4567 can be reformatted by pressing the key as shown below.
to confirm name or press to edit the name before EN 5. Touch saving. 6. Touch to confirm number or press to edit the number before saving. For long distance calls, you must add a 1 at the start of the number for correct dialing. 7. The record is now saved. NOTE: For details on how to edit Phonebook entries please see the section in this manual titled PHONEBOOK on Page 12. DELETING CALLER ID RECORD 1. Touch 2. Use or or to review the call log. to select the Caller ID record you wish to delete. 3.
EN MISSED CALLS If you miss a call, ‘MISSED CALL’ will appear with the time of the last call received. After you reviewed the call log, the MISSED CALL record or to enter and will disappear. To view your MISSED CALL, use browse the call log (see the section in this manual titled VIEWING AND CALLING CALLER ID RECORDS Page 15 for more details). When you view the Caller ID of your missed calls, the following notifications will appear: • ‘NEW’ indicates that the call details have not previously been reviewed.
1. Touch , your voice mail number will appear. 2. If you have pre-programmed your voice mail access number, it will be automatically dialed. To edit your voice mail number: 1. Touch . or 2. Touch or 4. Use or alphabetic search to select the VMAIL record. to confirm. 3. Touch to select ‘EDIT RECORD’. to confirm. 5. Touch 6. Do not change the VMAIL name. Press without changes. 7. Use 0 - 9 keys to edit the number or press the number before saving. to confirm the name to delete and edit to confirm.
EN 3. Touch to confirm. 4. ‘ACCEPTED’ indicates that base has been selected. ‘RETRY?’ indicates that selection has failed. Touch to retry or to quit. NOTE: Clearing the message waiting indicator without deleting or saving the new voice mail message(s) will only turn the indicator light off until next new call is received. You must first delete or save all new voice mail messages for the message waiting indicator light to turn off.
EN NAVIGATE HANDSET MENUS KEY FUNCTION Scroll up through current menu and submenu Scroll down through current menu and submenu Confirm selection Exit to previous menu Exit and return to standby mode How to navigate menus: 1. During Standby mode, touch to enter a menu or submenu. or to select the setting or menu. The 2. Use selected menu or setting. 3. Use to confirm or select the next menu. Use the previous menu.
EN List of submenus: Standby Language Ring Setting ENGLISH FRANCAIS ESPANOL Ring Volume Ring Tone Set Time Clock Setting Alarm Security Set External Call Intercom Call Enter Time Off On Display Format Phone Setup External Call Intercom Call Set Contrast Key Tone Smart Key Lock Auto Answer Dial Mode Flash Time Handset Name Backlight Time Registration Deregistration Clear Msg Wait Select Base Set Default Room Monitor Intercom Call 22 Enter Time 12/24hr MM/DD or DD/MM
To change language: 1. Go to Language menu. 2. Use or to select desired language. to confirm. 3. Touch To adjust screen contrast: 1. Go to Phone Setup menu > Set Contrast. 2. Use or to change contrast. to confirm. 3. Touch To alter backlight time: 1. Go to Phone Setup menu > Backlight Time. or 2. Use seconds). 3. Touch to change select backlight time (20, 30, 40, 50 or 60 to confirm. CHANGE RING AND KEY TONES There is a choice of 10 polyphonic ring melodies and 4 ring tones.
EN To adjust ring tone: 1. Go to Ring Setting menu > Ring Tone 2. Select ‘EXTERNAL CALL’ or ‘INTERCOM CALL’ . 3. Use or t to select ring tone. to confirm. 4. Touch To adjust key tone: Adjusting the key tone allows you to change the sound the key makes when touched. 1. Go to Phone Setup menu > Key Tone. 2. Use 3. Touch or to select key tone. (Select ‘OFF’ to silence the key tone) to confirm. ASSIGNING A NAME TO A HANDSET 1. Touch and select the Phone Setup menu > Handset Name. 2.
RESET To reset the handset to the default setting: 1. Touch 2. Use and select the Set Default menu. or 3. Touch to select ‘YES’. to confirm. NOTE: Resetting the handset will not delete Caller ID, Redial, Phonebook or Vmail data.
EN HANDSET SPECIAL FEATURES In addition to the basic functions, your handset also has a number of special features. PHONE SETUP To select between pulse and tone dial modes: 1. Go to Phone Setup menu > Dial Mode. 2. Use or to select ‘PULSE’ or ‘TONE’. to confirm. 3. Touch To change flash time: 1. Go to Phone Setup menu > Flash Time. 2. Use or to change select flash time (100, 270, 300 or 600ms). to confirm. 3. Touch SMART KEY LOCK Smart Key Lock prevents accidental key activation during a call.
• In standby mode touch then immediately touch . will appear in the top left corner of the display to indicate manual Key Lock is activated. NOTE: Upon receiving an incoming call, the key will automatically unlock to enable the answering of the call. Key Lock is temporarily deactivated when an emergency number is dialed and is pressed. When Key Lock is activated, for safety purposes, user can still enter and dial out digits 911.
EN 3. Use 0 - 9 to enter the time. (Use display format is selected). 4. Touch to change AM / PM if 12 hour to confirm. To set the alarm: 1. Touch and select the Set Time menu > Alarm. 2. Touch to confirm. 3. Use or 4. Touch to select ‘ON’. to confirm. 5. Use 0 - 9 to enter alarm time. (Use to change AM / PM if 12 hour display format is selected) 6. Touch to confirm. NOTE: indicates alarm is set. To turn alarm off, simply touch the keypad.
The ID-2820 may be used with any industry standard two-band 2.5mm headset (not included). Connect the headset to the jack located on the side of the handset. Your phone is now ready for headset use. You can purchase a suitable headset from AT&T or from any electronics retailer that sells phone equipment. MULTI-HANDSET OPERATION The ID-2820 provides multiple handset capability supporting up to 4 handsets.
EN 4. ‘REGISTERING’ appears instead of you will see the message. Press and hold the PAGE key on the cradle of the base unit. This may take up to a minute. 5. ‘REGISTRATION ACCEPTED’ indicates that handset is registered. ‘RETRY?’ indicates that registration has failed. Touch retry or to quit. to NOTE: The base unit will then send a signal to the handset registering the handset to the base unit. Once the Registration function has been completed, the handset will return to Standby Mode.
3. If other handset connects (by touching will appear. Touch ) , the handset number to toggle between the internal and external line. 4. To transfer the call, touch in handset 1, or place the handset 1 back into the base cradle. To establish an intercom conference call with an outside line: 1. Connect to an outside line by making or answering a call. 2. Transfer the call to another handset (see above) and press to begin an intercom conference call.
EN Enable / disable the Room Monitor handset: 1. Touch 2. Use 3. Touch and select the Room Monitor menu or to select ‘ON’ / ‘OFF’. to confirm. To listen to the room monitor handset: 1. Place the enabled handset in the room you wish to monitor. 2. Touch 3. Use touch and select the Intercom Call menu. and to select a handset number you wish to monitor and or dial the handset number. NOTE: When the Room Monitor is active, ‘ROOM MONITOR’ will appear on the display to indicate the feature is activated.
See below for some common problems and their remedies. Whatever the problem, you should first check that: • The base unit is connected to the power supply and phone line. • The main power is switched on at the electrical outlet. • The handset battery is installed and has not run out of power. DO NOT attempt to make repairs yourself. This will void your warranty.
• Full name and number (including area EN code) need to be stored in Phonebook for name display if the name is unavailable through Caller ID. Caller ID is not displayed during a Call Waiting call • You must subscribe to the Call Waiting Caller ID service for this feature to work. Contact your local phone company to confirm you have signed up for Call Waiting Caller ID service. • While receiving the Call Waiting call, a second phone was in use.
• A maximum of 4 units can be registered at one time. De-register a handset and try again. • Make sure you select a base number that has not been assigned. • Make sure that you are attempting to register only an AT&T ID-282H handset. Unable to make an intercom call • Only one external call and one internal intercom call can take place at once. Make sure no other handset is in use. SAFETY INFORMATION Warning! AT&T DOES NOT represent this unit to be waterproof.
EN 9. To reduce the risk of electric shock, do not disassemble this product, but take it to a qualified serviceperson when some service or repair work is required. Opening or removing covers may expose you to dangerous voltages or other risks. Incorrect reassembly can cause electric shock when the appliance is subsequently used. 10. Never use this unit near a gas leak as this can cause explosions. 11.
Caution! To reduce the risk of fire or injury to persons by the battery, read and follow these instructions: 1. Use only the AT&T battery pack specified in the user’s manual. Do not use Alkaline or Lithium battery pack, or mix battery packs of different sizes or from different manufacturers in this product. Do not use a non-rechargeable battery pack. 2. Do not dispose of the battery pack in a fire; the cells may explode. Do not expose battery pack to water.
EN CARE AND MAINTENANCE The following suggestions for care for your handset will enable you to enjoy many years of problem-free use. • Keep the handset dry. If it gets wet, wipe it dry immediately. Liquids might contain minerals that can corrode the electronic circuits. • Use and store the handset only in normal temperature environments. Temperature extremes can shorten the life of electronic devices, and distort or melt plastic parts. • Handle the handset gently and carefully.
types. Replace battery pack with the same or equivalent type recommended by the manufacturer. • Every effort has been made to ensure the highest standards of reliability for your phone. However, if something does go wrong, do not try to repair it yourself - Contact the AT&T Customer Service Center at 800-667-2118. SPECIFICATIONS TYPE DESCRIPTION Handset L x W x H 5.55 x 1.73 x 0.94 in Handset weight 4.41oz (with battery) Base L x W x H 4.96 x 4.48 x 1.50 in Base Weight Standard 5.
EN FCC STATEMENT DECLARATION OF CONFORMITY This device complies with Part 15 of the FCC Rules. Operation is subject to the following two conditions: (1) This device may not cause harmful interference, and (2) This device must accept any interference received, including interference that may cause undesired operation. WARNING: Changes or modifications to this unit not expressly approved by the party responsible for compliance could void the user authority to operate the equipment.
c. A plug and jack used to connect this equipment to the premises wiring and telephone network must comply with the applicable FCC Part 68 rules and requirements adopted by the ACTA. A compliant telephone cord with modular plug is provided with this product. It is designed to be connected to a compatible modular jack that is also compliant. See installation instructions for details. d. The REN (Ring Equivalence Number) is used to determine the number of devices that may be connected to a telephone line.
EN g. Should you experience trouble with this equipment, please contact the AT&T Customer Service Center at 800-667-2118 for repair or warranty information. If the equipment is causing harm to the telephone network, the telephone company may request that you disconnect the equipment until the problem is resolved. h. Please follow instructions for repairing if any (e.g. battery replacement section); otherwise do not alter or repair any parts of device except as specified. i.
If the product is repaired, reconditioned component parts or materials may be used. If the product is replaced, AT&T may chose to replace it with a new or reconditioned product of the same or similar design. The repaired or replacement product will be warranted for either (a) 90 days or (b) the remainder of the original one (1) year warranty period, w h i c h e v e r i s longer. Battery pack is warranted to be free from defects at the time of purchase.
EN SHALL BE LIMITED IN DURATION TO THE ONE-YEAR DURATION OF THIS WRITTEN LIMITED WARRANTY. WE DISCLAIM ANY LIABILITY FOR DAMAGES FOR LOSS OF USE OF THE PRODUCTS, LOSS OF TIME, INCONVENIENCE, INJURY TO CUSTOMER OR ANY OTHER PERSON, OR DAMAGE TO CUSTOMER PROPERTY CAUSED BY THE PRODUCT, LOSS OF REVENUE OR PROFIT, OR DAMAGES FOR ANY FAILURE TO PERFORM. IN NO EVENT SHALL AT&T BE LIABLE FOR ANY SPECIAL, INCIDENTAL, PUNITIVE OR CONSEQUENTIAL DAMAGES EVEN IF WE ARE ADVISED OF THE POSSIBILITY OF SUCH DAMAGES.
date of original purchase (if the unit was purchased within the last twelve months). • Print your name and address, along with a description of the defect, and include this in the package. • Include payment for any service or repair not covered by warranty, as determined by AT&T. WHAT IS NOT COVERED UNDER THE WARRANTY? • Battery pack • Damage from misuse, neglect, or acts of nature (lightning, floods, power surges, etc.) • Products, which may have been modified or incorporated into other products.