760_book_1AT&T 5/1/00 1 7:38 PM Page iii USER’S MANUAL Part 2 Digital Answering System with Caller ID/Call Waiting 1760 Please read Part 1 — Important Product Information, included in this package. Para recibir este manual en español, por favor llame al 1 800 222-3111. AT&T and the globe symbol are registered trademarks of AT&T Corp. licensed to Advanced American Telephones.
1760_book_1AT&T 5/1/00 7:38 PM Page ii © 2000 Advanced American Telephones. All rights reserved. Printed in Mexico.
1760_book_1AT&T 5/1/00 7:38 PM Page iv
1760_book_1AT&T 5/1/00 7:38 PM Page 1 CONTENTS BUTTONS AND SCREEN INDICATORS ....3 INSTALLATION.....................................4 About Softkeys ..........................................4 Table/Desk Installation..............................4 Wall Installation.........................................7 SET UP SYSTEM FEATURES ..................8 Feature Setup ............................................8 Set the Time and Date ...............................8 Answering System Feature Setup...........
1760_book_1AT&T 5/1/00 7:38 PM Page 2
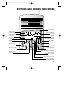
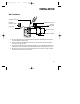
1760_book_1AT&T 5/1/00 7:38 PM Page 3 BUTTONS AND SCREEN INDICATORS Date of call Time of call Caller’s name Position of call in call history New call in call history Softkey Caller’s telephone number Softkey Indicates unreviewed call information in call history C Adjust volume c Record a memo Access system features Delete messages Indicates caller left message Dial number displayed on screen Turn system on or off Play messages / Stop message playback 3
1760_book_1AT&T 5/1/00 7:38 PM Page 4 INSTALLATION About Softkeys This answering system has been designed with your convenience in mind, offering you many features which you can access using the two “softkeys” shown in the illustration on the previous page. By pressing the softkey below the word indicated on the display screen, you select that operation. Softkey words are always underlined in the display and in this manual.
1760_book_1AT&T 5/1/00 7:38 PM Page 5 INSTALLATION 2 Connect the power cord. • Plug the smaller end of the power cord into the jack labeled POWER on the back of the answering system. • Flip out the bracket under the unit, and fit the power cord through the strain relief tab. • Plug the other end of the power cord into an electrical outlet not controlled by a wall switch. Use only the power cord supplied with this product. If you need a replacement, call 1 800 222–3111.
1760_book_1AT&T 5/1/00 7:38 PM Page 6 INSTALLATION 6 Set the Clock. The screen displays the time (the default setting is 12 AM). To correct the setting, use C or c to correct the hour, then select NEXT to move to the minutes setting; repeat to select AM or PM. Select DONE when the correct time is displayed. 7 Set the Date. The screen displays the date (the default setting is 1/04/98). To correct the setting, use C or c to correct the month, then select NEXT to move to the day and the year.
1760_book_1AT&T 5/1/00 7:38 PM Page 7 INSTALLATION Wall Installation Telephone Set Cord Standard Electrical Outlet Telephone Line Cord Modular Telephone Jack Power Cord #4 Round Screws Wall Mount Template 1 Choose a location near a modular telephone jack and a standard electrical outlet not controlled by a wall switch. 2 Using a pencil and the template at the back of the manual, mark the wall where you want to mount the unit.
1760_book_1AT&T 5/1/00 7:38 PM Page 8 SET UP SYSTEM FEATURES Feature Setup You can set up one feature at a time, or you can set up a feature and then move on to set up another feature. After you change one feature, use the softkey to select OK to move to another feature. If you change only one feature, you can continue to select OK until the screen exits the Feature Setup mode. NOTE: If the unit does not receive a command within 30 seconds, it automatically exits the Feature Setup mode.
1760_book_1AT&T 5/1/00 7:38 PM Page 9 SET UP SYSTEM FEATURES Answering System Feature Setup Record Outgoing Announcement NOTE: If you choose not to record an announcement, the system answers with a pre-recorded announcement: “Hello. Please leave a message after the tone.” 1 Press o. 2 Use the softkey to select ANS SYS. The screen displays Announcement. 3 Select RECORD. Begin speaking in a normal tone of voice, about nine inches from the unit. Your announcement can be up to three minutes long.
1760_book_1AT&T 5/1/00 7:38 PM Page 10 SET UP SYSTEM FEATURES Ring Select and Toll Saver You can select how many times the line will ring before the system answers a call. Set for 1 to 7 rings, or choose from two Toll Saver settings. If you select Toll Saver 4–2, the system answers after four rings when you have no new messages, and after two rings when you have new messages.
1760_book_1AT&T 5/1/00 7:38 PM Page 11 SET UP SYSTEM FEATURES Announcement Monitor This system comes set to On so you can hear your announcement when the system answers a call. You can reset the system so you won’t hear the announcement. 1 Press o. 2 Use the softkey to select ANS SYS. 3 Select OK until the screen displays Announce Monitor. 4 Select CHANGE or press C or c to change the setting to On or Off. 5 Select OK.
1760_book_1AT&T 5/1/00 7:38 PM Page 12 SET UP SYSTEM FEATURES You may, however, live in a region where for calls within your Home Area Code, you must dial 10 digits (that is, the three-digit area code and the seven digits of the phone number) or even 11 digits (“1” plus the area code and phone number). If this applies to you, program “000” instead of your Home Area Code into the unit.
1760_book_1AT&T 5/1/00 7:38 PM Page 13 SET UP SYSTEM FEATURES Local Area Codes Press o. Press C or c. Use the softkey to select CALL ID. Select OK until the screen displays Local Area Code. Press C or c to change the first digit. Select NEXT to move to the second digit. Press C or c to change the second digit. Select NEXT to move to the third digit. Press C or c to change the third digit. Select NEXT to move to the next Local Area Code, and follow Steps 5 through 10 above.
60_book_1AT&T 5/1/00 7:38 PM Page 14 SET UP SYSTEM FEATURES Set Display Screen Language Press o. Press C. Use the softkey to select CALL ID. (or ID LLAM). Select OK or SI until the screen displays Language/Idioma or (Idioma/Language) and the current selection. 5 Use the softkey under English or Espanol to change your selection. 6 Select OK or SI when your selection is displayed in the center of the screen. 1 2 3 4 Set Display Contrast 1 2 3 4 5 6 Press o. Press C. Use the softkey to select CALL ID.
1760_book_1AT&T 5/1/00 7:38 PM Page 15 ANSWERING SYSTEM OPERATION Answering Calls When the system answers a call, the caller hears the announcement you recorded followed by a beep. After the beep, the system begins recording your caller’s message, up to three minutes long. If the message is longer than three minutes, or if the caller is silent for more than seven seconds, or if the system runs out of memory, the system beeps once and hangs up.
1760_book_1AT&T 5/1/00 7:38 PM Page 16 ANSWERING SYSTEM OPERATION Listening to Your Messages As the system plays back messages, the screen displays the number of the message playing. Before playing each message, the system announces the day and time the message was received. The screen displays the caller’s name and number, if stored. You can dial the displayed number by pressing d (see “Display Dial” in the CALLER ID OPERATION section for more information).
1760_book_1AT&T 5/1/00 7:38 PM Page 17 ANSWERING SYSTEM OPERATION Stop message playback Press P. Saving messages The system automatically saves your messages until you delete them, and can store approximately 12 minutes of messages, memos and announcements (up to a maximum of 99 messages). When memory is full, or the maximum number of messages is recorded, the screen displays MEMORY FULL. You’ll need to delete messages to make room for new ones. Deleting Messages Deleting All Messages 1 Press D.
1760_book_1AT&T 5/1/00 7:38 PM Page 18 ANSWERING SYSTEM OPERATION FROM A REMOTE TOUCH TONE PHONE Connect with the Answering System 1 Dial your telephone number from a touch tone phone with a different telephone number. 2 When the system answers, enter your three-digit Remote Access Code during or after the announcement. The system announces the number of messages, then beeps twice.
1760_book_1AT&T 5/1/00 7:38 PM Page 19 ANSWERING SYSTEM OPERATION FROM A REMOTE TOUCH TONE PHONE Delete Messages Delete All Messages 1 Connect with the answering system 2 After you have listened to all messages and heard the two beeps, press 3 3. All messages are deleted. (If you haven’t listened to messages, you will hear an error tone, and the messages will not be deleted.) Delete Selected Message Press 3 while the message is playing. Record Announcement 1 Connect with the answering system.
1760_book_1AT&T 5/1/00 7:38 PM Page 20 ANSWERING SYSTEM OPERATION FROM A REMOTE TOUCH TONE PHONE Ending the Remote Access Call Press * 9. The system announces,“The machine will now hang up,” and disconnects from the line. Changing Remote Access Code 1 2 3 4 Connect with the answering system. Press 9 9. The system announces “Enter new code.” Enter your new Remote Access Code (any number between 000 and 999). If a valid code is entered, the system announces the new Remote Access Code.
1760_book_1AT&T 5/1/00 7:38 PM Page 21 CALLER ID OPERATION This product is designed to store and display information about incoming telephone calls. For this feature to work, the unit must be used with Caller Identification service provided by your local telephone company; there is a fee for this service, and it may not be available in all areas.
1760_book_1AT&T 5/1/00 7:38 PM Page 22 CALLER ID OPERATION NEW CALL Light This light stays on steadily when you have received call information but have not yet reviewed it. Reviewing Call History 1 To review latest calls, press c. 2 To advance through the call history from an earlier call, press C. Call history display NOTE: If a caller left a voice message, you’ll see the MSG indicator over the right softkey. Press the softkey to listen to the message.
1760_book_1AT&T 5/1/00 7:38 PM Page 23 CALLER ID OPERATION Making a Display Dial Call 1 Press C or c to locate the number in the call history that you want to dial. 2 Lift the receiver of the phone connected to the system. 3 Press d. The displayed number is dialed. (If you don’t lift the receiver before pressing d, the system will not dial the number. Instead, the screen displays Lift Receiver. You will need to repeat Steps 1–3.
1760_book_1AT&T 5/1/00 7:38 PM Page 24 CALLER ID OPERATION Display Messages PRIVATE NAME The other party is blocking name information. PRIVATE NUMBER The other party is blocking telephone number information. PRIVATE CALLER The other party is blocking name and telephone number information. UNKNOWN NAME Caller’s number is available, but name is not. UNKNOWN NUMBER Your phone company is unable to receive information about this caller’s number.
1760_book_1AT&T 5/1/00 7:38 PM Page 25 IN CASE OF DIFFICULTY If this answering system does not work properly, try the following suggestions. For Customer Service, visit our website at www.telephones.att.com, or call 1 800 222–3111. Please retain your receipt as your proof of purchase. Display Screen is Blank • Make sure the power cord is securely connected to both the answering system and an electrical outlet not controlled by a wall switch.
1760_book_1AT&T 5/1/00 7:38 PM Page 26 IN CASE OF DIFFICULTY System Does Not Respond to Remote Commands • Make sure you are calling from a touch tone phone. When you dial a number, you should hear tones. If you hear clicks instead, the phone is not a touch tone telephone. • There may be noise or interference on the phone line you are using. Press dial buttons firmly. • Make sure you are entering your Remote Access Code correctly.
1760_book_1AT&T 5/1/00 7:38 PM Page 27 TEMPLATE FOR WALL MOUNTING Use two #4 screws
5/1/00 7:32 PM Page 1 © 2000 Advanced American Telephones. All rights reserved. Printed in Mexico. 850002726 Issue 1AT&T 5/00 1760_wallet card_2AT&T © 2000 Advanced American Telephones. All rights reserved. Printed in Mexico. 850002726 Issue 1AT&T 5/00 fold fold 1 1 Answering System 1760 Answering System 1760 Remote Commands Remote Commands To connect with your answering system: 1 Dial your telephone number from a touch tone phone. 2 When the system answers, enter your Remote Access Code.
1760_wallet card_2AT&T 5/1/00 7:32 PM Page 2 ONE KEY REMOTE COMMANDS ONE KEY REMOTE COMMANDS Play All Play New Delete Play All Play New Delete Repeat Stop/Exit Skip Repeat Stop/Exit Skip System On Record Memo System On Record Memo TWO KEY REMOTE COMMANDS TWO KEY REMOTE COMMANDS 00 33 71 7 *, speak after beep, press 5 to stop Room monitor 9 8, press 8 to speak with someone in the room; press 5 or # to exit Change Remote Access Code 9 9 End remote access call *9 Turn system off Delete