
User guide


6-30 Setup and Configuration
24. Select Model Finder.
25. Click on Next.
> Teach the first fiducial in the same location where you taught the origin.
> If the dot does not fit entirely inside of the square overlay in the video display,
you will need to adjust the size of the Model Window. Notice the Model Size
Width and Height text boxes in the area below the video display.
26. Click on the up arrows next to the Width and Height text boxes to adjust the size of
the Model Window until the square is larger than the dot.
27. Click on Teach.
28. Click on Next.
> You are asked to select a method for teaching the second fiducial.
29. Select Model Finder.
30. Click on Next.
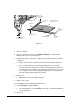
31. Use the Position Controls to move the dispensing head to the dot in the LRHC of
the Tutorial Board.
> Center the crosshairs on the dot.
32. Click on Teach.
33. Click on Next.
> The Teach Window closes and a message box opens, indicating that the
dispensing head is about to move to the Workpiece origin.
The dispensing head will move after your response.
34. Click on OK.
> The dispensing head moves to the location where you defined earlier as the
Workpiece origin.
35. Click on File in the menu bar and select Save As.
36. In the File Name text box, type the name of the file.
37. Activate the Attach Fluid File(s) feature by clicking on it.
> FMW will attach the currently active fluid file, in this case, the fluid file you
created earlier in this exercise, to the newly created program file.
38. Click on OK.
> The file will automatically be saved in the Program folder under the FMW root
directory as <filename>.fmw.
39. You have just created a new Workpiece and are ready to begin programming.
This concludes the tutorial on Programming Setup.