
User guide

Setup and Configuration 6-23
34. Use the Position Controls to center the Height Sensor over the first dot location.
35. Click on Teach.
36. Answer “Yes” if you are asked if you want to re-teach the reference dots.
> Notice the Enable Verification Step in the bottom of the Teach Window.
Enabling this feature activates a distance tolerance for later testing the needle-
to-camera offset. Refer to the on-line help for more information.
37. Use the Position Controls to center the needle tip over the first simulation dot as
shown in the on-screen prompt.
38. Click on Teach.
39. Repeat the previous 2 steps for the other three dots.
> Once you have taught the location of all four dots, the dispensing head moves
to the Purge Station and purges, then moves immediately back to the sample
substrate and dispenses all four dots. You are then asked to align the camera
crosshairs with the dots.
40. If necessary, use the Position Controls to center the camera crosshairs over the first
dot.
41. Click on Teach.
42. Repeat the previous 2 steps for all four dots.
> If you are using the Enable Verification Step feature, and you had to realign
the camera to the dots, you may be asked to re-teach the dots if the
verification tolerance was exceeded. Refer to the on-line help for more
information.
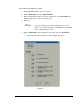
43. Click on Done to accept the results.
> The Teach Window closes and you return to the Setup dialog box. Notice that
the box next to number 5 now has an X in it to indicate that Step 5 has been
completed.
44. Click on Run next to 6. Calculate the camera-to-Height Sensor XY offset.
The dispensing head will move after your response.
> A Teach Window opens.
45. Choose an easily identifiable mark on the sample substrate, such as a dot or a line
intersection, and use the Position Controls to center the Height Sensor probe tip on
the selected mark.
46. Click on Teach.
47. Use the Position Controls to center the camera crosshairs over the same selected
mark, if necessary.
48. Click on Teach.