
User guide

6-22 Setup and Configuration
22. Use the Position Controls to align the needle tip with the same circle or with the
Load Cell, depending on your type of Needle Sensor.
> For NSZ Series Needle Sensor, DO NOT TOUCH THE LOAD CELL with
the needle tip. Center the needle tip over the Load Cell.
> For NS Series Needle Sensor, TOUCH THE NEEDLE TIP TO THE
SUBSTRATE.
23. Click on Teach.
The dispensing head will move after your response.
> The dispensing head automatically performs a height sense.
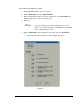
24. Click on Done to accept the results.
> The Teach Window closes and you return to the Setup dialog box. Notice that
the box next to number 3 now has an X in it to indicate that Step 3 has been
completed.
25. Click on Run next to 4. Teach Safe Z.
> A Teach Window opens.
26. Activate the Z-axis controls.
27. Raise or lower the dispensing head to a Safe Z Height.
> Safe Z Height is determined by choosing a height that ensures that the needle
or any other part of the dispensing head does not come in contact with any
obstacles while traveling anywhere around the dispensing area.
28. Click on Teach.
29. Click on Done.
> The Teach Window closes and you return to the Setup dialog box. Notice that
the box next to number 4 now has an X in it to indicate that Step 4 has been
completed.
30. Click on Run next to 5. Calculate the needle-to-camera XY offset.
> A Teach Window opens.
> During this step of the procedure, you will dispense four dots onto a sample
substrate, then align the needle to the dots.
> You do not actually have to dispense fluid during this procedure. You can
simulate four dots in the shape of a square on a piece of paper.
31. Place a sample substrate, or a piece of paper with four dots in the shape of a
square, in the indented square on top of the Needle Sensor.
> If you have a NSZ Series Needle Sensor, there should be a simulated
substrate already present on top of the Needle Sensor.
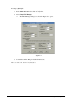
32. Select a Dot Style in the bottom of the Teach Window.
33. Click on Next.