
User guide

6-20 Setup and Configuration
6. Click on Run next to 1. Teach Purge Location.
The dispensing head will move after your response.
> The dispensing head Finds Home, then moves to the Purge Station location. A
Teach Window opens.
7. Use the Position Controls to align the needle tip to the purge boot opening at the
Purge Station.
8. Activate the Z-axis controls and lower the needle tip into the purge boot.
9. Click on Teach.
10. Click on Done.
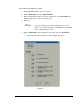
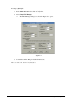
> The Teach Window closes and you return to the Setup dialog box. Notice that
the box next to number 1 now has an X in it to indicate that Step 1 has been
completed.
11. Click on Run next to 2. Teach Scale Location.
The dispensing head will move after your response.
> The dispensing head moves to the Weigh Station location. A Teach Window
opens.
12. Use the Position Controls to align the needle tip to the opening in the Weigh Station
lid.
13. Activate the Z-axis controls and lower the needle tip into the opening.
14. Click on Teach.
15. Click on Done.
> The Teach Window closes and you return to the Setup dialog box. Notice that
the box next to number 2 now has an X in it to indicate that Step 2 has been
completed.
16. Click on Run next to 3. Calculate the needle-to-Height Sensor Z offset or 3. Calculate
Valve2 to Valve1 Z Offset, depending on your setup. This calculation accounts for the
following possible pump/Height Sensor configurations:
Single pump with Height Sensor
Dual pumps with Height Sensor (you will be prompted to perform this routine
twice, once for each pump)
Single pump without Height Sensor (do not perform this routine; skip to Step 25)
> Once you have clicked on Run, a Teach Window opens. The dispensing head
moves to a Safe Z Height. The Height Sensor probe drops.