
User guide

Beginning Programming 8-27
> This will be where you will place your pattern.
37. Click on Teach.
38. Use the Position Controls to center the camera crosshairs on the ULHC of the
adjacent Flip Chip 2.
> The pattern will also be placed at this location.
39. Click on Teach.
40. Click on Done.
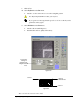
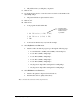
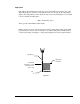
> Your program should look like this:
1 DO: FCLine1 at (0.348, 0.429)
2 DO: FCLine at (0.546, 0.356)
3 END
> Your location numbers may vary from this example.
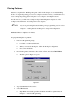
41. Select Dry Run from the Run menu.
> Watch to make sure that the program goes through the following steps:
• Locate Fiducials 1 (ULHC) and 2 (LRHC) of the Workpiece.
• Locate Fid 1 (ULHC) of Flip Chip 1.
• Locate Fid 2 (LRHC) of Flip Chip 1.
• Locate Fid 1 (ULHC) of Flip Chip 2.
• Locate Fid 2 (LRHC) of Flip Chip 2.
• Dry dispense L-shaped line starting at Fid 1 on Flip Chip 1.
• Dry dispense L-shaped line starting at Fid 1 on Flip Chip 2.
42. Select Wet Run from the Run menu.
> Watch as the pattern is dispensed in both locations.
> Examine the board for quality and accuracy.
This concludes the tutorial on Placing Patterns.
Function call to
dispense the line
FCLine1 at this
x,y location