
User guide

Beginning Programming 8-15
To program dots:
1. Perform the Programming Setup in Chapter 6 - Setup and Configuration.
> Load Side 1 of the Tutorial Board.
> When you create the Workpiece, define the Workpiece Alignment.
> Choose No Fiducials.
2. Click on Dispensing Elements from the Program Commands toolbar.
3. Select Dot from the Dispensing Elements toolbar.
4. Use the Position Controls to move the crosshairs to the center of the dot in the
ULHC of the first Dots Square on the Tutorial Board.
5. Click on Teach.
6. Use the Position Controls to move the crosshairs to the center of the dot in the
URHC of the first Dots Square on the Tutorial Board.
7. Click on Teach.
8. Use the Position Controls to move the crosshairs to the center of the dot in the
center of the first Dots Square on the Tutorial Board.
9. Click on Teach.
10. For the remaining 2 dots in the square, choose Type 2 in the Dot Style text box in
the area below the video display, then teach the location of the two dots in the
LRHC and LLHC of the first Dots Square on the Tutorial Board.
11. Click on Done when you have defined each dot.
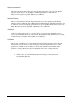
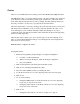
> Your program should look like this (your numbers may vary):
1 DOT: 1, (10.704, 10.064)
2 DOT: 1, (10, 691, 9.301)
3 DOT: 1, (11.439, 9.296)
4 DOT: 2, (11.449, 10.059)
5 DOT: 2, (11.449, 11.224)
END
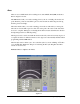
Dot Style
X,Y coordinates
of the dot on the
workpiece