WL500g / WL500g Deluxe Wireless Router (For 802.11g/b Wireless Clients) WL500b Wireless Router (For 802.
Copyright Information No part of this manual, including the products and software described in it, may be reproduced, transmitted, transcribed, stored in a retrieval system, or translated into any language in any form or by any means, except documentation kept by the purchaser for backup purposes, without the express written permission of ASUSTeK COMPUTER INC. (“ASUS”).
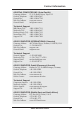
Contact Information ASUSTeK COMPUTER INC. (Asia-Pacific) Company Address: 15 Li-Te Road, Peitou, Taipei 112 General Telephone: +886-2-2894-3447 General Fax: +886-2-2894-7798 Web Site Address: www.asus.com.tw General Email: info@asus.com.
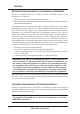
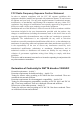
Notices Federal Communications Commission Statement This device complies with Part 15 of the FCC Rules. Operation is subject to the following two conditions: • • This device may not cause harmful interference, and This device must accept any interference received, including interference that may cause undesired operation. This equipment has been tested and found to comply with the limits for a class B digital device, pursuant to Part 15 of the Federal Communications Commission (FCC) rules.
Notices FCC Radio Frequency Exposure Caution Statement In order to maintain compliance with the FCC RF exposure guidelines, this equipment should be installed and operated with minimum distance 20 cm between the radiator and your body. Use only with supplied antenna. Unauthorized antenna, modification, or attachments could damage the transmitter and may violate FCC regulations.
Table of Contents 1. Introduction .......................................................................................... 9 Overview ................................................................................................ 9 System Requirements ........................................................................... 9 Features .............................................................................................. 10 The Product Package ....................................................
Table of Contents Static Route .................................................................................... 49 Miscellaneous ................................................................................. 50 NAT Setting ......................................................................................... 52 Port Trigger ..................................................................................... 52 Virtual Server ........................................................................
Table of Contents Setup Printer Wizard ........................................................................... 81 Installing the Printer Driver .............................................................. 81 Setup for LPR client under Windows XP ............................................. 84 Printer Setup Wizard ....................................................................... 86 Verifying Your Printer ...................................................................... 87 4.
1. Introduction Chapter 1 - Introduction 1. Introduction Overview Thank you for purchasing the ASUS Wireless Router. The ASUS Wireless Router, WL500g/WL500g Deluxe, complies with IEEE 802.11g and 802.11b standards. The ASUS 802.11b Wireless Router, WL500b, complies with IEEE 802.11b standards. The 802.11g is as extension to 802.11b (used in majority of wireless LANs today) that broadens 802.11b’s data rates to 54 Mbps within the 2.
Chapter 1 - Introduction 1. Introduction The Product Package The WL500g/WL500g Deluxe Wireless Router comes with: • • • • • One ASUS 802.11g Wireless Router One ASUS Wireless Router Quick Start Guide One power adapter (5 Volts DC) One support CD (utilities and user’s manual) One RJ-45 Ethernet cable (straight-through) The WL500b Wireless Router comes with: • • • • • One ASUS 802.
Chapter 1 - Introduction • • • • • • Broadband port. The Broadband port connects the Wireless Router to your cable/DSL modem. Static IP, dynamically IP and PPPoE (PPP over Ethernet) connection to Internet are supported. Shared Internet access. All computers on the local network can access the Internet through the Wireless Router, using only a single external IP address. Firewall protection.
Chapter 1 - Introduction 1. Introduction The ASUS Wireless Family The ASUS Wireless family contains a several wireless network solutions for 802.11g & 802.11b wireless local area networks in the home or office. Access Point or Client The ASUS WLAN 802.11g Access Point (WL-300g) creates a wireless network using the IEEE 802.11g and 802.11b wireless standards. The ASUS 3 in 1 Pocket Access Point (WL-330g) creates a wireless network using the IEEE 802.11g/b wireless standards.
1. Introduction Chapter 1 - Introduction PCI Client The ASUS WLAN PCI Card (WL138g) is a wireless LAN adapter that fits into a standard PCI slot in a desktop PC and creates a wireless network using the IEEE 802.11g/b wireless standards. USB Access Point or Client USB Client The ASUS USB Wireless LAN Adapter (WL-160g) creates a wireless network using the IEEE 802.11g/b wireless standards and connects to any computer using USB2.0 connectivity. 802 .
Chapter 1 - Introduction 1. Introduction Network Topology The settings that you need to perform will vary depending on the role that your ASUS Wireless Router will play. Network Backbone No software setting is necessary in the ASUS Wireless Router. Wireless ASUS Wireless Router LAN Wireless Client Wireless Client Wired Client In this topology, the wireless router connects your wired and wireless devices together to form a local area network (LAN), as shown.
Chapter 1 - Introduction Internet Service Provider 1. Introduction Agent to an ISP Internet Wireless ADSL or Cable Modem ASUS Wireless Router WAN LAN Wireless Client Wireless Client Wired Client In this topology, the wireless router is not only a backbone of your LAN but also an agent to your Internet Service Provider (ISP). You may use an ADSL or Cable modem to communicate with your ISP.
Chapter 1 - Introduction 1. Introduction Agent to Another Network Wireless Network Backbone WAN ASUS Wireless Router LAN Wireless Client Wireless Client Wired Client In this topology, the wireless router is an agent between your LAN and another network. Use a network cable with one end connected to the WAN port on the wireless router and the other to the other network as shown above.
Chapter 1 - Introduction 1. Introduction LED Indicators The LEDs on the front of the ASUS Wireless Router display the status of the ASUS Wireless Router.
Chapter 2 - Installation 2. Installation Procedure Follow these steps to install the ASUS Wireless Router. 2. Installation 1. Determine the best location for the ASUS Wireless Router. Keep in mind the following considerations: • The length of the Ethernet cable that connects the ASUS Wireless Router to the network must not exceed 100 meters.
Chapter 2 - Installation 2. Installation Warning: Use the ASUS Wireless Router only with the power adapter supplied in the product package. Using another power supply may damage the ASUS Wireless Router. 6. 7. Printer Connection: Connect a printer to the Wireless Router printer port (WL500g/WL500b only) or USB port to use the router as a printing server for your local network. USB Connection: Connect a supported USB web camera or USB storage device to the Wireless Router USB port.
Chapter 2 - Installation Wall Mounting Option Out of the box, the ASUS Wireless Router is designed to sit on a raised flat surface like a file cabinet or book shelf. The unit may also be converted for mounting to a wall or ceiling. Follow these steps to mount the ASUS Wireless Router to a wall: 2. Installation 1. 2. 3. 4. Look on the underside for the four mounting hooks. Mark two upper holes in a flat surface using the provided hole template. Tighten two screws until only 1/4” is showing.
Chapter 2 - Installation Vertical Standing Option 2. Installation The ASUS Wireless Router can also stand on its side to save space. Two hinges can be opened on the right side to support vertical standing. Orientate the antenna so that it points upwards.
Chapter 2 - Installation Connecting to the ASUS Wireless Router 2. Installation Wired Connection One RJ-45 cable is supplied with the ASUS Wireless Router. Auto crossover function is designed into the ASUS Wireless Router so you can use either a straight-through or a crossover Ethernet cable. Plug one end of the cable into the WAN port on the rear of the ASUS Wireless Router and the other end into the Ethernet port of your ADSL or Cable modem.
Chapter 3 - Software Configuration 3. Software Configuration Configuring the ASUS Wireless Router 3. Utilities The ASUS Wireless Router can be configured to meet various usage scenarios. Some of the factory default settings may suit your usage; however, others may need changing. Prior to using the ASUS Wireless Router, you must check the basic settings to guarantee it will work in your environment. Configuring the ASUS Wireless Router is done through a web browser.
Chapter 3 - Software Configuration Setting IP Manually If you want to set your IP address manually, the following default settings of the ASUS Wireless Router should be known: • IP address 192.168.1.1 • Subnet Mask 255.255.255.0. If you set your computer ’s IP manually, it needs to be on the same segment. For example: • 3. Utilities • • • 24 IP address 192.168.1.xxx (xxx can be any number between 2 and 254 that is not used by another device) Subnet Mask 255.255.255.
Chapter 3 - Software Configuration Installing the ASUS Wireless Router Utilities (1) Select a language and click Install ASUS Wireless Router Utilities. (2) Click Next after reading the welcome screen. (3) Click Yes after reading the license agreement. (4) Click Next to accept the default destination folder or enter another. (5) Click Next to accept the default program folder or enter another. (6) Click Finish when setup is complete. ASUS Wireless Router 3.
Chapter 3 - Software Configuration Using the Wireless Router for the First Time 1. ASUS Wireless Router Utilities Run Device Discovery from “ASUS Utility” in Windows Start Programs. 3. Utilities 2. Connect to the ASUS WLAN Web Manager Run the ASUS WLAN Device Discovery from the Start menu and click Config when the device is found. Microsoft® Internet Explorer Add 192.168.1.1 in the Exceptions box if you are using a proxy server (Microsoft® Internet Explorer).
Chapter 3 - Software Configuration Enter Address or Name Manually You can also open your PC’s web browser and enter the name or the default IP address of the ASUS Wireless Router: WL500g http://my.router or http://my.WL500g or http://192.168.1.1 WL500g Deluxe http://my.router or http://my.WL500gx or http://192.168.1.1 User Name & Password 3. Utilities Once connected, a window will ask for the User name and Password in order to log in. The factory default values are “admin” and “admin”.
Chapter 3 - Software Configuration WL500b IMPORTANT: After entering information on any page, click the . If you click any other link, you will be di“Apply” button rected to another page and lose your new settings. 3. Utilities 3. Set your own password 4.
Chapter 3 - Software Configuration Home Gateway Mode There are three operation modes in the ASUS Wireless Router. The default operation mode of the ASUS Wireless Router is Home Gateway Mode. Please refer to “System Setup” – “Operation Mode” in detail. To start quick setup, click Next to enter the “Quick Setup” page. Follow the instructions to setup the ASUS Wireless Router. 3. Utilities Quick Setup in Home Gateway Mode Select your time zone or the closest region. Click Next to continue.
Chapter 3 - Software Configuration Home Gateway Mode (Cont.) To set up your wireless interface, you must first give it an SSID (Service Set Identifier). The SSID is a unique identifier attached to packets sent over WLANs. This identifier emulates a password when a wireless device attempts communication on the WLAN. Because an SSID distinguishes WLANs from each other, access points and wireless devices trying to connect to a WLAN must use the same SSID. 3.
Chapter 3 - Software Configuration To adjust other settings, click an item on the menu to reveal a submenu and follow the instructions to setup the ASUS Wireless Router. Tips are given when you move your cursor over each item. The following have submenu items: Wireless IP Config NAT Setting Internet Firewall USB Application System Setup Status & Log ASUS Wireless Router 3.
Chapter 3 - Software Configuration Wireless Click an item on the menu to reveal a submenu. Follow the instructions to set up the ASUS Wireless Router. Tips are displayed when you move your cursor over an item. Interface WL500b WL500g/WL500g Deluxe 3. Utilities SSID The SSID is an identification string of up to 32 ASCII characters that differentiate one ASUS Wireless Router AP or Access Point from other manufacturers. The SSID is also referred to as the “ESSID” or “Extended Service Set ID.
Chapter 3 - Software Configuration Wireless (Cont.) Channel The 802.11g and 802.11b specifications supports up to 14 overlapping channels for radio communication. To minimize interference, configure each ASUS 802.11g AP to be non-overlapping; select Auto from the Channel drop-down list to enable the system to select a clear channel during boot up as your operating channel.
Chapter 3 - Software Configuration Wireless (Cont.) Authentication Method 3.
Chapter 3 - Software Configuration Wireless (Cont.) 64-bit WEP Encryption 64-bit WEP and 40-bit WEP are the same encryption method and can interoperate in a wireless network. This level of WEP encryption uses a 40-bit (10 Hex character) encryption scheme as a secret key, which is set by the user, and a 24-bit “Initialization Vector” scheme, which is not under user control. Together these two schemes make a 64-bit (40 + 24) encryption scheme.
Chapter 3 - Software Configuration Wireless (Cont.) WEP Key You can set a maximum of four WEP keys. A WEP key is either 10 or 26 hexadecimal digits (0~9, a~f, and A~F) based on whether you select 64bits or 128bits in the WEP pull-down menu. The ASUS Wireless Router and ALL of its wireless clients MUST have at least the same default key. 3. Utilities Key Index The Default Key field lets you specify which of the four encryption keys you use to transmit data on your wireless LAN.
Chapter 3 - Software Configuration Wireless Click an item on the menu to reveal a submenu. Follow the instructions to set up the ASUS Wireless Router. Tips are displayed when you move your cursor over an item. Bridge/Access Control List WDS Only (WL500g/WL500g Deluxe) 3. Utilities AP Only Hybrid Wireless bridge (also known as Wireless Distribution System or WDS) allows you to connect to one or many Access Points.
Chapter 3 - Software Configuration Wireless (Cont.) AP Mode AP (Access Point) Mode configures the ASUS Wireless Router for a specific application. By default, the ASUS Wireless Router is configured as an Access Point which enables wireless mobile clients to connect wirelessly to a wired Ethernet network. The following options are available from the drop-down list: AP Only: the ASUS Wireless Router acts only as an Access Point.
Chapter 3 - Software Configuration Wireless (Cont.) MAC Address Enter the MAC address of the target ASUS Wireless Router in order to designate which ASUS Wireless Router will be the partner for this ASUS Wireless Router. 3. Utilities You can setup your wireless environment as shown in this figure: Note: The content in braces “( )” is the MAC address in the Remote Bridge List of the AP. For example, WB1 have the MAC address of WB in its Remote Bridge List.
Chapter 3 - Software Configuration Wireless Click an item on the menu to reveal a submenu. Follow the instructions to set up the ASUS Wireless Router. Tips are displayed when you move your cursor over an item. Access Control Pull down menu items: Disable (no info required) Accept (need to input information) Reject (need to input information) 3.
Chapter 3 - Software Configuration Wireless Click an item on the menu to reveal a submenu. Follow the instructions to set up the ASUS Wireless Router. Tips are displayed when you move your cursor over an item. Radius Setting (WL500g/WL500g Deluxe) 3. Utilities This section enables you to set up additional parameters for connection with a RADIUS Server. Values are required for this page when the Authentication Method field in the Wireless - Interface screen are set as “WPA” or “Radius with 802.1x”.
Chapter 3 - Software Configuration Wireless Click an item on the menu to reveal a submenu. Follow the instructions to set up the ASUS Wireless Router. Tips are displayed when you move your cursor over an item. Advanced This section allows you to set up additional parameters for the wireless router function. We recommend that you use the default values for all items in this window. 3.
Chapter 3 - Software Configuration Wireless (Cont.) Basic Rate Set (WL500g/WL500g Deluxe) - This field indicates the basic rates that wireless clients must support. Use “1 & 2 Mbps” only when backward compatibility is needed for some older wireless LAN cards with a maximum bit rate of 2Mbps. Fragmentation Threshold (256-2346) – Fragmentation is used to divide 802.11 frames into smaller pieces (fragments) that are sent separately to the destination.