® ASUS WLAN Card WL-100gE (For 802.11g & 802.
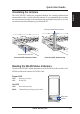
Quick Start Guide Installation Procedures English Important: Install the WLAN card utilities before inserting the WLAN Card into your computer. Follow these two easy steps before using the WLAN card. 1. Install the WLAN card utilities and driver from the support CD. 2. Insert the WLAN card into your computer. Installing the WLAN utilities and driver Follow these instructions to install the WLAN card utilities and driver. Insert the support CD and an autorun menu will appear.
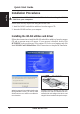
Quick Start Guide Orientating the Antenna English The ASUS WLAN Card has two integrated antennas, one external omnidirectional antenna and the other is a built-in diversity antenna. It is recommended that you adjust the external antenna straight up for maximum range and higher link quality. Lower the external antenna when transporting your Notebook PC.
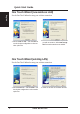
Quick Start Guide One Touch Wizard (new wireless LAN) English Use the One Touch Wizard to setup your wireless connection. 1. Select Create a new... and click Next to use the simplest configuration or select another option first. 2. Enter the SSID name of the access point that you wish to connect to. Select Data encryption if secured connections are enabled. One Touch Wizard (existing LAN) Use the One Touch Wizard to setup your wireless connection. 1. Select Connect to...
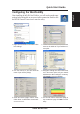
Quick Start Guide Configuring the WLAN utility 1. Right-click the WLAN icon and select “Wireless Settings” 2. Set the Network Name (SSID) to the same name as the SSID set in your wireless access point. 3. Use “Site Survey” if you don’t know the name of your access point(s). 4. Encryption settings must also match those set in the access point. Ask your network administrator about settings if necessary. Click Apply to save your settings 5. Check the “Status” page to see the “Association State”.
Quick Start Guide Soft AP (Windows XP Only) English Soft AP mode allows the WLAN card to act as a virtual access point. The computer needs to be connected to a wired network using an Ethernet connection in order to provide network access to WLAN clients. 1. Select Soft AP Mode 2. Drag and drop a wired network connection next to the globe icon. 3. Enable ICS* and Firewall if desired. Refer to Windows help for information on “Internet Connection Sharing”. 4.
Quick Start Guide Windows XP Wireless Options English The wireless options shown below is only available for Windows XP. The first time you run the Control Center utility, it will automatically show. Select one of the radio buttons to decide which interface to use with your WLAN Card. Only use XP wireless function – Only use “Windows XP” wireless network settings to configure the WLAN Card. Only use utilities and disable XP wireless function – Only use “WLAN Card utilities” to configure the WLAN Card.
Quick Start Guide Using the Control Center Taskbar English The Control Center Taskbar menu display the following information: • The link quality of the WLAN Card (Excellent, Good, Fair, Poor, Not Linked) • Whether the WLAN Card is connected to the Internet (Blue: Connected, Gray: Not Connected) Taskbar Icon and Status (Station mode) Taskbar Icon and Status (Access Point mode) Wireless Status Icons (on the taskbar) Excellent link quality and connected to Internet (Infrastructure) Good link quality and co
Quick Start Guide Taskbar Icon - Right Menu • • • • • • • English Right-clicking the taskbar icon shows the following menu items: Wireless Settings – Launches Wireless Settings application. Activate Configuration – Allows you to set which profile to use. Mobile Manager – Launches Mobile Manager application. Site Monitor – Launches the Site Monitor application. Change Mode (Windows XP Only) - Configures your card in Station (STA) or Soft Access Point (Soft AP) mode.
Quick Start Guide Wireless Settings Utility English Wireless Settings is an application that allows you to control your WLAN Card. Use Wireless Settings to View or Modify the configuration settings and monitor the operational status of your PC Card. Once Wireless Settings is launched, you can see the tabbed property sheet. This property sheet is composed of tabbed “pages”, each with its own group of feature-specific settings.
Quick Start Guide Association State English Displays the connection status as follows: Connected - The station is now associated with one wireless LAN device. When operating in Infrastructure mode, this field shows the MAC address of the Access Point with which you are communicating. When operating in Ad Hoc* mode, this field shows the virtual MAC address used by computers participating in the Ad Hoc* network. Scanning...
Quick Start Guide Save as Profile English Later, when you make individual settings, you may want to use profiles to save your settings. Profiles will help you combine all your settings for work, home, roaming, and other locations so that you do not have to repeat individual settings. When you travel from work to home, for example, choose a “home” profile that contains all your settings for home use. When you travel back to work, choose an “office” profile.
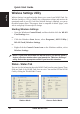
Quick Start Guide Status - IP Config English IP Config tab shows all the current network configuration information for the WLAN Card. Use it to verify your network settings. IP CONFIG will display all the current TCP/IP configuration values including the IP address, subnet mask, default gateway and Windows Internet Naming Service (WINS) and DNS configuration. Button IP Release - Clicking this button will attempt to release the DHCP IP address for the WLAN Card in case you wish to remove your IP address.
Quick Start Guide Network Name (SSID) English Use the SSID field to configure the SSID for the WLAN Card. You can enter a new SSID or select one from the drop-down list box. SSID stands for “Service Set Identifier”, which is a string used to identify a wireless LAN. You will only be able to connect Access Points which has the same SSID as the one you set. Use different SSIDs to segment the wireless LAN and increase security.
Quick Start Guide Config - Encryption English Lets you configure the Wireless LAN Card encryption settings. For data confidentiality in a wireless environment, IEEE 802.11 specifies a Wired Equivalent Privacy (WEP) algorithm to offer transmission privacy similar to wired network. The WEP uses keys to encrypt transmit data packets and decrypt received data packets. The encryption process can scramble frame bits to avoid disclosure to others.
Quick Start Guide English WPA - The network is operating in IEEE 802.1x authentication mode. This mode is environments with a RADIUS (Remote Access Dial-in User Service) infrastructure. In a RADIUS environment, various Extensible Authentication Protocol (EAP) are supported, including PEAP, TLS/Smart Card, TTLS, and LEAP. Data encryption For open and shared authentication mode, the selection of encryption type are Disable and WEP.
Quick Start Guide English Two ways to assign WEP keys 1. Manual Assignment - When you click this button, the cursor appears in the field for Key 1. For 64-bit encryption, you are required to enter four WEP Keys. Each Key contains exactly 10 hex digits (0~9, a~f, and A~F). For 128-bit encryption, you are required to enter four WEP Keys. Each Key contains exactly 26 hex digits (0~9, a~f, and A~F). 2.
Quick Start Guide English sent separately to the destination. Enable fragmentation by setting a specific packet size threshold. If there is an excessive number of collisions on the WLAN, experiment with different fragmentation values to increase the reliability of frame transmissions. The default value (2346) is recommended for normal use. Preamble Mode This parameter is used to control whether frames will transmit with the Long or Short Preamble. The default value is Long Tx Preamble.
Quick Start Guide Survey - Site Survey • • • • • English Use the Site Survey tab to view statistics on the wireless networks available to the WLAN Card. The Site Survey tab is readonly with no user configurable data fields. Use the Site Survey tab to view the following network parameters. SSID: View the SSID (service set identification) of the available networks. CH: View the direct-sequence channel used by each network.
Quick Start Guide Ping English The Ping tab allows you to verify the connection of your computer with another computer in a network. To ping a connection: 1. Type the IP address of the connection you want to verify in the IP Address field. 2. Configure the ping session by assigning the size and count of packet to send, and the time limit for a ping session to continue (in milliseconds). 3. Click the Ping button. During the ping session, the Ping button toggles into a Stop button.
Quick Start Guide English Ad Hoc The Wireless LAN card when set to Ad Hoc mode can connect to other wireless device(s) in a wireless network called an Ad Hoc network. To connect the Wireless LAN card to another wireless device: 1. Launch the Wireless Settings utility by double-clicking the Control Center icon in the Windows® taskbar. 2. Click the Survey button to scan available wireless device(s) within the Wireless LAN card’s range. Select the wireless device you wish to connect.
Quick Start Guide English 5. Click the Status button to verify if the Wireless LAN card is connected to the device. If connection is established, the Association State field shows “Connected - XX:XX:XX:XX:XX:XX” 22 6. Click the Connection tab to display the connection strength and link quality between the Wireless LAN card and the wireless device.
Appendix FCC Requirements This device complies with Part 15 of the FCC Rules. Operation is subject to the following two conditions: (1) this device may not cause harmful interference, and (2) this device must accept any interference received, including interference that may cause undesired operation.. This equipment has been tested and found to comply with the limits for a class B digital device, pursuant to part 15 of the FCC Rules.
Appendix Declaration of Conformity for R&TTE directive 1999/5/EC Essential requirements – Article 3 Protection requirements for health and safety – Article 3.1a Testing for electric safety according to EN 60950-1 has been conducted. These are considered relevant and sufficient. Protection requirements for electromagnetic compatibility – Article 3.1b Testing for electromagnetic compatibility according to EN 301 489-1 and EN 301 489-17 has been conducted. These are considered relevant and sufficient.