
User's Manual

2-2
Chapter 2: Card installation
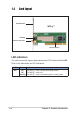
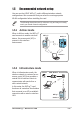
Follow these instructions to install the WiFi-g™ card in your system.
1. Remove the computer cover (if your motherboard is already installed in
a chassis).
2. Remove the bracket opposite the PCI slot that you intend to use.
Keep the screw for later use.
3. Align the WiFi-g™ card connector with the slot and press firmly until
the card is completely seated on the slot.
4. Secure the card to the chassis with the screw you removed earlier.
5. Replace the computer cover, then connect the power plug.
6. Connect the omni-directional antenna twist-on connector to the
antenna connector (male) of the WiFi-g™ card.
7. Turn on the computer.
2.1.2 Installing the card
2.1 Card installation
2.1.1 System requirements
Before installing the WiFi-g™ card, make sure that your system meets the
following requirements.
• ASUS motherboard*
• PCI slot
• Intel
®
Pentium™ 4 or AMD Duron; Athlon™XP/64/64FX; Opteron™ system
• Minimum 64MB system memory
• Operating system
Station mode
: Windows
®
2000/XP/Server 2003
AP/wireless bridge mode
: Windows
®
XP/Server 2003; Linux
• Optical drive for utilities and driver installation
*Visit the ASUS website for an updated list of motherboards that
support the WiFi-g™ card.
Before handling the card, touch a bare metal portion of your PC to
discharge static electricity from your body. Wear a wrist strap grounded
to the PC chassis when handling the card.