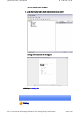
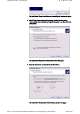
Quick Start Guide - Introduction 第 64 頁,共 160 頁 The [Fax Console] window will appear. 3. In the [Fax Console] window, double -click on the fax that has arrived An image of the received fax will be displayed. Related topic: " Sending a fax" Printing file://C:\Documents and Settings\anitachou\Local Settings\Temp\~hh3F24.
Quick Start Guide - Introduction 第 65 頁,共 160 頁 This section describes how to use a Bluetooth -compatible printer for printing. Types of printer functions When printing using Bluetooth, the methods for configuring and using the printer will vary with the corresponding profile. Profile Bluetooth Settings Operation SPP You must register the printer in Bluetooth Settings Allows you to print from various applications, as with ordinary cable-connected printers.
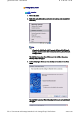
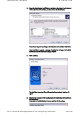
Quick Start Guide - Introduction 第 66 頁,共 160 頁 Setting up the printer Procedure 1. Turn on the printer 2. Right-click on the Bluetooth icon in the task tray, and then click on [Add New Connection] Note { Alternatively, click [Start] →[All Programs]→[Bluetooth]→[Bluetooth Settings], and then click on [New Connection] from the active [Bluetooth Settings] window. The [Add New Connection Wizard (Welcome to the Add New Connection Wizard)] window will appear. 3.
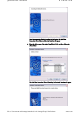
Quick Start Guide - Introduction 第 67 頁,共 160 頁 Once the program has finished searching for the devices, the [Add New Connection Wizard (Device Selection)] window will appear. 4. Select the device name of the printer from [Device List], and then click on the [Next] button The [Add New Connection Wizard (Searching for Services)] window will appear. file://C:\Documents and Settings\anitachou\Local Settings\Temp\~hh3F24.
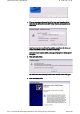
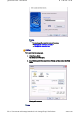
Quick Start Guide - Introduction 第 68 頁,共 160 頁 5. If you are connecting to the printer for the first time, enter the passkey for the device from the [Bluetooth Passkey (PIN Code)] window, and then click on the [OK] button. Once the services have been detected successfully, connection to the device and creation of the HCRP port will be performed automatically. If you have not yet installed a printer, a message prompting you to install a printer will appear. 6.
Quick Start Guide - Introduction 第 69 頁,共 160 頁 The [Add Printer Wizard (Local Printer or Network Printer)] window will appear. 8. Select "Local printer attached to this computer", remove the check next to "Automatically detect and install my Plug and Play printer", and then click on the [Next] button The [Add Printer Wizard (Select Printer Port)] window will appear. 9. Select the desired port, and then click on the [Next] button The [Add Printer Wizard (Install Printer Software)] window will appear.
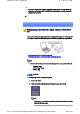
Quick Start Guide - Introduction 第 70 頁,共 160 頁 10. Select the [Manufacturer] and [Printer] as pertains to the printer to be installed, or click on the [Use Device] button, and then click on the [Next] button Please install the printer according to the instructions in the windows that follow. Once installation is complete, a message of confirmation will appear in the [Add New Connection Wizard (Printer Settings)] window. 11.
Quick Start Guide - Introduction 第 71 頁,共 160 頁 Note { You can change the connection icon and icon name. →"Changing the connection icon name " →"Changing the connection icon " Printing Try to print from the message pad. 1. Click [File]→[Print] The [Print] screen will appear. 2. Select wireless printer from under [Select Printer], and then click on the [Print] button Printing will commence. Note file://C:\Documents and Settings\anitachou\Local Settings\Temp\~hh3F24.
Quick Start Guide - Introduction 第 72 頁,共 160 頁 z If you have connected to a printer using HCRP or SPP profiles, all future Bluetooth connections to that printer will be established automatically once you have printed a document from your PC. Printing images directly from a digital camera or other device [BIP] If you have a printer that supports BIP (Basic Imaging Profile), you can send images dire to a printer to be printed out, without having to perform any special set -up procedure.
Quick Start Guide - Introduction 第 73 頁,共 160 頁 The [Bluetooth Information Exchanger] window will appear. 3. Double-click on the [Image Transfer] icon A list of devices will appear in the [Image Transfer] window. Note { If your desired printer does not appear in the list, please confirm that the pr has been turned on, and then click on [Bluetooth] →[Search Devices] A device search will be performed. 4. Drag and drop the file to be sent on top of the icon of the destination printer file://C:\Documents
Quick Start Guide - Introduction 第 74 頁,共 160 頁 The file will be sent to the printer. If the file has been sent to the printer successfully, the message below will appea the image will be printed out. Please click on the [OK] button. The message below will appear if the file transmission was unsuccessful. Please on the [OK] button to close the message, and repeat the printing procedure.
Quick Start Guide - Introduction 第 75 頁,共 160 頁 1. Turn on the printer 2. Right-click on the file to be sent, and then click on the destination printer under [ Bluetooth] Note { If your desired device does not appear in the list, please confirm that the de has been turned on, and then click on [to Bluetooth] →[Search Other Devi Once the device has been detected, the message below will appear. Please s the destination device, and click on the [Send] button. file://C:\Documents and Settings\anitachou\Lo
Quick Start Guide - Introduction 第 76 頁,共 160 頁 A window indicating that the file is being sent to the printer will appear. If the file has been sent to the printer successfully, the message below will appea the image will be printed out. Please click on the [OK] button. The message below will appear if the file transmission was unsuccessful. Please on the [OK] button to close the message, and repeat the printing procedure.
Quick Start Guide - Introduction 第 77 頁,共 160 頁 →Printing business card data (using icons) →Printing business card data (by right -clicking the mouse) Procedure ■Printing business card data (using icons) 1. Turn on the printer 2. Click on the Bluetooth Information Exchanger icon on the Desktop Note { Alternatively, open Explorer and click on the Bluetooth Information Exch folder for the same result. The [Bluetooth Information Exchanger] window will appear. 3.
Quick Start Guide - Introduction 第 78 頁,共 160 頁 Here, the image will be sent to the target printer. Note { If your desired printer does not appear in the list, please confirm that the pr has been turned on, and then click on [Bluetooth] →[Search Devices] A device search will be performed. 4. Drag and drop the business card data to be sent on top of the icon of the destinati printer file://C:\Documents and Settings\anitachou\Local Settings\Temp\~hh3F24.
Quick Start Guide - Introduction 第 79 頁,共 160 頁 The business card will be sent to the printer. If the business card has been sent to the printer successfully, the message below w appear, and the image will be printed out. Please click on the [OK] button. The message below will appear if the business card transmission was unsuccessfu Please click on the [OK] button to close the message, and repeat the printing procedure. ■Printing business card data (by right -clicking the mouse) 1.
Quick Start Guide - Introduction 第 80 頁,共 160 頁 , [ ] The business card will be sent to the printer. If the business card has been sent to the printer successfully, the message below w appear, and the image will be printed out. Please click on the [OK] button. The message below will appear if the business card transmission was unsuccessfu Please click on the [OK] button to close the message, and repeat the printing procedure.
Quick Start Guide - Introduction 第 81 頁,共 160 頁 →Configuring the stereo headphones →Connecting to the stereo headphones →Listening to music or other audio files →Playing music using remote control →Copyright protection function Configuring the stereo headphones Procedure 1. Right-click on the Bluetooth icon in the task tray, and click on [Add New Connection].
Quick Start Guide - Introduction 第 82 頁,共 160 頁 The [Add New Connection Wizard (Searching for Bluetooth Devices)] screen wi appear. Once the search for the devices has ended, the [Add New Connection Wizard (Se Device)] screen will appear. 4. Select the device name of the stereo headphones from the list, and click on the [N button file://C:\Documents and Settings\anitachou\Local Settings\Temp\~hh3F24.
Quick Start Guide - Introduction 第 83 頁,共 160 頁 The [Add New Connection Wizard (Searching for Services)] screen will appear. 5. Configure the type and name of the icon to appear once registration is complete, click on the [Next] button Please click the [Next] button once you are satisfied with the configuration. The [Add New Connection Wizard (Configure Connection Name)] screen will appear. 6.
Quick Start Guide - Introduction 第 84 頁,共 160 頁 1. Playing music or other audio files on your PC Important { Please confirm the points below if you are unable to hear anything despite having properly connected the stereo headphones. Click [Start]→[All Programs]→[Accessories]→[Entertainment]→[Volum Control]. { { { Remove the tick next to [Mute] if it has been ticked. If the volume is at its lowest setting, please adjust it to an appropriate level.
Quick Start Guide - Introduction 第 85 頁,共 160 頁 Music/video playback applications e-Conferencing applications Voice-recognition applications Please completely disconnect the stereo headphones before launching any o these applications. Please refer to the user guide for information on terminating a connection f the stereo headphones. Playing music using remote control Music applications and video playback applications installed on your PC (e.g.
Quick Start Guide - Introduction 第 86 頁,共 160 頁 [Windows Media Player 9] z z z z z z z Play Stop Pause Next Previous Fast forward Rewind [InterVideo WinDVD] z z z z z z z z z z z z z z Play Stop Pause Next chapter Previous chapter Fast Forward Fast Backward Up Down Left Right Select Root menu Angle Copyright protection function A copyright protection function is supported according to the SCMS -T format as defined in the Bluetooth specifications.
Quick Start Guide - Introduction 第 87 頁,共 160 頁 Setting up the wireless keyboard Procedure 1. Right-click on the Bluetooth icon in the task tray, and then click on [Add New Connection] Note { Alternatively, click [Start] →[All Programs]→[Bluetooth]→[Bluetooth Se and then click on [New Connection] from the active [Bluetooth Settings] window. The [Add New Connection Wizard (Welcome to the Add New Connection Wizar window will appear. 2.
Quick Start Guide - Introduction 第 88 頁,共 160 頁 Once the program has finished searching for the devices, the [Add New Connecti Wizard (Device Selection)] window will appear. 3. Select the device name of the keyboard from [Device List], and then click on the [Next] button The [Add New Connection Wizard (Searching for Services)] window will appear file://C:\Documents and Settings\anitachou\Local Settings\Temp\~hh3F24.
Quick Start Guide - Introduction 第 89 頁,共 160 頁 4. Use the wireless keyboard to enter the numbers that appear in [Bluetooth Passke Code)], and then hit the [Enter] key Once the program has detected the services successfully, connection to the device registration of settings information will be performed automatically. The [Add New Connection Wizard (Connection Name Settings)] window will ap 5.
Quick Start Guide - Introduction 第 90 頁,共 160 頁 Note { You can change the connection icon and icon name. →"Changing a connection icon name " →"Changing a connection icon " The [Add New Connection Wizard (Completing the Add New Connection Wizar window will appear. 6. Click on the [Finish] button The settings information will be registered, and an icon will appear in the [Blueto Settings] window. Note z Pressing any key on the wireless keyboard will automatically connect it to the PC thereafter.
Quick Start Guide - Introduction 第 91 頁,共 160 頁 Procedure 1. Turn on the wireless mouse, and set it to be connectable via Bluetooth Please refer to the instruction manual for details on how to operate the mouse. 2. Right-click on the Bluetooth icon in the task tray, and then click on [Add New Connection] Note { Alternatively, click [Start] →[All Programs]→[Bluetooth]→[Bluetooth Se and then click on [New Connection] from the active [Bluetooth Settings] window.
Quick Start Guide - Introduction 第 92 頁,共 160 頁 Once the program has finished searching for the devices, the [Add New Connecti Wizard (Device Selection)] window will appear. 4. Select the device name of the mouse from [Device List], and then click on the [N button The [Add New Connection Wizard (Searching for Services)] window will appear file://C:\Documents and Settings\anitachou\Local Settings\Temp\~hh3F24.
Quick Start Guide - Introduction 第 93 頁,共 160 頁 A message confirming a device connection will appear. 5. Click on the [OK] button The [Add New Connection Wizard (Connection Name Settings)] window will ap 6. Enter the type and name of the icon displayed after registration, and then click on [Next] button Please click on the [Next] button if you are satisfied with the settings. Note { Please use this window to change the connection name and icon.
Quick Start Guide - Introduction 第 94 頁,共 160 頁 The settings information will be have been registered, and an icon will appear in [Bluetooth Settings] window. Note { Clicking on one of the mouse buttons or otherwise operating it will automatically connect it to the PC thereafter. Please connect manually if automatic connection is unsuccessful. Exchanging files with a PC or PDA [FTP] You can send and receive files other than business card data with a Bluetooth -enabled P PDA.
Quick Start Guide - Introduction 第 95 頁,共 160 頁 Note { Alternatively, opening Explorer and clicking on the Bluetooth Information Exchanger folder will produce the same result. The [Bluetooth Information Exchanger] window will appear. 3. Double-click on the [File transfer] icon A list of devices will appear in the [File transfer] window. Note file://C:\Documents and Settings\anitachou\Local Settings\Temp\~hh3F24.
Quick Start Guide - Introduction 第 96 頁,共 160 頁 { { If the desired device does not appear in the list, please confirm that the dev has been turned on, and then select [Bluetooth] →[Search Devices]. A device search will be performed. You can also use "Image transfer" when sending individual image files. 4. Use the mouse to drag and drop the file you wish to send over the destination ico In this case, the file will be sent to a PC named "PC -1".
Quick Start Guide - Introduction 第 97 頁,共 160 頁 The message below will appear if the file transmission was unsuccessful. Please click on the [OK] button to close the message, and repeat the procedure. Note { { { Files that have been sent will be saved in a file transfer shared folder on the destination device. Additionally, with "File transfer", you can open the shared folder on the destination device using Explorer, specify a subfolder, and then send the fil there.
Quick Start Guide - Introduction 第 98 頁,共 160 頁 Note { If the desired device does not appear in the list, please confirm that the dev has been turned on, and then select [to Bluetooth] →[Search other devices] Once the devices have been detected, the message below will appear. Pleas select the destination device, and then click on the [Send] button. 3. Confirm that the file is being sent The file will be sent to the PC. file://C:\Documents and Settings\anitachou\Local Settings\Temp\~hh3F24.
Quick Start Guide - Introduction 第 99 頁,共 160 頁 Note { When sending files using "File transfer", a message requesting permission t receive the files may appear on the destination (receiving) device. The cont the message will vary with the Bluetooth software installed on the destinati device, so please be sure to follow the instructions provided. If you are using the Bluetooth Utility, a message similar to the one below w appear. If the file has been sent successfully, the message below will appear.
Quick Start Guide - Introduction 第 100 頁,共 160 頁 Note { Alternatively, opening Explorer and clicking on the Bluetooth Information Exchanger folder will produce the same result. The [Bluetooth Information Exchanger] window will appear. 3. Double-click on the [File transfer] icon A list of devices will appear in the [File transfer] window. In this case the file will be received from the PDA named "My Mobile" file://C:\Documents and Settings\anitachou\Local Settings\Temp\~hh3F24.
Quick Start Guide - Introduction 第 101 頁,共 160 頁 In this case, the file will be received from the PDA named My Mobile . 4. Double-click on the [PDA-1] icon The file saved in the shared folder in "My Mobile" will appear. 5. Right-click on the file you wish to receive, and then select "Receive file". The file will be received from a PDA. Note { With "File transfer", you can send individual files as well as entire folders.
Quick Start Guide - Introduction 第 102 頁,共 160 頁 Note { The received file will be saved in the "Shared folder" under "File transfer" Bluetooth Information Exchanger You can use Properties under the Bluetooth Information Exchanger to spec the location of the "Shared folder" on the hard drive. Sending images to a mobile telephone [BIP] You can send image data to a Bluetooth -compatible mobile telephone. Large images will be automatically reduced to fit on the telephone display screen.
Quick Start Guide - Introduction 第 103 頁,共 160 頁 { { { Bitmap (*.bmp) JPEG (*.jpg, *.jpeg) PNG (*.png) →Sending images to a mobile telephone (using icons) →Sending images to a mobile telephone (by right -clicking the mouse) Procedure ■Sending images to a mobile telephone (using icons) 1. Turn on the PC or PDA Confirm that a Bluetooth connection has been enabled before proceeding. 2.
Quick Start Guide - Introduction 第 104 頁,共 160 頁 Note { If the desired device does not appear in the list, please confirm that the dev has been turned on, and then select [Bluetooth] →[Search Devices]. A device search will be performed. 4. Drag and drop the file you wish to send over the destination icon In this case, the image will be sent to a mobile telephone named "BT -Phone-1". The image will be sent. If the image has been sent successfully, the message below will appear.
Quick Start Guide - Introduction 第 105 頁,共 160 頁 ■Sending images to a mobile telephone (by right -clicking the mouse) 1. Turn on the mobile telephone Confirm that a Bluetooth connection has been enabled before proceeding. 2.
Quick Start Guide - Introduction 第 106 頁,共 160 頁 The image will be sent. If the image has been sent successfully, the message below will appear. Please click on the [OK] button. The message below will appear if the image transmission was unsuccessful. Please click on the [OK] button to close the message, and repeat the procedure. Sending images to a PC or PDA [BIP] You can send image data to a Bluetooth -enabled PC or PDA. Images are sent using "Image transfer" under Bluetooth Information Exchanger.
Quick Start Guide - Introduction 第 107 頁,共 160 頁 z The following image file formats can be sent and received using "Image transfer": { { { Bitmap (*.bmp) JPEG (*.jpg, *.jpeg) PNG (*.png) →Sending images to a PC or PDA (using icons) →Sending images to a PC or PDA (by right -clicking the mouse) Procedure ■Sending images to a PC or PDA (using icons) 1. Turn on the PC or PDA Confirm that a Bluetooth connection has been enabled before proceeding. 2.
Quick Start Guide - Introduction 第 108 頁,共 160 頁 Note { If the desired device does not appear in the list, please confirm that the dev has been turned on, and then select [Bluetooth] →[Search Devices]. A device search will be performed. 4. Drag and drop the file you wish to send over the destination icon In this case, the image will be sent to a PC named "PC -1". The image will be sent. If the image has been sent successfully, the message below will appear. Please click on the [OK] button. file://C:\D
Quick Start Guide - Introduction 第 109 頁,共 160 頁 The message below will appear if the image transmission was unsuccessful. Please click on the [OK] button to close the message, and repeat the procedure. Note { { { Images that have been sent will be saved in an image transfer folder on the destination device. Images received using "Image transfer" in the Bluetooth Information Excha will be saved in the "Image Box" in "Image transfer".
Quick Start Guide - Introduction 第 110 頁,共 160 頁 Note { If the desired device does not appear in the list, please confirm that the dev has been turned on, and then select [to Bluetooth] →[Search other devices] Once the devices have been detected, the message below will appear. Pleas select the destination device, and then click on the [Send] button. The image will be sent. If the image has been sent successfully, the message below will appear. Please click on the [OK] button.
Quick Start Guide - Introduction 第 111 頁,共 160 頁 Note { When you send images by right -clicking the mouse, the image data that ha sent will be saved in the image transfer shared folder on the destination dev This is also the case when you send images using icons. Exchanging business card data with a PC or PDA [OPP] You can exchange business card data with a Bluetooth -enabled PC or PDA. Business card data are exchanged using "Object Push" under Bluetooth Information Exchanger.
Quick Start Guide - Introduction 第 112 頁,共 160 頁 1. Turn on the PC or PDA Confirm that a Bluetooth connection has been enabled before proceeding. 2. Double-click on the Bluetooth Information Exchanger icon on the Desktop Note { Alternatively, opening Explorer and clicking on the Bluetooth Information Exchanger folder will produce the same result. The [Bluetooth Information Exchanger] window will appear. 3.
Quick Start Guide - Introduction 第 113 頁,共 160 頁 Note { If the desired device does not appear in the list, please confirm that the dev has been turned on, and then select [Bluetooth] →[Search Devices]. A device search will be performed. 4. Use the mouse to drag and drop the business card you wish to send over the destination icon In this case, the business card will be sent to a PC named "PC -1". The business card will be sent.
Quick Start Guide - Introduction 第 114 頁,共 160 頁 The message below will appear if the business card transmission was unsuccessfu Please click on the [OK] button to close the message, and repeat the procedure. Memo { { Data that have been sent will be saved in a folder for exchanged business c on the destination device. You can configure an associated application (Microsoft Outlook etc) to star automatically when you have received a business card, allowing you to vie card details.
Quick Start Guide - Introduction 第 115 頁,共 160 頁 Note { If the desired device does not appear in the list, please confirm that the dev has been turned on, and then select [to Bluetooth] →[Search other devices] Once the devices have been detected, the message below will appear. Pleas select the destination device, and then click on the [Send] button. The business card will be sent.
Quick Start Guide - Introduction 第 116 頁,共 160 頁 If the business card has been sent successfully, the message below will appear. Please click on the [OK] button. The message below will appear if the business card transmission was unsuccessfu Please click on the [OK] button to close the message, and repeat the procedure. Note { Data that have been sent will be saved in a folder for exchanged business c on the destination device.
Quick Start Guide - Introduction 第 117 頁,共 160 頁 { Alternatively, opening Explorer and clicking on the Bluetooth Information Exchanger folder will produce the same result. The [Bluetooth Information Exchanger] window will appear. 3. Double-click on the [Object Push] icon A list of devices will appear in the [Object Push] window. Note { If the desired device does not appear in the list, please confirm that the dev has been turned on, and then select [Bluetooth] →[Search Devices].
Quick Start Guide - Introduction 第 118 頁,共 160 頁 The business card will be sent. Note { When you try to send a business card, a message requesting permission to receive the files may appear on the device belonging to the other party (i.e. the receiving end). The content of the message will vary with the Bluetooth software installed on the destination device, so please be sure to follow the instructions provided. If you are using the Bluetooth Utility, a message sim the one below will appear.
Quick Start Guide - Introduction 第 119 頁,共 160 頁 Note { Data that has been sent will be saved in a folder for exchanged business car the destination device. ■Acquiring a business card from another party You can use your PC to acquire a business card from a party containing their details. 1. Turn on the PC or PDA Confirm that a Bluetooth connection has been enabled before proceeding 2.
Quick Start Guide - Introduction 第 120 頁,共 160 頁 Note { If the desired device does not appear in the list, please confirm that the dev has been turned on, and then select [Bluetooth] →[Search Devices]. A device search will be performed. 4. Right-click on the icon of the party whose card you wish to acquire, and then clic [Receive business card] In this case, the business card of the other party will be acquired from a PC name "PC-1". The business card will be received.
Quick Start Guide - Introduction 第 121 頁,共 160 頁 If the business card has been received successfully, the message below will appea Please click on the [OK] button. The message below will appear if the business card was unsuccessfully received. Please click on the [OK] button to close the message, and repeat the procedure. Note { Business card data that have been received will be saved in the Inbox unde "Object Push".
Quick Start Guide - Introduction 第 122 頁,共 160 頁 The [Bluetooth Information Exchanger] window will appear. 3. Double-click on the [Object Push] icon A list of devices will appear in the [Object Push] window. Note { If the desired device does not appear in the list, please confirm that the dev has been turned on, and then select [Bluetooth] →[Search Devices]. A device search will be performed. 4.
Quick Start Guide - Introduction 第 123 頁,共 160 頁 The business card from the party who executed the "Exchange business cards" command will be sent first. Note { When you try to send a business card, a message requesting permission to receive the files may appear on the device belonging to the other party (i.e. the receiving end). The content of the message will vary with the Bluetooth software installed on the destination device, so please be sure to follow the instructions provided.
Quick Start Guide - Introduction 第 124 頁,共 160 頁 A message of confirmation will appear if the card has been successfully received Note { Business cards that have been received will be saved in the "Inbox" under "Object Push". You can use Properties under the Bluetooth Information Exchanger to set t location of the Inbox on the hard drive.
Quick Start Guide - Introduction 第 125 頁,共 160 頁 Note { Different cameras are operated in different ways, depending on the manufa and model used. Please refer to the instruction manual for further details on to operate your camera. 3. Click on the [Camera Search...] button The camera will be detected and its icon displayed. 4. Right-click on the camera icon, and select [Connect] The camera will be connected, and images from the camera will appear on -scree file://C:\Documents and Settings\anitachou\
Quick Start Guide - Introduction 第 126 頁,共 160 頁 Taking pictures By placing the mouse cursor over the on -screen image, the camera's operating window w appear. You can operate the camera from this window. Procedure ■Taking a single picture 1. Click on the button in the operating window. A single image will be captured and sent to the PC. ■Taking several consecutive frames 1. Click on the button in the operating window A succession of images will be captured and sent to the PC. file://C:\Documents a
Quick Start Guide - Introduction 第 127 頁,共 160 頁 Note { { The remote camera shutter cannot be operated while the camera is connecte the PC. The number of consecutive pictures taken can be set to anywhere between 16 1. In the [Remote Camera] window, click on [Bluetooth]→[Propertie [Consecutive Image Settings] The [Change number of consecutive images] dialog box will appe 2.
Quick Start Guide - Introduction 第 128 頁,共 160 頁 Viewing images saves on your PC A "Remote Camera" folder will be created in the "Bluetooth" folder under "My Documen during initial set -up. A folder bearing the same name as the camera will be created in it, images will be saved in this folder. Click the [Explorer] button in the [Remote Camera] window to display the folder where images have been saved.
Quick Start Guide - Introduction 第 129 頁,共 160 頁 →Connecting using ActiveSync →Establishing a partnership between ActiveSync and a PDA →Finishing an ActiveSync connection →Cancelling a partnership Important z z z Please use ActiveSync v.3.7 or higher. Also please establish a partnership between the devices using a USB or infrared link before you connect via Bluetooth. Please refer to the ActiveSync Help or other manuals for information on how to use the application.
Quick Start Guide - Introduction 第 130 頁,共 160 頁 The [Connection Settings] window will appear. 3. Place a check next to [Allow serial cable or infrared connection to this COM por and then select "COM7". Note { In the standard set -up, the port is configured to "COM7" (refer to Steps (3) (4) under "Preparing the PDA" below). When using a different port, please change the port number selected in this window. ■Preparing the PDA Procedure 1.
Quick Start Guide - Introduction 第 131 頁,共 160 頁 Important { The graphic above shows an example of a PDA operating window. The connection procedure may be different depending on the manufacturer model of PDA you use. Please refer to the product instruction manuals for further details. The [Bluetooth Settings] window will open. The message "Connection not registered" will appear if no Bluetooth device has registered. Please tap on [OK] to close the message. 2.
Quick Start Guide - Introduction 第 132 頁,共 160 頁 The application searches for nearby Bluetooth devices. 3. Tap and hold on the destination PC icon, and then select [Update Services] A search for services will be carried out, and then a list of service names and the connection status will appear as list in the lower window. 4. Tap and hold on "COM7" from the list of service names, and then select "Registe ActiveSync". file://C:\Documents and Settings\anitachou\Local Settings\Temp\~hh3F24.
Quick Start Guide - Introduction 第 133 頁,共 160 頁 5. Tap [OK] in the confirmation message window An ActiveSync connection will be initiated. Establishing a partnership between ActiveSync and a PDA Once a connection has been successfully established with a PDA, the procedure for establishing a partnership with the PDA will be started by the ActiveSync application on PC. Performing this set -up procedure will enable data to be synchronised between your PC a PDA. Procedure 1.
Quick Start Guide - Introduction 第 134 頁,共 160 頁 The [New Partnership (Specify Data Synchronisation Method)] window will appe 2. Select "Synchronise with this PC", and then click on the [Next] button The [New Partnership (Select Synchronisation Settings)] window will appear. 3. Select the type of information to be synchronised between your PC and PDA, and click on the [Next] button file://C:\Documents and Settings\anitachou\Local Settings\Temp\~hh3F24.
Quick Start Guide - Introduction 第 135 頁,共 160 頁 The [New Partnership (Completing Setup)] window will appear. 4. Click on the [Finish] button When you click on the [Finish] button, ActiveSync will begin to synchronise you information. [Confirming changes] ↓ (Synchronisation process) ↓ [Synchronisation complete] file://C:\Documents and Settings\anitachou\Local Settings\Temp\~hh3F24.
Quick Start Guide - Introduction 第 136 頁,共 160 頁 While the ActiveSync connection is active, synchronisation will be performed whenever information is changed on either the PC or the PDA. Once a partnership has been established, every time you start your PC (and PDA thereafter, a Bluetooth connection will be opened and ActiveSync will synchroni your information. Finishing an ActiveSync connection Follow the procedure below on your PDA if you want to end an ActiveSync connection manually. Procedure 1.
Quick Start Guide - Introduction 第 137 頁,共 160 頁 Follow the procedure below from the ActiveSync window on the PC if you want to canc partnership between your PC and PDA. Procedure 1. Click on [File]→"Delete partnership" Click on the [Yes] button when the confirmation message appears. Note { If you wish to create another ActiveSync connection, you will have to repe above procedure to re -establish a partnership.
Quick Start Guide - Introduction 第 138 頁,共 160 頁 Procedure 1. Right-click on the Bluetooth icon in the tasktray, then click on [Add New Conne Wizard] Note { Alternatively, you can click on [Start]>[All Programs]>[Bluetooth]>[Blueto Settings], then click on [New Connection] in the [Bluetooth Settings] scree has opened. The [Add New Connection Wizard (Welcome to the Add New Connection Wizar screen will appear. 2.
Quick Start Guide - Introduction 第 139 頁,共 160 頁 The [Add New Connection Wizard (Searching for Bluetooth Devices)] screen wi appear. Once the device search has been completed, the [Add New Connection Wizard (S a Device)] screen will appear. 4. Select the name of the headset device from the list, then click on the [Next] butto 5.
Quick Start Guide - Introduction 第 140 頁,共 160 頁 Please press the headset switch. Important { The procedure for operating the headset may differ depending on the manufacturer and model. Please consult your user guide for a detailed description of how to operate unit. The [Add New Connection Wizard (Configuring (Connecting to Voice Circuit))] screen will appear, and device configuration will be performed.
Quick Start Guide - Introduction 第 141 頁,共 160 頁 The [Add New Connection Wizard (Completing the Found New Hardware Wizar screen, which is the final screen of the installation wizard, will appear. 8. Click on the [Finish] button Once driver installation is complete, the [Add New Connection Wizard (Enter Connection Name)] will appear. 9. Confirm the information you have entered, and click on the [Next] button file://C:\Documents and Settings\anitachou\Local Settings\Temp\~hh3F24.
Quick Start Guide - Introduction 第 142 頁,共 160 頁 The [Add New Connection Wizard (Completing the Add New Connection Wizar screen will appear. 10. Click on the [Finish] button The configuration information will be registered, and an icon will be displayed in [Bluetooth Settings] screen. Making a connection to the headset You can make a connection to the headset from an icon that has been registered in [Blue Settings].
Quick Start Guide - Introduction 第 143 頁,共 160 頁 2. Answer with the headset A screen will appear indicating that the headset is being called, and a tone will accordingly sound in the headset. Please press the headset switch. If the connection has been properly established, the icon's appearance will change indicate a connected state. You may now launch conferencing and voice -recognition software and use the headset.
Quick Start Guide - Introduction 第 144 頁,共 160 頁 A message will appear, requesting confirmation that you wish to disconnect. Clic the [Yes] button. The icon on the [Bluetooth Settings] screen will appear as shown below, indicatin that the device has been disconnected. Troubleshooting This section describes possible causes and countermeasures to be considered when your Blue device cannot be configured properly, functions abnormally or presents other problems relate its operation.
Quick Start Guide - Introduction 第 145 頁,共 160 頁 Bluetooth icon does not appear in task tray z If the Bluetooth icon does not appear in the task tray, Bluetooth Manager will not b active, which will prevent you from being able to use any of the functions of the Bluetooth Utility. Start the utilities as instructed below to enable Bluetooth Manager to start automati and allow all functions to be utilized.
Quick Start Guide - Introduction 第 146 頁,共 160 頁 y z y g g Select and right-click on a file, and then you can choose either the FTP or OPP pro use when you click on [Send to Bluetooth Device]. If neither profile is supported by the destination device, the file will not be able to b sent from the right -click menu. The transmission will also fail if you use FTP to send a file to a device that only supports the OPP profile.
Quick Start Guide - Introduction 第 147 頁,共 160 頁 device will be able to connect to the modem station. Bluetooth passkey entry failed z The Bluetooth passkey (PIN code) comprises a sequence of alphanumeric character with the letters able to be rendered in upper and lower case.
Quick Start Guide - Introduction 第 148 頁,共 160 頁 z The fax service may not have been enabled for sending (or receiving). Please check the settings by following the procedure below. 1. Open [Printers and Faxes] from the Control Panel, right -click on the [Fax] and then click on [Properties] The [Fax properties] window will appear. 2. Select the [Device] tab, right -click on the modem you wish to use, and the on [Properties] 3.
Quick Start Guide - Introduction 第 149 頁,共 160 頁 4. Select the [Receive] tab, and then confirm that "Enable device to receive" h been checked (when you wish to receive faxes) 5. Click on the [OK] button Using an access point Important Pl f " Wh d k b file://C:\Documents and Settings\anitachou\Local Settings\Temp\~hh3F24.
Quick Start Guide - Introduction 第 150 頁,共 160 頁 z Please refer to " What you need to know about using Bluetooth " for an understandi the basic concepts to be aware of when using Bluetooth. Access point cannot be detected z If the access point is connected to and is being used by another device, the access p will be undetectable even if you search for it.
Quick Start Guide - Introduction 第 151 頁,共 160 頁 Printer cannot be detected z If the printer is connected to and is being used by another device, the printer will b undetectable even if you search for it. Cannot connect to printer z If the printer is connected to and is being used by another device, no other device w able to connect to the printer.
Quick Start Guide - Introduction 第 152 頁,共 160 頁 disconnection of the other Bluetooth devices. We strongly recommend using a Blue headset on its own, not in connection with other Bluetooth devices. z Please confirm that the Bluetooth Headset is being operated correctly (for example ensure that the correct mode (audio or communications) mode has been selected).
Quick Start Guide - Introduction 第 153 頁,共 160 頁 Camera cannot be detected z If the camera is connected to and is being used by another device, the camera will b undetectable even if you search for it. Cannot connect to camera z If the camera is connected to and is being used by another device, no other device w be able to connect to the camera. Images from the camera can be displayed, but no pictures can be taken z The memory card in the camera may be full.
Quick Start Guide - Introduction 第 154 頁,共 160 頁 Examples: Images transferred to your PDA using "Image transfer" > saved in the "Image trans folder Images transferred to your PDA using "File transfer" > saved in the "Shared folder Using a mobile telephone Important z Please refer to " What you need to know about using Bluetooth " for an understandi the basic concepts to be aware of when using Bluetooth.
Quick Start Guide - Introduction 第 155 頁,共 160 頁 Cannot send or receive faxes z Once you have registered a mobile telephone as your fax server, you will need to e the fax settings from the [Printer and Faxes] window in the Control Panel. Please refer to " Using a modem station for fax transmissions " for information on t configuration procedure. z The telephone number of the fax destination may have been entered incorrectly. Pl check the telephone number.
Quick Start Guide - Introduction 第 156 頁,共 160 頁 3. Select the [Send] tab, and then confirm that "Enable device to send" has be checked. 4. Select the [Receive] tab, and then confirm that "Enable device to receive" h been checked when you wish to receive faxes) 5. Click on the [OK] button file://C:\Documents and Settings\anitachou\Local Settings\Temp\~hh3F24.
Quick Start Guide - Introduction 第 157 頁,共 160 頁 Glossary This glossary provides definitions for Bluetooth -related terminology. You will be able to look up the meanings of any uncertain terms here. A2DP Profile Abbreviation of Advanced Audio Distribution. A Bluetooth profile allowing you to adjust the sound quality of wireless headsets and ot audio devices. AVRCP Profile Abbreviation of Audio/Video Remote Control Profile. A Bluetooth profile enabling rem control functions to be sent and received.
Quick Start Guide - Introduction 第 158 頁,共 160 頁 DUN Profile A Bluetooth profile for Dial -up Networking. This profile enables you to establish a dial -up Bluetooth connection with a wireless mo station, mobile telephone, or similar device. FAX Profile A Bluetooth profile that enables you to establish a Bluetooth connection with a wireless modem station, mobile telephone, or similar device to send or receive a fax. FTP Abbreviation of File Transfer Profile.
Quick Start Guide - Introduction 第 159 頁,共 160 頁 LAP Abbreviation of LAN Access Profile. A Bluetooth profile that enables you to establish a Bluetooth connection to a LAN acces point to access a LAN via PPP. OPP Abbreviation of Object Push Profile. A Bluetooth profile that enables you to exchange business cards with a wireless device. Passkey Also known as a PIN code This is a password consisting of up to 16 alphanumeric characters that enables a connec to be established to a wireless device.
Quick Start Guide - Introduction 第 160 頁,共 160 頁 configured for a Bluetooth connection. This can be used for printers and printer adapters PDAs, using a method different from HCRP or ActiveSync . TCP/IP Abbreviation of Transmission Control Protocol/Internet Protocol. Standard communications protocol (convention for enabling data communication) used Internet. Using the same protocol enables computers to exchange data with each other. vCARD Common standard for electronic business cards.