
User's Manual


A-13
Software Problem - BIOS
Updating the BIOS.
1. Please verify the Notebook PCʼs exact model and download the latest BIOS file for your model
from the ASUS website and save it in your flash disk drive.
2. Connect your flash disk drive to the Notebook PC and power on the Notebook PC.
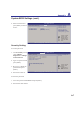
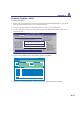
3. Use the “Easy Flash” function on the Advanced page of the BIOS Setup Utility. Follow the in-
structions shown.
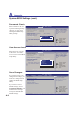
4. Locate the latest BIOS file and start updating (flashing) the BIOS.
Select Screen
Select Item
+-
Change Field
Enter Go to Sub Screen
F1 General Help
F10 Save and Exit
ESC Exit
v02.61 (C)Copyright 1985-2006, American Megatrends, Inc.
BIOS SETUP UTILITY
Main Advanced Security Power Boot Exit
Advanced Settings
WARNING: Setting wrong values in below sections
may cause system to malfunction.
IDE Configuration
Start Easy Flash
ASUS FancyStart [Disabled]
Internal Pointing Device [Enabled]
Internal Numeric Pad Lock [Enabled]
Speaker Volume [4]
Intel Virtualization Tech
Intel VT-d [Disabled]
Over-Clock in POST [0%]
DTS-based Thermal Management [Enabled]
Press ENTER to run
the utility to select
and update BIOS.
Press Hotkey F4 at
POST to invoke the
Utility. This
utility doesn't
support :
1. CDROM
2. USB HDD
3. Secondary HDD
Start Easy Flash Utility?
[OK] [Cancel]
AsusTek BIOS ROM Easy Flash Utility V1.15
Current ROM
Update ROM
A:
B:
C:
D:
Note
<Up/Dn> to move ,<Enter> to determine ,<BSpace> to drive select
FLASH TYPE: MXIC MX25L8005
PATH: A:\
PLATFORM: UX30
VER: 002.T22
DATE: 03/24/09
PLATFORM: Unknown
VER: Unknown
DATE: Unknown
5. You must “Load Setup Defaults” on the Exit page after updating (flashing) the BIOS.
Drive File
Appendix A