Notebook PC Hardware Userʼs Manual E4737/ May 2009
Contents Table of Contents 1. Introducing the Notebook PC About This Userʼs Manual ...............................................................................6 Notes For This Manual........................................................................................... 6 Safety Precautions ..........................................................................................7 Preparing your Notebook PC...........................................................................9 2.
Contents Table of Contents (Cont.) Touchpad Usage Illustrations ............................................................................... 35 Caring for the Touchpad....................................................................................... 37 Automatic Touchpad Disabling............................................................................. 37 Storage Devices ............................................................................................38 Hard Disk Drive .............
Contents 4
1. Introducing the Notebook PC About This Userʼs Manual Notes For This Manual Safety Precautions Preparing your Notebook PC There may be differences between your Notebook PC and the drawings shown in this manual. Please accept your Notebook PC as being correct. Photos and icons in this manual are used for artistic purposes only and do not show what is actually used in the product itself.
1 Introducing the Notebook PC About This Userʼs Manual You are reading the Notebook PC Userʼs Manual. This Userʼs Manual provides information on the various components in the Notebook PC and how to use them. The following are major sections of this Userʼs Manuals: 1. Introducing the Notebook PC Introduces you to the Notebook PC and this Userʼs Manual. 2. Knowing the Parts Gives you information on the Notebook PCʼs components. 3.
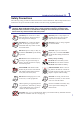
Introducing the Notebook PC 1 Safety Precautions The following safety precautions will increase the life of the Notebook PC. Follow all precautions and instructions. Except as described in this manual, refer all servicing to qualified personnel. IMPORTANT! Disconnect the AC power and remove the battery pack(s) before cleaning.
1 Introducing the Notebook PC DO NOT throw the Notebook PC in municipal waste. This product has been designed to enable proper reuse of parts and recycling. The symbol of the crossed out wheeled bin indicates that the product (electrical, electronic equipment and mercury-containing button cell battery) should not be placed in municipal waste. Check local regulations for disposal of electronic products. DO NOT throw the battery in municipal waste.
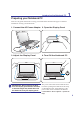
Introducing the Notebook PC 1 Preparing your Notebook PC These are only quick instructions for using your Notebook PC. Read the later pages for detailed information on using your Notebook PC. 1. Connect the AC Power Adapter 2. Open the Display Panel 2 3 1 3. Adjust the Display Panel IMPORTANT! When opening, DO NOT force the display panel down to the table or else the hinges may break! Never lift the Notebook PC by the display panel! 4.
1 10 Introducing the Notebook PC
2. Knowing the Parts Basic sides of the Notebook PC There may be differences between your Notebook PC and the drawings shown in this manual. Please accept your Notebook PC as being correct. Photos and icons in this manual are used for artistic purposes only and do not show what is actually used in the product itself.
2 Knowing the Parts Top Side Refer to the diagram below to identify the components on this side of the Notebook PC. The keyboard differs for each territory.
Knowing the Parts 1 2 Microphone (Built-in) The built-in mono microphone can be used for video conferencing, voice narrations, or simple audio recordings. 2 Camera (on selected models) The built-in camera allows picture taking or video recording. Can be used with video conferencing and other interactive applications. 3 Camera Indicator The camera indicator shows when the built-in camera is in use. The camera may be auto-activated by supported software.
2 Knowing the Parts Keyboard 8 The keyboard provides full-sized keys with comfortable travel (depth at which the keys can be depressed) and palm rest for both hands. Two Windows function keys are provided to help ease navigation in the Windows operating system. Touchpad and Buttons 9 The touchpad with its buttons is a pointing device that provides the same functions as a desktop mouse.
Knowing the Parts 2 Bottom Side Refer to the diagram below to identify the components on this side of the Notebook PC. The bottom side may vary in appearance depending on model. 1 2 1 WARNING! The bottom of the Notebook PC can get very hot. Be careful when handling the Notebook PC while it is in operation or recently been in operation. High temperatures are normal during charging or operation. Do not use on soft surfaces such as beds or sofas which may block the vents.
2 Knowing the Parts Audio Speaker 1 The built-in stereo speaker system allows you to hear audio without additional attachments. The multimedia sound system features an integrated digital audio controller that produces rich, vibrant sound (results improved with external stereo headphones or speakers). Audio features are software controlled.
Knowing the Parts 2 Left Side Refer to the diagram below to identify the components on this side of the Notebook PC. 1 1 2 3 4 5 6 Power (DC) Input The supplied power adapter converts AC power to DC power for use with this jack. Power supplied through this jack supplies power to the Notebook PC and charges the internal battery pack. To prevent damage to the Notebook PC and battery pack, always use the supplied power adapter. CAUTION: MAY BECOME WARM TO HOT WHEN IN USE.
2 4 HDMI Knowing the Parts HDMI Port HDMI (High-Definition Multimedia Interface) is an uncompressed all-digital audio/video interface between any audio/video source, such as a set-top box, DVD player, and A/V receiver and an audio and/or video monitor, such as a digital television (DTV). Supports standard, enhanced, or high-definition video, plus multichannel digital audio on a single cable.
Knowing the Parts 2 Right Side Refer to the diagram below to identify the components on this side of the Notebook PC. 3D 1 1 3D 2 Headphone Output Jack The stereo headphone jack (1/8 inch) is used to connect the Notebook PCʼs audio out signal to amplified speakers or headphones. Using this jack automatically disables the built-in speakers. 2 USB Port (2.0/1.1) The USB (Universal Serial Bus) port is compatible with USB 2.0 or USB 1.
2 Knowing the Parts Front Side Refer to the diagram below to identify the components on this side of the Notebook PC. 1 2 3 4 1 Audio Speaker 1 The built-in stereo speaker system allows you to hear audio without additional attachments. The multimedia sound system features an integrated digital audio controller that produces rich, vibrant sound (results improved with external stereo headphones or speakers). Audio features are software controlled.
3. Getting Started Using AC Power Using Battery Power Powering ON the Notebook PC Checking Battery Power Powering Options Power Management Modes Special Keyboard Functions Switches and Status Indicators There may be differences between your Notebook PC and the drawings shown in this manual. Please accept your Notebook PC as being correct. Photos and icons in this manual are used for artistic purposes only and do not show what is actually used in the product itself.
3 Getting Started Power System Using AC Power The Notebook PC power is comprised of two parts, the power adapter and the battery power system. The power adapter converts AC power from a wall outlet to the DC power required by the Notebook PC. Your Notebook PC comes with a universal AC-DC adapter. That means that you may connect the power cord to any 100V-120V as well as 220V-240V outlets without setting switches or using power converters.
Getting Started 3 Powering ON the Notebook PC The Notebook PCʼs power-ON message appears on the screen when you turn it ON. If necessary, you may adjust the brightness by using the hot keys. If you need to run the BIOS Setup to set or modify the system configuration, press [F2] upon bootup to enter the BIOS Setup. If you press [Tab] during the splash screen, standard boot information such as the BIOS version can be seen.
3 Getting Started Checking Battery Power The battery system implements the Smart Battery standard under the Windows environment, which allows the battery to accurately report the amount of charge left in the battery. A fully-charged battery pack provides the Notebook PC a few hours of working power. But the actual figure varies depending on how you use the power saving features, your general work habits, the CPU, system memory size, and the size of the display panel.
Getting Started 3 Power Options The power switch turns ON and OFF the Notebook PC or putting the Notebook PC into sleep or hibernation modes. Actual behavior of the power switch can be customized in Windows Control Panel “Power Options.” For other options, such as “Switch User, Restart, Sleep, or Shut Down,” click the arrowhead next to the lock icon. Restarting or Rebooting After making changes to your operating system, you may be prompted to restart the system.
3 Getting Started Power Management Modes The Notebook PC has a number of automatic or adjustable power saving features that you can use to maximize battery life and lower Total Cost of Ownership (TCO). You can control some of these features through the Power menu in the BIOS Setup. ACPI power management settings are made through the operating system.
Getting Started 3 Special Keyboard Functions Colored Hot Keys The following defines the colored hot keys on the Notebook PCʼs keyboard. The colored commands can only be accessed by first pressing and holding the function key while pressing a key with a colored command. The Hot Key locations on the function keys may vary depending on model but the functions should remain the same. Follow the icons instead of the function keys.
3 Getting Started Colored Hot Keys (cont.) Crossed Speaker Icons (F10): Toggles the speakers ON and OFF (only in Windows OS) Speaker Down Icon (F11): Decreases the speaker volume (only in Windows OS) Speaker Up Icon (F12): Increases the speaker volume (only in Windows OS) Fn+C: Toggles “Splendid Video Intelligent Technology” function ON and OFF.
Getting Started 3 Microsoft Windows Keys There are two special Windows keys on the keyboard as described below. The key with the Windows Logo activates the Start menu located at the bottom left of the Windows desktop. The other key, that looks like a Windows menu with a small pointer, activates the properties menu and is equivalent to pressing the right mouse button on a Windows object.
3 Getting Started Multimedia Control Keys (on selected models) The multimedia control keys allows for convenient controlling of the multimedia application. The following defines the meaning of each multimedia control key on the Notebook PC. Some control key functions may defer depending on Notebook PC model. Use the [Fn] key in combination with the arrow keys for CD control functions. CD Play/Pause During CD stop, begins CD play. During CD play, pauses CD play. CD Stop During CD play: Stops CD play.
Getting Started 3 Switches and Status Indicators Switches Express Gate/ Power4Gear Hybrid Key Pressing this button will launch Express Gate when the Notebook PC is powered off. Refer to the Express Gate Userʼs Manual for details. The Power4Gear Hybrid key toggles power savings between various power saving modes. The power saving modes control many aspects of the Notebook PC to maximize performance versus battery time.
3 Getting Started Switches and Status Indicators (cont.) Status Indicators Battery Charge Indicator The battery charge indicator shows the status of the batteryʼs power as follows: ON: The Notebook PCʼs battery is charging when AC power is connected. OFF: The Notebook PCʼs battery is charged or completely drained. Blinking: Battery power is less than 10% and the AC power is not connected.
4. Using the Notebook PC Pointing Device Storage Devices Hard disk drive Flash memory card reader Memory (RAM) Connections Network Connection Wireless LAN Connection (on selected models) Bluetooth Wireless Connection (on selected models) There may be differences between your Notebook PC and the drawings shown in this manual. Please accept your Notebook PC as being correct. Photos and icons in this manual are used for artistic purposes only and do not show what is actually used in the product itself.
4 Using the Notebook PC Pointing Device The Notebook PCʼs integrated touchpad pointing device is fully compatible with all two/three-button and scrolling knob PS/2 mice. The touchpad is pressure sensitive and contains no moving parts; therefore, mechanical failures can be avoided. A device driver is still required for working with some application software.
Using the Notebook PC 4 Touchpad Usage Illustrations Single-finger gesture input Clicking/Tapping - With the pointer over an item, press the left button or use your fingertip to touch the touchpad lightly, keeping your finger on the touchpad until the item is selected. The selected item will change color. The following 2 examples produce the same results. Clicking Tapping Lightly but rapidly strike the Press the left pointer button and touchpad. release.
4 Using the Notebook PC Multi-finger gesture input Zoom in Zoom out Two-finger zooming in/out - Moving two fingertips apart or together on the touchpad to zoom in or zoom out. This is convenient when viewing photos or reading documents. Two-finger scrolling - Use two fingertips to slide up or down on the touchpad to scroll a window up or down. If your display window includes several sub-windows, move the pointer on that pane before scrolling.
Using the Notebook PC 4 Caring for the Touchpad The touchpad is pressure sensitive. If not properly cared for, it can be easily damaged. Take note of the following precautions. • Ensure the touchpad does not come into contact with dirt, liquids or grease. • Do not touch the touchpad if your fingers are dirty or wet. • Do not rest heavy objects on the touchpad or the touchpad buttons. • Do not scratch the touchpad with your finger nails or any hard objects. The touchpad responds to movement not to force.
4 Using the Notebook PC Storage Devices Storage devices allow the Notebook PC to read or write documents, pictures, and other files to various data storage devices. This Notebook PC has the following storage devices: • Hard disk drive • Flash memory reader Hard Disk Drive Hard disk drives have higher capacities and operate at much faster speeds than floppy disk drives and optical drives. The Notebook PC comes with a replaceable hard disk drive. Current hard drives support S.M.A.R.T.
Using the Notebook PC 4 Flash Memory Card Reader Normally a memory card reader must be purchased separately in order to use memory cards from devices such as digital cameras, MP3 players, mobile phones, and PDAs. This Notebook PC has a single built-in memory card reader that can use many flash memory cards as shown in the example below.
4 Using the Notebook PC Connections The built-in network cannot be installed later as an upgrade. After purchase, network can be installed as an expansion card. Network Connection Connect a network cable, with RJ-45 connectors on each end, to the modem/network port on the Notebook PC and the other end to a hub or switch. For 100 BASE-TX / 1000 BASE-T speeds, your network cable must be category 5 or better (not category 3) with twisted-pair wiring.
Using the Notebook PC 4 Wireless LAN Connection (on selected models) The optional built-in wireless LAN is a compact easy-to-use wireless Ethernet adapter. Implementing the IEEE 802.11 standard for wireless LAN (WLAN), the optional built-in wireless LAN is capable of fast data transmission rates using Direct Sequence Spread Spectrum (DSSS) and Orthogonal Frequency Division Multiplexing (OFDM) technologies on 2.4GHz/5GHz frequencies.
4 Using the Notebook PC Windows Wireless Network Connection Connecting to a network 1. Switch ON the Wireless function if necessary for your model (see switches in Section 3). 42 2. Press [FN+F2] repeatedly until wireless LAN icon and bluetooth icon are shown. 2b. Or double click the Wireless Console icon on Windows notification area and select the wireless LAN icon. 3. You should see the “Not Connected” network icon. 4. Right click on the network icon and select Connect to a network. 5.
Using the Notebook PC 4 Bluetooth Wireless Connection (on selected models) Notebook PCs with Bluetooth technology eliminates the need for cables for connecting Bluetooth-enabled devices. Examples of Bluetooth-enabled devices may be Notebook PCs, Desktop PCs, mobile phones, and PDAs. If your Notebook PC did not come with built-in Bluetooth, you need to connect a USB or ExpressCard Bluetooth module in order to use Bluetooth. Bluetooth-enabled mobile phones You can wireless connect to your mobile phone.
4 44 Using the Notebook PC
Appendix Optional Accessories & Connections Operating System and Software System BIOS Settings Common Problems and Solutions Windows Software Recovery Glossary Declarations and Safety Statements Notebook PC Information There may be differences between your Notebook PC and the drawings shown in this manual. Please accept your Notebook PC as being correct. Photos and icons in this manual are used for artistic purposes only and do not show what is actually used in the product itself.
A Appendix Optional Accessories These items, if desired, come as optional items to complement your Notebook PC. USB Hub (Optional) Attaching an optional USB hub will increase your USB ports and allow you to quickly connect or disconnect many USB peripherals through a single cable. USB Flash Memory Disk A USB flash memory disk is an optional item that can provide storage up to several hundred megabytes, higher transfer speeds, and greater durability.
Appendix A Optional Connections These items, if desired, may be purchased from third-parties. USB Keyboard and Mouse Attaching an external USB keyboard will allow data entry to more comfortable. Attaching an external USB mouse will allow Windows navigation to be more comfortable. Both the external USB keyboard and mouse will work simultaneously with the Notebook PCʼs built-in keyboard and touchpad. be Printer Connection One or more USB printers can be simultaneously used on any USB port or USB hub.
A Appendix Bluetooth Mouse Setup (optional) This process can be used to add most Bluetooth devices in Windows operating system. 1. Switch ON the Wireless function if necessary for your model (see switches in Section 3). 2. Press [FN+F2] repeatedly until wireless LAN icon and bluetooth icon are shown. 2b. Or double click the Wireless Console icon on the Windows notification area and select the bluetooth icon. 3. Select Add a Bluetooth Device on the taskbar menu. 3b.
ESET A R OFF ON Appendix 4. Prepare the Bluetooth mouse. • Install two “AA” batteries. 5. Select Bluetooth Mouse and click Next to continue. • Turn ON the power switch on the bottom of the mouse. The bottom sensor should glow red. • Push the “RESET” button on the bottom of the Bluetooth mouse. 6. The pairing starts. 7. The Bluetooth mouse has been successfully paired with the Notebook PC. Click Close to finish the setup. “RESET” may be necessary after changing batteries. Repeat steps if necessary.
A Appendix Operating System and Software This Notebook PC may offer (depending on territory) its customers the choice of a pre-installed Microsoft Windows operating system. The choices and languages will depend on the territory. The levels of hardware and software support may vary depending on the installed operating system. The stability and compatibility of other operating systems cannot be guaranteed.
Appendix A System BIOS Settings (cont.) 2. Select each item and press [Enter] to select a device. BIOS SETUP UTILITY Boot Boot Device Priority 1st 2nd 3rd 4th Boot Boot Boot Boot Device Device Device Device [Hard Drive] [CD/DVD] [Removable Device] [Network] Specifies the boot sequence from the availabe devices. A device enclosed in parenthesis has been disabled in the corresponding type menu. +- F1 F10 ESC Select Screen Select Item Change Option General Help Save and Exit Exit v02.
A Appendix System BIOS Settings (cont.) Password Check Select whether to ask for a password during bootup (Always) or only when entering the BIOS setup utility (Setup).
Appendix A Common Problems and Solutions Hardware Problem - Optical Disc The optical disc drive is not able to read or write discs. 1. Update the BIOS to the latest version and try again. 2. If updating the BIOS does not help, try better quality discs and try again. 3. If the problem still exist, contact your local service center and ask an engineer for assistance. Unknown Reason - System Unstable Cannot wake up from the hibernation. 1.
A Appendix Common Problems and Solutions (Cont.) Hardware Problem - Battery Battery maintenance. 1. Register the Notebook PC for a one-year-warranty using the following website: http://member.asus.com/login.aspx?SLanguage=en-us 2. Do NOT remove the battery pack while using the Notebook PC with the AC adaptor to prevent damage caused by the accidental power loss. The ASUS battery pack has protection circuitry to prevent over-charging so it will not damage the battery pack if it is left in the Notebook PC.
Appendix A Common Problems and Solutions (Cont.) Hardware Problem - Wireless Card How to check whether a Notebook PC is equipped with a wireless card? A. Enter Control Panel -> Device Manager. You will see whether the Notebook PC has a WLAN card under the “Network Adapter” item. Mechanical Problem - FAN / Thermal Why is the cooling fan always ON and the temperature high? 1. Make sure that the FAN works when the CPU temperature is high and check whether there is air flow from the main air vent. 2.
A Appendix Common Problems and Solutions (Cont.) Unknown Reason - Blue screen with white text A blue screen with white text appears after system bootup. 1. Remove additional memory. If additional memory was installed after purchase, power OFF, remove the additional memory, and power ON to see if the problem is due to incompatible memory. 2. Un-install software applications. If you have installed software applications recently, they may not be compatible with your system.
Appendix A Software Problem - BIOS Updating the BIOS. 1. Please verify the Notebook PCʼs exact model and download the latest BIOS file for your model from the ASUS website and save it in your flash disk drive. 2. Connect your flash disk drive to the Notebook PC and power on the Notebook PC. 3. Use the “Easy Flash” function on the Advanced page of the BIOS Setup Utility. Follow the instructions shown.
A Appendix Common Problems and Solutions (Cont.) Symantecʼs Norton Internet Security (NIS) (on selected models) 1. Sometimes NIS will show an alert to stop a Trojan virus from a local IP address. This problem can be solved by making sure the virus definition file is the latest one and regularly updating the virus definition file. 2. Reinstalling fails at the “Information Wizard” after uninstalling Norton Antivirus.
Appendix A Common Problems and Solutions (Cont.) 8. Cannot uninstall NIS. Go to Control Panel | Add or Remove Programs. Look for “Norton Internet Security 200x (Symantec Corporation)”. Click Change/Remove and choose Remove All to uninstall NIS. 9. Windows Firewall must be stopped before installing “Norton Internet Security” or “Norton Personal Firewall”. How to stop Windows Firewall: 1. Click Start and then Control Panel. 2. You will have one of two control panels. Click on the Security Center icon. 3.
A Appendix Windows Vista Software Recovery Using Hard Disk Partition The Recovery Partition includes an image of the operating system, drivers, and utilities installed on your Notebook PC at the factory. The Recovery Partition provides a comprehensive recovery solution that quickly restores your Notebook PCʼs software to its original working state, provided that your hard disk drive is in good working order.
Appendix A Windows Vista Software Recovery (Cont.) Using DVD (on selected models) Before using the recovery DVD to recover your Notebook PC, you need the following items. • A USB 2.0 DVD-ROM • Three blank writable DVDs Creating the Recovery DVD: 1. Double-click the AI Recovery Burner icon on the Window desktop. 2. Insert a blank writable DVD into the optical drive and click Start to start creating the Recovery DVD. 3. Follow the onscreen instructions to complete creating the recovery DVD.
A Appendix Glossary ACPI (Advanced Configuration and Power Management Interface) Modern standard for reducing power usage in computers. APM (Advanced Power Management) Modern standard for reducing power usage in computers. AWG (American Wire Gauge) This table is for general reference only and should not be used as a source of the American Wire Gauge standard as this table may not be current or complete. Gauge AWG 33 32 30 29 27 26 25 Diam (mm) 0.18 0.19 0.20 0.25 0.30 0.35 0.40 0.45 Area (mm2) 0.026 0.
Appendix A Glossary (Cont.) CPU (Central Processing Unit) The CPU, sometimes called “Processor,” actually functions as the “brain” of the computer. It interprets and executes program commands and processes data stored in memory. Device Driver A device driver is a special set of instructions that allows the computerʼs operating system to communicate with devices such as VGA, audio, Ethernet, printer, or modem.
A Appendix Glossary (Cont.) Laser Classifications As lasers became more numerous and more widely used, the need to warn users of laser hazards became apparent. To meet this need, laser classifications were established. Current classification levels vary from optically safe, requiring no controls (Class 1) to very hazardous, requiring strict controls (Class 4). CLASS 1: A Class 1 laser or laser system emits levels of optical energy that are eye-safe and consequently require no controls.
Appendix A Glossary (Cont.) Suspend Mode In Save-to-RAM (STR) and Save-to-Disk (STD), the CPU clock is stopped and most of the Notebook PC devices are put in their lowest active state. The Notebook PC enters Suspend when the system remains idle for a specified amount of time or manually using the function keys. The time-out setting of both Hard Disk and Video can be set by the BIOS Setup. The Power LED blinks when the Notebook PC is in STR mode. In STD mode, the Notebook PC will appear to be powered OFF.
A Appendix Declarations and Safety Statements DVD-ROM Drive Information The Notebook PC comes with an optional DVD-ROM drive or a CD-ROM drive. In order to view DVD titles, you must install your own DVD viewer software. Optional DVD viewer software may be purchased with this Notebook PC. The DVD-ROM drive allows the use of both CD and DVD discs. Regional Playback Information Playback of DVD movie titles involves decoding MPEG2 video, digital AC3 audio and decryption of CSS protected content.
Appendix A Internal Modem Compliancy The Notebook PC with internal modem model complies with JATE (Japan), FCC (US, Canada, Korea, Taiwan), and CTR21. The internal modem has been approved in accordance with Council Decision 98/482/EC for pan-European single terminal connection to the public switched telephone network (PSTN).
A Appendix Internal Modem Compliancy (Cont.) This table shows the countries currently under the CTR21 standard.
Appendix A Federal Communications Commission Statement This device complies with FCC Rules Part 15. Operation is subject to the following two conditions: • This device may not cause harmful interference, and • This device must accept any interference received, including interference that may cause undesired operation. This equipment has been tested and found to comply with the limits for a class B digital device, pursuant to Part 15 of the Federal Communications Commission (FCC) rules.
A Appendix FCC Radio Frequency (RF) Exposure Caution Statement This equipment complies with FCC RF exposure limits set forth for an uncontrolled environment. To maintain compliance with FCC RF exposure compliance requirements, please follow operation instructions in the userʼs manual. This equipment is for operation within 5.15 GHz and 5.25GHz frequency ranges and is restricted to indoor environments only.
Appendix A Wireless Operation Channel for Different Domains N. America 2.412-2.462 GHz Ch01 through CH11 Japan 2.412-2.484 GHz Ch01 through Ch14 Europe ETSI 2.412-2.472 GHz Ch01 through Ch13 France Restricted Wireless Frequency Bands Some areas of France have a restricted frequency band. The worst case maximum authorized power indoors are: • 10mW for the entire 2.4 GHz band (2400 MHz–2483.5 MHz) • 100mW for frequencies between 2446.5 MHz and 2483.
A Appendix UL Safety Notices Required for UL 1459 covering telecommunications (telephone) equipment intended to be electrically connected to a telecommunication network that has an operating voltage to ground that does not exceed 200V peak, 300V peak-to-peak, and 105V rms, and installed or used in accordance with the National Electrical Code (NFPA 70).
Appendix A Nordic Lithium Cautions (for lithium-ion batteries) CAUTION! Danger of explosion if battery is incorrectly replaced. Replace only with the same or equivalent type recommended by the manufacturer. Dispose of used batteries according to the manufacturerʼs instructions. (English) ATTENZIONE! Rischio di esplosione della batteria se sostituita in modo errato. Sostituire la batteria con un una di tipo uguale o equivalente consigliata dalla fabbrica. Non disperdere le batterie nellʼambiente.
A Appendix Optical Drive Safety Information Laser Safety Information Internal or external optical drives sold with this Notebook PC contains a CLASS 1 LASER PRODUCT. Laser classifications can be found in the glossary at the end of this userʼs manual. WARNING: Making adjustments or performing procedures other than those specified in the userʼs manual may result in hazardous laser exposure. Do not attempt to disassemble the optical drive.
Appendix A CTR 21 Approval (for Notebook PC with built-in Modem) Danish Dutch English Finnish French German Greek Italian Portuguese Spanish Swedish A-31
A Appendix Notebook PC Information This page is provided for recording information concerning your Notebook PC for future reference or for technical support. Keep this Userʼs Manual in a secured location if passwords are filled out.
This product is protected by one or more of the following U.S.
Copyright Information No part of this manual, including the products and software described in it, may be reproduced, transmitted, transcribed, stored in a retrieval system, or translated into any language in any form or by any means, except documentation kept by the purchaser for backup purposes, without the express written permission of ASUSTeK COMPUTER INC. (“ASUS”).