® Wireless N USB Adapter USB-N13 (For 802.11n draft, 802.11g & 802.
Copyright Information No part of this manual, including the products and software described in it, may be reproduced, transmitted, transcribed, stored in a retrieval system, or translated into any language in any form or by any means, except documentation kept by the purchaser for backup purposes, without the express written permission of ASUSTeK COMPUTER INC. (“ASUS”).
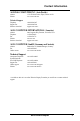
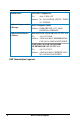
Contact Information ASUSTeK COMPUTER INC. (Asia Pacific) Address Website Technical Support Telephone Support Fax Software download 15 Li-Te Road, Peitou, Taipei, Taiwan 11259 www.asus.com.com +886228943447 +886228907698 support.asus.com* ASUS COMPUTER INTERNATIONAL (America) Address Telephone Fax Website Software download 800 Corporate Way, Fremont, CA 94539, USA +15029550883 +15029338713 usa.asus.com support.asus.
Manufacturer: ASUSTeK Computer Inc. Tel: +886-2-2894-3447 Address: No. 150, LI-DE RD., PEITOU, TAIPEI 112, TAIWAN Authorised representative ASUS Computer GmbH in Europe: Address: HARKORT STR. 21-23, 40880 Authorised distributors in Turkey: RATINGEN, GERMANY BOGAZICI BIL GISAYAR SAN. VE TIC. A.S. Tel: +90 212 3311000 Address: AYAZAGA MAH. KEMERBURGAZ CAD. NO.10 AYAZAGA/ISTANBUL INDEX BILGISAYAR SISTEMLERI MUHENDISLIK SAN. VE TIC. A.S.
Table of Contents 1. Introduction.................................................................................5 Package contents...................................................................................5 Features..................................................................................................5 2. Installation..................................................................................6 System Requirements....................................................................
Chapter 1 - Introduction Chapter 1 Introduction 1. Introduction Package contents Check the following items in your ASUS Wireless LAN Adapter package. Contact your retailer if any item is damaged or missing. 1 x ASUS Wireless LAN Adapter (USB-N13) 1 x Support CD 1 x Quick Start Guide 1 x Warranty Card Features High speed networking (11n Draft) for fast download, file transfer, and media streaming EZ WPS setup: Press button on adapter and router for WiFi setup.
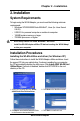
Chapter 2 - Installation 2. Installation System Requirements • ASUS utility cannot run under Windows 7 and Linux. • Install the WLAN Adapter utilities CD before inserting the WLAN Adapt er into your computer. Chapter 2 Installation To begin using the WLAN Adapter, you must meet the following minimum requirements: • Windows XP/2000/2003/Vista 32/64bit/7, Linux (for Linux Kernel 2.6.29) • USB 2.
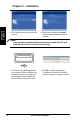
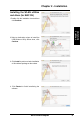
Chapter 2 - Installation Chapter 2 Installation 5. The installation process takes several seconds. 6. When Setup is complete, click Finish to exit the installation wizard and restart the computer. Notes: • For Linux user, download the Linux driver source code form CD, and build the driver for the Linux OS you are using. 7. Carefully insert the WLAN Adapter into your computer’s USB slot.
Chapter 2 - Installation Installing the WLAN utilities and driver (for MAC OS) Chapter 2 Installation 1.Double click the installation Icon and then click Continue. 2.Select a destination volume to install the USB Wireless Utility. When done, click Continue. 3. Click Install to perform a basic installation of this software package on the volume. 4. Click Restart to finish installating the software.
Chapter 2 - Installation Installing the WLAN utilities and driver (for Linux) If you want to install the utilities and driver under Linux, please refer to the attached CD for details. Reading the WLAN status indicators Chapter 2 Installation The device comes with one LED to indicate the status of the WLAN Adapter, and on button for WiFi Protected Setup (WPS). LED LED ON: Connected to wireless device. Blinking: Transmitting data; the blinking speed indicates the link speed. OFF: Adapter is disabled.
Chapter 2 - Installation WPS Wizard WPS Wizard is a utility that allows you to easily set up your wireless network. Chapter 2 Installation To set up WPS wizard: Use Pust Button to set up WPS Wizard: 1. Press the WPS button of USB-N13 and then press the WPS button on the router.
Chapter 2 - Installation 2. Follow the onscreen instructions to continue. When done, click Next. Chapter 2 Installation Use the PIN code to set up WPS Wizard: 1. Select Use the PIN code box, when done, click Next.
Chapter 2 - Installation Chapter 2 Installation 2. Select the WPS AP you want to connect. When done, click Next. 3. Key in the following PIN code into AP’s internal registrar (through its webpage) or external registrar. Key in the PIN number given by AP into the router’s setting page. If the SSID status you selected is unconfigured, you must key in the AP/router PIN numbers.
Chapter 2 - Installation Key in the router's PIN number in the the WPS Wizard or utility. Chapter 2 Installation Search for the wireless router. 4. Key in the Network Name (SSID). When done, click Next. If the router is used for the first time, the WPS wizard will run this process automatically.
Chapter 2 - Installation Chapter 2 Installation 5. Follow the onscreen constructions to set up the key. When done, click next. 6. When done, click Finish.
Chapter 2 - Installation 7. Insert the USB-N13 and select the drive from the list below. Chapter 2 Installation 8. When done, click Finish.
Chapter 2 - Installation Configuring with the WLAN utility (Infrastructure) Chapter 2 Installation Use ASUS WLAN utility to get connected with an existing wireless network. 1. Right-click the wireless connection icon and select Wireless Settings. 2. Check the Config page to set the SSID (network name) to that of your wireless AP. 3. Use Site Survey if you don’t know the SSID of your access point(s). 4. Encryption settings must match those at the access point.
Chapter 2 - Installation Configuring with the WLAN utility (Ad Hoc) The WLAN Adapter supports Ad Hoc mode that allows communication between wireless stations without an AP. Chapter 2 Installation 1. Right-click the wireless connection icon and select Wireless Settings. 2. Click the Config button and set the WLAN Adapter to Ad Hoc connection mode. 3. Click the Survey button to scan for Ad Hoc nodes. Select the node you want to communicate with and press Connect. 4.
Chapter 3 - Software Reference 3. Software Reference ASUS WLAN Control Center ASUS WLAN Control Center is an application which makes it easier to launch WLAN applications and activate network location settings. The WLAN Control Center starts automatically when system boots. When WLAN Control Center is running, you can see a Control Center icon on the Windows taskbar.
Chapter 3 - Software Reference Taskbar icon - Right-click menu Right-click the taskbar icon to show the following menu items: • • • • • • • Wireless Settings – Click to launch Wireless Settings application. Activate Configuration – Click to choose a preset profile. WPS – Click to launch Wireless Protected Setup Wizard. Preferences – Click to customize the Control Center program. You can create a Control Center shortcut on the desktop and decide whether to start Control Center when system boots.
Chapter 3 - Software Reference ASUS Wireless Settings Utility Wireless Settings is an application for managing the WLAN Adapter. Use Wireless Settings to view or modify the configuration settings, or to monitor the operational status of your WLAN Adapter. When Wireless Settings is launched, you can see the tabbed property sheets which categorize the configuration options into groups.
Chapter 3 - Software Reference Scanning... : The station is trying to authenticate and associate with an access point or Ad Hoc node. Disconnected: The WLAN Adapter is installed to the system, but not yet connected to a wireless device. SSID: Displays the Service Set Identifier (SSID) of the device that the adapter is either associated or intending to join. MAC address: Shows the hardware address of the WLAN Adapter.
Chapter 3 - Software Reference Activate Configuration Auto roaming is enabled by default and makes the adapter automatically switch to APs with better signal. You can uncheck it if you want to connect to a specified AP using a particular profile. Status - Connection You can view the current link statistics about the WLAN Adapter. These statistics are updated once per second and are valid if the WLAN Adapter is correctly installed.
Chapter 3 - Software Reference Status - IP Config IP Config tab shows all the current host and WLAN Adapter information including host name, DNS servers, IP address, Subnet Mask and Default Gateway. Button IP Release - If you want to remove the current IP address, click this button to release the IP address from DHCP server. IP Renew - If you want to obtain a new IP address from DHCP server, click this button to renew the IP address.
Chapter 3 - Software Reference Config - Basic This page enables you to change the WLAN Adapter configurations. Network Type Infrastructure – Infrastructure means to establish a connection with an access point. Once connected, the access point allows you to access wireless LAN and wired LAN (Ethernet). The Channel field turns to Auto if the connection is based on Infrastructure.
Chapter 3 - Software Reference PS Mode Constantly Awake Mode (CAM), also known as Disable Power Saving Mode, is a full powered state that yields the best performance. We recommend this mode for devices running on AC power. Power Saving Polling Mode (PSP Mode), which is also known as Enable Power Saving mode, periodically wakes up the system to check if there is any data being sent. We recommend this mode for devices running on battery power.
Chapter 3 - Software Reference Config - Encryption This page enables you to configure the Wireless LAN Adapter encryption settings. For data confidentiality in a wireless environment, IEEE 802.11 specifies a Wired Equivalent Privacy (WEP) algorithm to offer transmission privacy. The WEP uses keys to encrypt and decrypt data packets. The encryption process can scramble frame bits to avoid disclosure to others. The WPA/WPA2 is improved security system for 802.
Chapter 3 - Software Reference Data encryption For Open and Shared authentication mode, the configuration options of encryption type are Disabled and WEP. For WPA, WPA-PSK, WPA2 and WPA2-PSK authentication mode, Temporal Key Integrity Protocol (TKIP) encryption and Advanced Encryption Standard (AES) encryption are supported. Disabled - Disable the encryption function. WEP - WEP Key is used to encrypt your data before it is transmitted over air.
Chapter 3 - Software Reference Select one as your Default Key The Default Key field allows you specify which of the four encryption keys is to use for transmitting data over wireless LAN. You can change the default key by clicking on the downward arrow, selecting the number of the key you want to use, and clicking the “Apply” button. If the access point or station with which you are communicating uses the identical key by the same sequence, you can use any of the keys as the default on your WLAN Adapter.
Chapter 3 - Software Reference Config - Authentication This tab allows you to set the security settings to match those of your AP. It is configurable only if you have set Network Authentication to WPA or WPA2 in Config-Encryption tab. Authentication Type The authentication type methods include: Chapter 3 Software Reference PEAP: PEAP (Protected Extensible Authentication Protocol) authentication is a version of Extensible Authentication Protocol (EAP).
Chapter 3 - Software Reference • • • RSSI: The Received Signal Strength Indication (RSSI) transmitted by each network. This information is helpful in determining which network to connect to. The value is then normalized to a dBm value. Security: Wireless network encryption information. All devices in the network should use the same encryption method to ensure the communication. BSSID: The media access control (MAC) address of the access point or the Basic Service Set ID of the Ad Hoc node.
Chapter 3 - Software Reference Link State WLAN Adapter “Link State” icon appears on the left side of the WLAN Adapter Settings. Use the icon to view the current signal status. Excellent Link Quality (Infrastructure) Good Link Quality (Infrastructure) Fair Link Quality (Infrastructure) Poor Link Quality (Infrastructure) Not linked (Infrastructure) Chapter 3 Software Reference ASUS Mobile Manager The Mobile Manager is a convenient tool to set up and manage network location settings.
Chapter 3 - Software Reference Site Monitor The Site Monitor can monitor the signal of wireless. Exit Wireless Settings ASUS WLAN Adapter Chapter 3 Software Reference To exit Wireless Settings, you can click OK or Cancel.
Chapter 3 - Software Reference Windows® XP Wireless Options The wireless options window shown below is only available for Windows® XP. It appears when you run the Control Center utility at the first time. Select the utility you want to use for configuring your WLAN Adapter. Only use Windows wireless function – Only use Windows® XP Wireless Zero Configuration service to configure the WLAN Adapter.