® ASUS EZ N Network Adapter USB-N10 (For 802.
E4952 First Edition September 2009 Copyright © 2008 ASUSTeK Computer Inc. All Rights Reserved. No part of this manual, including the products and software described in it, may be reproduced, transmitted, transcribed, stored in a retrieval system, or translated into any language in any form or by any means, except documentation kept by the purchaser for backup purposes, without the express written permission of ASUSTeK COMPUTER INC. (“ASUS”).
Table of Contents Chapter 1: Knowing your network adapter Package contents .................................................................................. 5 Features .................................................................................................. 5 System Requirements ........................................................................... 5 LED status indicators ............................................................................
Config - Advanced ........................................................................... 31 Profiles ......................................................................................... 32 Survey - Site Survey ....................................................................... 33 About - Version Info......................................................................... 33 Link State ........................................................................................
Chapter 1 Knowing your network adapter Package contents Check the following items in your ASUS 802.11n Network Adapter package. 1 x ASUS USB-N10 1 x Support CD 1 x Quick Start Guide 1 x Warranty card Note: If any of the items is damaged or missing, contact your retailer.
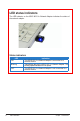
LED status indicators The LED indicator on the ASUS 802.11n Network Adapter indicates the status of the network adapter. Status indicators LED ON Blinking OFF 6 ASUS USB-N10 Indication The ASUS 802.11n Network Adapter is connected to a wireless device. Transmitting data via the ASUS 802.11n Network Adapter. The blinking speed indicates the link speed. The ASUS 802.11n Network Adapter is not connected to a wireless device.
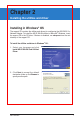
Chapter 2 Installing the utilities and driver Installing in Windows® OS The support CD contains the utilities and drivers for configuring the ASUS 802.11n Network Adapter. To install the ASUS WLAN utilities in Microsoft® Windows, insert the support CD in the CD drive. If Autorun is disabled, run setup.exe from the root directory of the support CD. To install the utilities and driver in Windows® OS: 1. Select your language and click Install ASUS WLAN Card Utilities/ Driver. 2.
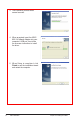
3. The installation process takes several seconds. 4. When prompted, insert the ASUS 802.11n Network Adapter into your computer’s USB port, then follow the onscreen instructions to install the driver. 5. When Setup is completed, click Finish to exit the installation wizard and restart the computer.
Installing in MAC OS To install the utilities and driver in MAC OS: 1. Double click the installation Icon and then click Continue. 2. Select a destination volume to install the USB Wireless Utility. When done, click Continue. 3. Click Install to perform a basic installation of this software package on the volume. 4. Click Restart to finish installating the software.
Installing in Linux OS To install the utilities and driver in Linux OS: • Refer to the README text file in the Linux zipped file included in the support CD. Note: Obtain the Linux driver source code from the support CD, and build the driver for the Linux OS you are using.
Chapter 3 Connecting to the wireless network Using the WPS Wizard WPS Wizard is a utility that allows you to easily set up your wireless network using any of the following: • WPS button on both the 802.11n network adapter and the router (or Access Point) that you want to connect to. • PIN code of the WPS router or AP that you want to connect to. Launching the WPS Wizard To launch the WPS Wizard: 1. From the Windows® taskbar, rightclick the WLAN icon , then select WPS. 2. The WPS Wizard appears.
Connecting via the WPS button 1. From the WPS Wizard, select Use the WPS button. Click Next. 2. Press the WPS button on the router.
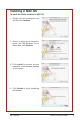
3. The 802.11n network adapter searches for the wireless router. When done, click Next and follow the succeeding onscreen instructions. Note: If WPS configuration failed, move your computer closer to the router then try again. Connecting via the PIN code 1. From the WPS Wizard, select Use the PIN code. Click Next. 2. Select the router that you want to connect to.
3. Click Next. Key in the eight-digit PIN code from the label posted on the router. 4. Assign a name to your network. When done, click Next. 5. Use the auto-generated passphrase as your network’s security key or manually assign a passphrase containing between 8 and 63 characters. Click Next.
To configure the advanced security settings, click Show advanced network security options. Select the Security Method and manually key in your Security key or passphrase. 6. Wait until the WPS Wizard finishes applying the wireless settings. 7. Installation is completed. Click Save or print settings for future reference or Save settings to a USB flash drive to add other devices to the network. Click Finish to close the WPS Wizard.