User Guide RT-N56U Extreme Wireless N Router Ultra Slim, True Dual Band, and Gigabit Internet The ultra-thin and stylish RT-N56U features a 2.4GHz and 5GHz dual bands for an unmatched concurrent wireless HD streaming; built-in ASUS AiDisk and Download Master that support HTTP, FTP, SMB, and BT protocols for uninterrupted download tasks; a capability to handle 300,000 sessions; and the ASUS Green Network Technology, which provides up to 70% power-saving solution.
Table of contents 1 A quick look Package contents................................................................4 Your wireless router...........................................................4 Mounting placement..........................................................5 2 Creating your network What you need....................................................................6 Before you proceed............................................................7 Setting up your wireless router...............
Table of contents Setting up your network printer.....................................36 4 Using the utilities Device Discovery...............................................................40 Firmware Restoration.......................................................41 Download Master.............................................................42 5 Troubleshooting Troubleshooting................................................................46 ASUS DDNS Service.......................................
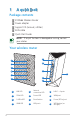
1 A quick look Package contents RT-N56U Wireless Router Power adapter Support CD (manual, utilities) RJ45 cable Quick Start Guide NOTE: If any of the items is damaged or missing, contact your retailer. Your wireless router 7 1 8 2 3 9 4 12 5 10 6 11 1 USB LED 5 Internet connection LED 9 LAN 1 ~ 4 ports 2 5GHz LED 6 Power LED 10 WAN port 3 2.
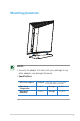
Mounting placement NOTES: • Use only the adapter that came with your package. Using other adapters may damage the device. • Specifications: DC Power adapter DC Input: +19V with max 1.
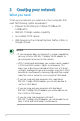
2 Creating your network What you need To set up your network, you need one or two computers that meet the following system requirements: • Ethernet RJ-45 (LAN) port (10Base-T/100Base-TX/ 1000BaseTX) • IEEE 802.11a/b/g/n wireless capability • An installed TCP/IP service • Web browser such as Internet Explorer, Firefox, Safari, or Google Chrome NOTES: • If your computer does not have built-in wireless capabilities, you may install an IEEE 802.
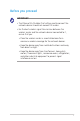
Before you proceed IMPORTANT! • The Ethernet RJ-45 cables that will be used to connect the network devices should not exceed 100 meters. • For the best wireless signal transmission between the wireless router and the network devices connected to it, ensure that you: • Place the wireless router in a centralized area for a maximum wireless coverage for the network devices. • Keep the device away from metal obstructions and away from direct sunlight.
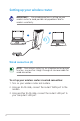
Setting up your wireless router IMPORTANT! Use wired connection in setting up your wireless router to avoid possible setup problems due to wireless uncertainty. B A Wired connection (A) NOTE: Your wireless router has an integrated auto-crossover function, so use either straight-through or crossover cable for wired connection. To set up your wireless router via wired connection: 1. Turn on your wireless router and modem. 2. Using an RJ-45 cable, connect the router’s WAN port to the modem. 3.
Wireless connection (B) To set up your wireless router via wireless connection: 1. Turn on your wireless router and modem. 2. Using an RJ-45 cable, connect the router’s WAN port to the modem. 3. Install an IEEE 802.11a/b/g/n WLAN adapter on your computer. NOTES: • For details on connecting to a wireless network, refer to the WLAN adapter’s user manual. • To set up the security settings for your network, refer to the section Setting up the wireless security settings in this user manual.
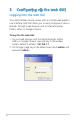
3 Configuring via the web GUI Logging into the web GUI Your ASUS Wireless Router comes with an intuitive web graphics user interface (GUI) that allows you to easily configure its various features through a web browser such as Internet Explorer, Firefox, Safari, or Google Chrome. To log into the web GUI: 1. On your web browser such as Internet Explorer, Firefox, Safari, or Google Chrome, manually key in the wireless router’s default IP address: 192.168.1.1 2.
2. The wireless router’s web GUI launches. Use the web GUI to configure various wireless settings. Setting up the Internet connection Quick Internet Setup (QIS) with auto-detection The Quick Internet Setup (QIS) function guides you in quickly setting up your Internet connection. To use QIS with auto-detection: 1. Launch a web browser such as Internet Explorer, Firefox, Safari, or Google Chrome.
2. The wireless router automatically detects if your ISP connection type is Dynamic IP, PPPoE, PPTP, L2TP, and Static IP. Key in the necessary information for your ISP connection type. IMPORTANT! Obtain the necessary information about your Internet connection type from your ISP. NOTE: The auto-detection of your ISP connection type takes place when you configure the wireless router for the first time or when your wireless router is reset to its default settings. 3. Internet connection setup is done.
2. Simply Wireless Security Setting: Click to go to the wireless router’s web graphics user interface (GUI) to configure your wireless security settings. IMPORTANT! • By default, encryption is disabled and open system authentication is used in your wireless router. This renders your network unsecured against unauthorized access and malicious attacks from hackers. • We strongly recommend that you set up your wireless security settings.
Quick Internet Setup (QIS) without auto-detection To use QIS without auto-detection: 1. Under Internet status, click GO in the Quick Internet Setup field. 2. Select your connection type from these types of ISP services: Dynamic IP, PPPoE, PPTP, L2TP, and Static IP. 3. Click Apply all settings to save the settings. IMPORTANT! Obtain the necessary information about your Internet connection type from your ISP.
Your ASUS Wireless Router as a 3.5G mobile router Install a 3.5G USB adapter on your wireless router to turn it into a mobile router to provide a quick Internet connnection access and sharing for your wireless network clients virtually anywhere. IMPORTANT! Ensure that you subscribe to a mobile (3G/3.5G) Internet service. Contact your ISP for more details about subscribing to this service. NOTES: • The 3.5G USB adapter is purchased separately. • Your wireless router model may not support the 3G function.
Setting up the 3.5G Internet connection settings To set up the 3.5G Internet connection settings: 1. Key in 192.168.1.1 on your web browser. 2. On the login screen, key in the default user name (admin) and password (admin), then click OK. The wireless router’s web GUI launches. 3. From the navigation menu, click Network Map > USB_3G_ dongle, and under the HSDPA status, click GO. You may also click Advanced Setting > USB Application from the navigation menu. 4.
• PIN: Key in the PIN (Personal Identification Number) code. • Dial Number: Key in your dial number. • Username: Key in your username. • Password: Key in your password. IMPORTANT! Obtain the APN service name, PIN code, dial number, username, and password from your ISP. 5. Click Apply, then you are prompted to configure your wireless network settings such as security settings via the wireless router’s web GUI.
NOTE: You can set up different wireless security settings for 2.4GHz and 5GHz bands. 2.
4. On the Wireless name (SSID) field, key in a unique name for your wireless network. 5. From the Security Level dropdown list, select the encryption method for your wireless network. IMPORTANT! The IEEE 802.11n standard prohibits using High Throughput with WEP or WPA-TKIP as the unicast cipher. If you use these encryption methods, your data rate will drop to IEEE 802.11g 54Mbps connection. 6. Key in your security passkey. 7. Click Apply when done.
3. In the Priority field under the Client List, you can set the priority packet for each client as Normal, High, or Low. 4. To block a client’s access to your network, select the client and click Block. To restore a client’s access to your network, select the client in the Blocked client list and click Unblock. Monitoring your USB device The ASUS Wireless Router provides two USB 2.
2. On the Network Map screen, select the USB Disk Status icon to display the information about your USB device. 3. On the UPnP Media Server field, click GO to allow UPnP (Universal Plug and Play) devices such as PS3 to access the multimedia files in your USB disk. NOTE: For more details, refer to the next section Using your router as a UPnP Media Server in this user manual. 4. On the AiDisk Wizard field, click GO to set up an FTP server for Internet file sharing.
Using your router as a UPnP Media Server Your wireless router allows UPnP (Universal Plug and Play) multimedia devices, such as PS3 and XBox 360, to access multimedia files from the USB disk connected to your wireless router. NOTE: Before using the UPnP Media Server function, install a wireless adapter on your UPnP device. To use your router as a UPnP Server: 1. Click UPnP Media Server from the navigation menu at the left side of your screen. 2. Select Enabled.
Using AiDisk for an FTP Server and Network Neighborhood setup AiDisk allows you to set up an FTP server and share the content of a USB disk to the clients in your network. NOTE: Before using AiDisk, ensure that you have inserted a USB disk into the USB port of your wireless router. To use AiDisk: 1. Click AiDisk from the navigation menu at the left side of your screen. 2. From the Welcome to AiDisk wizard screen, click Go.
3. Select the access rights that you want to assign to the clients accessing your shared data. 4. To create your own domain for your FTP site via the ASUS DDNS services, select I will use the service and accept the Terms of service and key in your domain name. 5. Click Next to finish the setup.
5. When done, click Finish. 6. To access the FTP site that you created, launch a web browser or a third-party FTP client utility and key in the ftp link (ftp://) you have previously created. Managing EZQoS Bandwidth EzQoS Bandwidth Management allows you to set the bandwidth priority and manage the network traffic. To set up the bandwidth priority: 1. Click EzQoS Bandwidth Management from the navigation menu at the left side of your screen.
2. Click each of these four applications to set the bandwidth priority: Icon Description Gaming Blaster The router handles gaming traffic at first priority. Internet Application The router handles the e-mail, web browsing and other Internet applications traffic at first priority. AiDisk The router handles at first priority the traffic of downloading/ uploading data to/from the FTP server. Voip/Video Streaming The router handles the audio/video traffic at first priority. 3.
Configuring the Advanced settings Advanced Setting allows you to configure the advanced features of your wireless router. Setting up the DHCP Server You may enable the DHCP Server function in your wireless router so your network clients can automatically obtain IP addresses from your wireless router. NOTE: The ASUS Wireless Router can support up to 253 IP addresses for your network. To set up the DHCP server: 1. Click Advanced Setting from the navigation menu at the left side of your screen. 2.
3. In the Enable the DHCP Server? field, tick Yes. 4. In the IP Pool Starting Address field, key in the starting IP address. 5. In the IP Pool Ending Address field, key in the ending IP address. 6. In the Lease Time field, key in the time that the IP addresses expire and the wireless router automatically assigns new IP Addresses for the network clients. IMPORTANT! • For the IP Pool Starting and Ending IP addresses, we recommend that you use: • IP address: 192.168.1.
Upgrading the firmware NOTE: Download the latest firmware from the ASUS website at http://www.asus.com To upgrade the firmware: 1. Click Advanced Setting from the navigation menu at the left side of your screen. 2. Under the Administration menu, click Firmware Upgrade. 3. In the New Firmware File field, click Browse to locate the new firmware on your computer. 4. Click Upload. The uploading process takes about three minutes.
Restoring/Saving/Uploading settings To restore/save/upload the settings: 1. Click Advanced Setting from the navigation menu at the left side of your screen. 2. Under the Administration menu, click Restore/Save/Upload Setting. 3. Select the tasks that you want to do: • To restore to the default factory settings, click Restore, and click OK in the confirmation message.
Sharing files from a USB storage device Creating a user account You need to create user accounts before you can share the files or data in the USB storage device. To create a user account: 1. Click Advanced Setting > USB Application from the navigation menu at the left side of your screen. 2. Click Share with account, and click OK to enable the sharing feature. 3. Click the Add account icon .
4. In the Account and Password fields, key in the name and password of the client/computer in your network. Retype the password to confirm. Click Add to add the account to the list. Assigning access rights To assign access rights: 1. Click Advanced Setting > USB Application from the navigation menu at the left side of your screen. 2. Select the account that you want to assign access rights to.
3. From the list of file folders, select the type of access rights that you want to assign for specific file folders: • R/W: Select this option to assign read/write access for a specific file folder. • R: Select this option to assign read only access for a specific file folder. • No: Select this option if you do not want to share a specific file folder. 4. Click Apply to apply the changes. 5.
To share files via the FTP server: 1. Ensure that you have set up your FTP server through AiDisk. NOTE: For more details, refer to the section Using AiDisk for an FTP Server and Network Neighborhood setup in this user manual. 2. Enable the DDNS service for FTP server access. To do this, follow these steps: a. From the navigation menu, click Advanced > WAN > DDNS tab. b. In the Enable the DDNS Client? field, tick Yes. c. Key in your User Name or E-mail Address and Password or DDNS key. d.
4. From the list of files/folders, select the type of access rights that you want to assign for specific files/folders: • R/W: Select this option to assign read/write access for a specific file/folder. • W: Select this option to assign write only access for a specific file/folder. • R: Select this option to assign read only access for a specific file/folder. • No: Select this option if you do not want to share a specific file/folder. 5. Click Apply to apply the changes. 6.
Setting up your network printer Use the Network Printer Setup utility to set up a USB printer on your wireless router and allow network clients to access the USB printer. NOTE: To check if your USB printer is compatible with your ASUS wireless router, visit the ASUS website at www.asus.com and click Products > Networks > Printer Support List. To set up your USB Printer: 1. Run the ASUS Wireless Utilities from the support CD, then click Run Network Printer Setup Program.
2. Follow the onscreen instructions to set up your hardware, then click Next. 3. Wait for a few minutes for the initial setup to finish. Click Next.
4. Click Finish to complete the installation. 5. Follow the Windows® OS instructions to install the printer driver.
6. After the printer’s driver installation is completed, network clients can now use the printer.