RT-N10U BLACK 11n Wireless Router User Manual E6688_RT-N10U BLACK_Manual.
E6688 First Edition June 2011 Copyright © 2011 ASUSTeK Computer Inc. All Rights Reserved. No part of this manual, including the products and software described in it, may be reproduced, transmitted, transcribed, stored in a retrieval system, or translated into any language in any form or by any means, except documentation kept by the purchaser for backup purposes, without the express written permission of ASUSTeK Computer Inc. (“ASUS”). 3URGXFW ZDUUDQW\ RU VHUYLFH ZLOO QRW EH H[WHQGHG LI WKH SURGXFW L
Table of contents About this guide .................................................................................... 4 Chapter 1: Knowing your wireless router Package contents .................................................................................. 7 System requirements ............................................................................ 7 Before you proceed ............................................................................... 7 Hardware features ...........................
Table of contents Chapter 5: Installing the utilities utilitie Installing the utilities ........................................................................... 31 Device Discovery ................................................................................. 33 Firmware Restoration.......................................................................... 34 WPS Wizard.......................................................................................... 35 8VLQJ :36 :L]DUG.......................
&KDSWHU &RQÀJXULQJ YLD WKH ZHE *8, 7KLV FKDSWHU SURYLGHV LQVWUXFWLRQV RQ FRQÀJXULQJ WKH $686 :LUHOHVV 5RXWHU using its web graphics user interface (web GUI). • Chapter 5: Installing the utilities This chapter provides information on the utilities that are available from the support CD. • Chapter 6: Troubleshooting This chapter provides you with a troubleshooting guide for solving common problems you may encounter when using the ASUS Wireless Router.
E6688_RT-N10U BLACK_Manual.
1 Knowing your wireless router Package contents Check the following items in your ASUS Wireless Router package. RT-N10U BLACK Wireless Router x1 Power adapter x1 Support CD (manual, utilities) x1 RJ45 cable x1 Quick Start Guide x1 Note: If any of the items is damaged or missing, contact your retailer. System requirements Before installing the ASUS Wireless Router, ensure that your system/network meets the following requirements: • • • An Ethernet RJ-45 port (10Base-T/100Base-TX) At least one IEEE 802.
• Install the device at least 20cm from a person to insure that the product is operated in accordance with the RF Guidelines for Human Exposure adopted by the Federal Communications Commission.
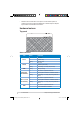
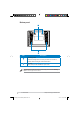
Rear panel 1 Reset 2 Power WAN 3 4 LAN4 LAN3 LAN2 LAN1 5 WPS 7 USB 6 Item Description 1 Reset button 3UHVV WKLV EXWWRQ IRU PRUH WKDQ ÀYH VHFRQGV WR UHVHW WKH V\VWHP WR its factory default settings. 2 Power switch Press this button to turn the power on/off. 3 Power (DC-In) port Insert the AC adapter into this port to connect your router to a power source. 4 WAN port Connect an RJ-45 Ethernet cable to this port to establish WAN connection.
Bottom panel 1 2 Item Description 1 Mounting hooks Use the mounting hooks to mount your router on concrete or wooden surfaces using two round head screws. 2 Air vents These vents provide ventilation to your router. Note: For details on mounting your router on a wall or ceiling, refer to the section Mounting options on the next page of this user manual. 10 RT-N10U BLACK E6688_RT-N10U BLACK_Manual.
Mounting options 2XW RI WKH ER[ WKH $686 :LUHOHVV 5RXWHU LV GHVLJQHG WR VLW RQ D UDLVHG ÁDW VXUIDFH OLNH D ÀOH FDELQHW RU ERRN VKHOI 7KH XQLW PD\ DOVR EH FRQYHUWHG IRU PRXQWLQJ WR D wall or ceiling. To mount the ASUS Wireless Router: 1. 3. 4. Look on the underside for the two mounting hooks. 0DUN WZR XSSHU KROHV LQ D ÁDW VXUIDFH Tighten two screws until only 1/4'' is showing. Latch the hooks of the ASUS Wireless Router onto the screws.
RT-N10U BLACK E6688_RT-N10U BLACK_Manual.
2 Getting started Setting up the wireless router The ASUS Wireless Router includes a web graphics user interface (web GUI) WKDW DOORZV \RX WR FRQÀJXUH WKH ZLUHOHVV URXWHU XVLQJ \RXU ZHE EURZVHU RQ \RXU computer. Note: )RU GHWDLOV RQ FRQÀJXULQJ \RXU ZLUHOHVV URXWHU XVLQJ WKH ZHE *8, UHIHU WR Chapter 4: &RQÀJXULQJ YLD WKH ZHE *8, Using the Quick Internet Setup (QIS) Using QIS with auto-detection The Quick Internet Setup (QIS) function guides you in quickly setting up your Internet connection.
Notes: • If QIS does not detect your Internet connection type, click Skip to manual setting and PDQXDOO\ FRQÀJXUH \RXU FRQQHFWLRQ VHWWLQJV • If QIS does not automatically launch, key in http://192.168.1.1 in your web browser, and manually launch QIS. For more details, refer to the next section Using QIS without autodetection. 2. Assign the network name and network key for a secure wireless network. Click Finish when done. 3. Internet connection setup is done.
Select your next preferred task from any of these options: 1. Going to Internet &OLFN WR VWDUW VXUÀQJ WKH ,QWHUQHW RU GR ,QWHUQHW related activities such as chat, or read/write e-mail messages. 2. Advanced Setting page &OLFN WR JR WR WKH ZLUHOHVV URXWHU·V $GYDQFHG 6HWWLQJ SDJH DQG FRQÀJXUH PRUH DGYDQFHG ZLUHOHVV settings. 3. Add to Favorites &OLFN WR DGG WKH URXWHU·V ZHE LQWHUIDFH WR \RXU Favorites. Note: If you choose options 2 and 3, you will need to log into the web GUI.
RT-N10U BLACK E6688_RT-N10U BLACK_Manual.
3 &RQÀJXULQJ WKH network clients Accessing the wireless router Setting an IP address for wired or wireless clients To access the ASUS Wireless Router, you must have the correct TCP/IP settings RQ \RXU ZLUHG RU ZLUHOHVV FOLHQWV (QVXUH WKDW WKH FOLHQWV· ,3 DGGUHVVHV DUH ZLWKLQ the same subnet as the ASUS Wireless Router. By default, the ASUS Wireless Router integrates the DHCP server function, which automatically assigns IP addresses to the clients in your network.
Windows® 2000 1. Click Start > Control Panel > Network and Dial-up Connection. Right-click Local Area Connection then click Properties. 2. Select Internet Protocol (TCP/IP), then click Properties. 3. Select Obtain an IP address automatically if you want the IP settings to be assigned automatically. Otherwise, select Use the following IP address: and key in IP address, Subnet mask, and Default gateway. 4.
Windows® XP 1. Click Start > Control Panel > Network Connection. Right-click Local Area Connection then select Properties. 2. Select Internet Protocol (TCP/IP), then click Properties. 3. Select Obtain an IP address automatically if you want the IP settings to be assigned automatically. Otherwise, select Use the following IP address: and key in IP address, Subnet mask, and Default gateway. 4. Select Obtain DNS server address automatically if you want the DNS server settings to be assigned automatically.
Windows® Vista/7 1. Go to Start > Control Panel > Network and Internet > Network and Sharing Center. Click View status > Properties > Continue. 2. Select Internet Protocol Version 4 (TCP/IPv4), then click Properties. 3. Select Obtain an IP address automatically if you want the IP settings to be assigned automatically. Otherwise, select Use the following IP address: and key in IP address and Subnet mask. 4.
4 &RQÀJXULQJ YLD the web GUI &RQÀJXULQJ YLD WKH ZHE *8, 7KH URXWHU·V ZHE JUDSKLFV XVHU LQWHUIDFH ZHE *8, DOORZV \RX WR FRQÀJXUH WKHVH features: Network Map and EZQoS Bandwidth Management. To access the web GUI: /DXQFK D ZHE EURZVHU WKHQ NH\ LQ WKH URXWHU·V ,3 DGGUHVV 7KH ORJLQ SDJH RI WKH URXWHU·V ZHE *8, DSSHDUV Note: ,Q WKH 5RXWHU PRGH WKH URXWHU·V ,3 DGGUHVV LV , Q WKH $3 PRGH XVH 'HYLFH 'LVFRYHU\ LQFOXGHG LQ WKH VXSSRUW &' WR ÀQG WKH URXWHU·V ,3 address. 2.
Using the Network Map 1HWZRUN 0DS DOORZV \RX WR YLHZ WKH VWDWXV DQG FRQÀJXUH WKH FRQQHFWLRQ VHWWLQJV of the Internet, system, and clients in your network. It enables you to quickly set up your Wide Area Network (WAN) using the Quick Internet Setup (QIS) feature, or to TXLFNO\ VHW XS \RXU /RFDO $UHD 1HWZRUN /$1 XVLQJ WKH :36 :L]DUG Note: )RU PRUH GHWDLOV RQ WKH :36 :L]DUG UHIHU WR WKH VHFWLRQ WPS Wizard in Chapter 5 of this user manual. 7R YLHZ WKH VWDWXV RU FRQÀJXUH WKH VHWWLQJV FOLFN DQ\ RI WKHVH LF
&UHDWLQJ PXOWLSOH 66,' SURÀOHV 7KH ZLUHOHVV URXWHU DOORZV \RX WR FUHDWH PXOWLSOH 66,' SURÀOHV WKDW PHHW YDULRXV working scenarios. 7R FUHDWH DQ 66,' SURÀOH 1. Click Add LQ WKH 66,' ÀHOG &RQÀJXUH WKH SURÀOH VHWWLQJV WKHQ FOLFN Add. &KDSWHU &RQÀJXULQJ YLD WKH ZHE *8, E6688_RT-N10U BLACK_Manual.indd 23 57 1 8 %/$&.
Managing bandwidth with EzQoS (]4R6 %DQGZLGWK 0DQDJHPHQW HQDEOHV \RX WR VHW WKH EDQGZLGWK SULRULW\ DQG PDQDJH WKH QHWZRUN WUDIÀF To set up the bandwidth priority: 1. Click EzQoS Bandwidth Management from the navigation menu at the left side of your screen. 2. Click each of these four applications to set the bandwidth priority: Icon Description Gaming Blaster 7KH URXWHU KDQGOHV JDPLQJ WUDIÀF DW ÀUVW SULRULW\ Internet Application The router handles the e-mail, web browsing and other Internet DSSOLFDWLRQV
Setting up the operation mode The Operation Mode page allows you to set up your wireless router into any of these three operation modes: Router mode, Repeater mode, or Access Point mode.
Setting up the wireless router in Repeater mode In the Repeart mode, the wireless router extends your wireless network coverage DQG SURYLGHV \RX ZLWK KLJKHU ZLUHOHVV VLJQDO 1$7 ÀUHZDOO DQG ,3 VKDULQJ DUH disabled. To set up the wireless router in Repeater mode: 1. From the navigation menu, click Operation Mode, select Repeater mode, and click Save. 2. From the network list, select the network that you want to connect to, then click Connect. 26 57 1 8 %/$&. E6688_RT-N10U BLACK_Manual.
Setting up the wireless router in AP mode In the AP mode, the wireless router receives the WAN IP address from the router connected to the WAN port and provides you with wireless radio signals. The NAT, ÀUHZDOO DQG ,3 VKDULQJ VHUYLFHV DUH GLVDEOHG To set up the wireless router in AP mode: 1. From the navigation menu, click Operation Mode, select AP mode, and click Save. 2. From the network list, select the network that you want to connect to, then click Connect.
8SJUDGLQJ WKH ÀUPZDUH Note: 'RZQORDG WKH ODWHVW ÀUPZDUH IURP WKH $686 ZHEVLWH DW http://www.asus.com. 7R XSJUDGH WKH ÀUPZDUH 1. Click Advanced Setting from the navigation menu at the left side of your screen. 2. Under the Administration menu, click Firmware Upgrade. 3. In the New Firmware File ÀHOG FOLFN Browse WR ORFDWH WKH QHZ ÀUPZDUH RQ \RXU computer. 4. Click Upload. The uploading process takes about three minutes.
Restoring/Saving/Uploading settings To restore/save/upload the settings: 1. Click Advanced Setting from the navigation menu at the left side of your screen. 2. Under the Administration menu, click Restore/Save/Upload Setting. 3. Select the tasks that you want to do: • To restore to the default factory settings, click Restore, and click OK in the FRQÀUPDWLRQ PHVVDJH • To save the current system settings, click Save, and click Save LQ WKH ÀOH GRZQORDG ZLQGRZ WR VDYH WKH V\VWHP ÀOH LQ \RXU SUHIHUUHG SDWK •
57 1 8 %/$&. E6688_RT-N10U BLACK_Manual.
5 Installing the utilities Installing the utilities 7KH VXSSRUW &' FRQWDLQV WKH XWLOLWLHV IRU FRQÀJXULQJ WKH $686 :LUHOHVV 5RXWHU To install the ASUS WLAN Utilities in Microsoft® Windows, insert the support CD in the CD drive. If Autorun is disabled, run setup.exe from the root directory of the support CD. To install the utilities: 1. Click Install...Utilities. 2. Click Next. Chapter 5: Installing the utilities E6688_RT-N10U BLACK_Manual.
3. Click Next to accept the default destination folder or click Browse to specify another path. 4. Click Next to accept the default program folder or enter another name. 5. Click Finish when setup is completed. 32 RT-N10U BLACK E6688_RT-N10U BLACK_Manual.
Device Discovery Device Discovery is an ASUS WLAN utility that detects an ASUS wireless router DQG HQDEOHV \RX WR FRQÀJXUH WKH GHYLFH To launch the Device Discovery utility: )URP \RXU FRPSXWHU·V GHVNWRS FOLFN Start > All Programs > ASUS Utility > RT-N10U BLACK Wireless Router > Device Discovery. • • • Click &RQÀJXUH WR DFFHVV WKH ZHE *8, DQG FRQÀJXUH WKH ZLUHOHVV URXWHU Click Search to search for ASUS wireless routers within range. Click Exit to exit the application.
Firmware Restoration Firmware Restoration is used on an ASUS Wireless Router that failed during its ÀUPZDUH XSJUDGLQJ SURFHVV ,W XSORDGV WKH ÀUPZDUH WKDW \RX VSHFLI\ 7KH SURFHVV takes about three to four minutes. Important: Launch the rescue mode before using the Firmware Restoration utility. To launch the rescue mode and use the Firmware Restoration utility: 1. Unplug the wireless router from the power source. 2.
WPS Wizard WPS (Wi-Fi Protected Setup) allows you to set up a secure and protected wireless network easily. Using WPS Wizard Note: • Ensure that you use a wireless LAN adapter with WPS function. • Windows® operating systems and wireless LAN cards/adapters that support WPS: OS Support Wireless Adapter Support Intel wireless LAN card Vista 32/64 ASUS 167gv2 driver v3.0.6.0 or later ASUS 160N/130N driver v2.0.0.0 or later Intel wireless LAN card XP SP2 ASUS 167gv2 driver v1.2.2.
2. Press the WPS button on your router. Reset Power WAN LAN4 LAN3 LAN2 LAN1 WPS USB WPS button 2Q WKH :36 :L]DUG FOLFN Next to continue. Notes: :KHQ UXQQLQJ :36 WKH ,QWHUQHW FRQQHFWLRQ SDXVHV EULHÁ\ WKHQ UHHVWDEOLVKHV WKH FRQQHFWLRQ ,I WKH :36 EXWWRQ LV SXVKHG ZLWKRXW UXQQLQJ WKH :36 :L]DUG WKH 3:5 LQGLFDWRU ÁDVKHV DQG ,QWHUQHW FRQQHFWLRQ SDXVHV EULHÁ\ DQG WKHQ UHHVWDEOLVKHV WKH FRQQHFWLRQ 36 RT-N10U BLACK E6688_RT-N10U BLACK_Manual.
.H\ LQ GHVLUHG QHWZRUN QDPH RU 66,' VHUYLFH VHW LGHQWLÀHU :KHQ GRQH FOLFN Next. 5. Create and key in a passphrase consisting of 8-63 characters or use the automatically generated passphrase then click Next. A passphrase is a sentence, phrase, or sequence of alpha-numeric characters used to generate a security key. Chapter 5: Installing the utilities E6688_RT-N10U BLACK_Manual.
:KHQ ÀQLVKHG FOLFN Save or print settings for future reference or Save VHWWLQJV WR D 86% ÁDVK GULYH to add other devices to the network. Click Next to connect to the Internet. Note: )RU PRUH GHWDLOV RQ DGGLQJ GHYLFHV WR WKH QHWZRUN XVLQJ D 86% ÁDVK GULYH UHIHU WR WKH section $GGLQJ QHWZRUN GHYLFHV XVLQJ D 86% ÁDVK GULYH on the next page.
$GGLQJ QHWZRUN GHYLFHV XVLQJ D 86% ÁDVK GULYH :LWK WKH :36 XWLOLW\ \RX FDQ DGG GHYLFHV WR \RXU QHWZRUN XVLQJ D 86% ÁDVK GULYH 7R DGG QHWZRUN GHYLFHV XVLQJ D 86% ÁDVK GULYH ,Q WKH :36 :L]DUG FOLFN 6DYH VHWWLQJV WR D 86% ÁDVK GULYH. ,QVHUW D 86% ÁDVK GULYH LQWR \RXU FRPSXWHU V 86% SRUW WKHQ VHOHFW WKH GULYH from the dropdown list. When done, click Next. Chapter 5: Installing the utilities E6688_RT-N10U BLACK_Manual.
3. Unplug the USB flash drive from your computer then insert it to the other computer that you want to add to your wireless network. 4. Locate SetupWireless.exe from the USB drive, and double-click to run it. Click Yes to add the computer to the wireless network. 5. Click OK to exit the Wireless Network Setup Wizard. 40 RT-N10U BLACK E6688_RT-N10U BLACK_Manual.
Setting up your network printer Use the Network Printer Setup utility to set up a USB printer on your wireless router and allow network clients to access the USB printer. Note: To check if your USB printer is compatible with your ASUS wireless router, visit the ASUS website at ww.asus.com and click Products > Networks > Printer Support List. To set up your USB Printer: 1. Run the ASUS Wireless Utilities from the support CD, then click Run Network Printer Setup Program. 2.
:DLW IRU D IHZ PLQXWHV IRU WKH LQLWLDO VHWXS WR ÀQLVK &OLFN Next. 4. Click Finish to complete the installation. 42 RT-N10U BLACK E6688_RT-N10U BLACK_Manual.
5. Follow the Windows® OS instructions to install the printer driver. $IWHU WKH SULQWHU·V GULYHU LQVWDOODWLRQ LV FRPSOHWHG QHWZRUN FOLHQWV FDQ QRZ XVH the printer. Chapter 5: Installing the utilities E6688_RT-N10U BLACK_Manual.
RT-N10U BLACK E6688_RT-N10U BLACK_Manual.
6 Troubleshooting Troubleshooting This troubleshooting guide provides solutions to some common problems that you may encounter while installing or using the ASUS Wireless Router. These problems require simple troubleshooting that you can perform by yourself. Contact the ASUS Technical Support if you encounter problems not mentioned in this chapter. Problem Action I cannot access the web GUI IRU FRQÀJXULQJ WKH URXWHU 1. Launch a web browser, then click Tools > Internet Options... 2. Under 7HPSRUDU\ ,QW
Problem Cannot access the Internet via wireless LAN adapter. Action • • • • • • Internet is not accessible. • • When ADSL Modem “Link” light is ON (not blinking), this means Internet Access is possible. Check the status indicators on the ADSL modem and the wireless router. Check if the WAN LED on the wireless router is ON. If the LED is not ON, change the cable and try again. • • Restart your computer.
Problem How to restore the system to its default settings? Action • • Press the Restore button at the rear panel RI WKH ZLUHOHVV URXWHU IRU PRUH WKDQ ÀYH seconds. Refer to the section Restoring/Saving/ Uploading settings in Chapter 4 of this user manual. The following are the factory default settings: User Name: admin Password: admin Enable DHCP: Yes (if WAN cable is plugged in) IP address: 192.168.1.1 Domain Name: (Blank) Subnet Mask: 255.255.255.0 DNS Server 1: 192.168.1.
ASUS DDNS Service RT-N10U BLACK supports the ASUS DDNS service. When exchanging devices at the service center, if you have registered the ASUS DDNS service and want to keep the original domain name, data transfer is a must. Visit your local service center for more information. Notes: ,I WKHUH LV QR DFWLYLW\ LQ WKH GRPDLQ VXFK DV UHFRQÀJXULQJ WKH URXWHU RU DFFHVVLQJ WKH registered domain name - within 90 days, the system automatically deletes the registered information. ,I \RX HQFRXQWHU DQ\ SUREO
5. After restarting the router, why is it that I see different WAN IPs in MS '26 DQG LQ WKH URXWHU FRQÀJXUDWLRQ SDJH" This is normal. The interval time between the ISP DNS server and ASUS ''16 UHVXOWV LQ GLIIHUHQW :$1 ,3V LQ 06 '26 DQG LQ WKH URXWHU FRQÀJXUDWLRQ page. Different ISPs may have different interval time for IP updating. 6. Is the ASUS DDNS service free, or is it just a trial version? The ASUS DDNS service is a free and embedded service in some ASUS routers.
RT-N10U BLACK E6688_RT-N10U BLACK_Manual.
Appendices Notices ASUS Recycling/Takeback Services ASUS recycling and takeback programs come from our commitment to the highest standards for protecting our environment. We believe in providing solutions for you to be able to responsibly recycle our products, batteries, other components, as well as the packaging materials. Please go to http://csr.asus.com/english/Takeback.htm for the detailed recycling information in different regions.
Prohibition of Co-location This device and its antenna(s) must not be co-located or operating in conjunction with any other antenna or transmitter. Safety Information 7R PDLQWDLQ FRPSOLDQFH ZLWK )&&·V 5) H[SRVXUH JXLGHOLQHV WKLV HTXLSPHQW VKRXOG be installed and operated with minimum distance 20cm between the radiator and your body. Use on the supplied antenna.
GNU General Public License Licensing information This product includes copyrighted third-party software licensed under the terms of the GNU General Public License. Please see The GNU General Public License for the exact terms and conditions of this license. We include a copy of the GPL ZLWK HYHU\ &' VKLSSHG ZLWK RXU SURGXFW $OO IXWXUH ÀUPZDUH XSGDWHV ZLOO DOVR be accompanied with their respective source code. Please visit our web site for updated information.
$OVR IRU HDFK DXWKRU·V SURWHFWLRQ DQG RXUV ZH ZDQW WR PDNH FHUWDLQ WKDW HYHU\RQH understands that there is no warranty for this free software. If the software is PRGLÀHG E\ VRPHRQH HOVH DQG SDVVHG RQ ZH ZDQW LWV UHFLSLHQWV WR NQRZ WKDW ZKDW they have is not the original, so that any problems introduced by others will not UHÁHFW RQ WKH RULJLQDO DXWKRUV· UHSXWDWLRQV Finally, any free program is threatened constantly by software patents.
F ,I WKH PRGLÀHG SURJUDP QRUPDOO\ UHDGV FRPPDQGV LQWHUDFWLYHO\ ZKHQ UXQ you must cause it, when started running for such interactive use in the most ordinary way, to print or display an announcement including an appropriate copyright notice and a notice that there is no warranty (or else, saying that you provide a warranty) and that users may redistribute the program under these conditions, and telling the user how to view a copy of this License.
binary form) with the major components (compiler, kernel, and so on) of the operating system on which the executable runs, unless that component itself accompanies the executable. If distribution of executable or object code is made by offering access to copy from a designated place, then offering equivalent access to copy the source code from the same place counts as distribution of the source code, even though third parties are not compelled to copy the source along with the object code. 4.
has the sole purpose of protecting the integrity of the free software distribution system, which is implemented by public license practices. Many people have made generous contributions to the wide range of software distributed through WKDW V\VWHP LQ UHOLDQFH RQ FRQVLVWHQW DSSOLFDWLRQ RI WKDW V\VWHP LW LV XS WR WKH author/donor to decide if he or she is willing to distribute software through any other system and a licensee cannot impose that choice.
12 IN NO EVENT UNLESS REQUIRED BY APPLICABLE LAW OR AGREED TO IN WRITING WILL ANY COPYRIGHT HOLDER, OR ANY OTHER PARTY WHO MAY MODIFY AND/OR REDISTRIBUTE THE PROGRAM AS PERMITTED ABOVE, BE LIABLE TO YOU FOR DAMAGES, INCLUDING ANY GENERAL, SPECIAL, INCIDENTAL OR CONSEQUENTIAL DAMAGES ARISING OUT OF THE USE OR INABILITY TO USE THE PROGRAM (INCLUDING BUT NOT LIMITED TO LOSS OF DATA OR DATA BEING RENDERED INACCURATE OR LOSSES SUSTAINED BY YOU OR THIRD PARTIES OR A FAILURE OF THE PROGRAM TO OPERATE WITH ANY OTHE
ASUS Contact Information $6867H. &20387(5 ,1& $VLD 3DFLÀF Address Website 15 Li-Te Road, Peitou, Taipei, Taiwan 11259 www.asus.com.tw Technical Support Telephone Support Fax Online support +886228943447 +886228907698 support.asus.com ASUS COMPUTER INTERNATIONAL (America) Address Telephone Fax Website Online support 800 Corporate Way, Fremont, CA 94539, USA +15029550883 +15029338713 usa.asus.com support.asus.com ASUS COMPUTER GmbH (Germany and Austria) Address Fax Website Online contact Harkort Str.
Manufacturer: ASUSTeK Computer Inc. Tel: +886-2-2894-3447 Address: No. 150, LI-TE RD., PEITOU, TAIPEI 112, TAIWAN ASUS Computer GmbH Authorised representative in Europe: Address: HARKORT STR. 21-23, 40880 RATINGEN, GERMANY BOGAZICI BIL GISAYAR SAN. VE TIC. A.S. Authorised distributors in Turkey: Tel: +90 212 3311000 Address: AYAZAGA MAH. KEMERBURGAZ CAD. NO.10 AYAZAGA/ISTANBUL CIZGI Elektronik San. Tic. Ltd. Sti. Tel: 0090 2123567070 Address: CEMAL SURURI CD.