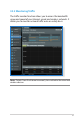
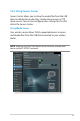
3.3.2 Monitoring Traffic The traffic monitor function allows you to access the bandwidth usage and speed of your Internet, wired, and wireless networks. It allows you to monitor network traffic even on a daily basis. Note: Packets from the Internet are evenly transmitted to the wired and wireless devices.
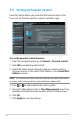
3.4 Setting up Parental Control Parental Control allows you to control the Internet access time. Users can set the time limit for a client’s network usage. To use the parental control function: 1. From the navigation panel, go to General > Parental control. 2. Click ON to enable Parental Control. 3. Select the client whose network usage you want to control. You may also key in the client’s MAC address in the Client MAC Address column.
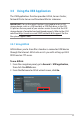
.5 Using the USB Application The USB Applications function provides AiDisk, Servers Center, Network Printer Server and Download Master submenus. IMPORTANT! To use the server functions, you need to insert a USB storage device, such as a USB hard disk or USB flash drive, in the USB 2.0 port on the rear panel of your wireless router. Ensure that the USB storage device is formatted and partitioned properly. Refer to the ASUS website at http://event.asus.
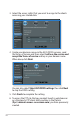
3. Select the access rights that you want to assign to the clients accessing your shared data. 4. Create your domain name via the ASUS DDNS services, read the Terms of Service and then select I will use the service and accept the Terms of service and key in your domain name. When done, click Next. You can also select Skip ASUS DDNS settings then click Next to skip the DDNS setting. 5. Click Finish to complete the setting. 6.
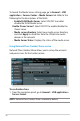
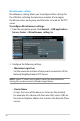
3.5.2 Using Servers Center Servers Center allows you to share the media files from the USB disk via a Media Server directory, Samba share service, or FTP share service. You can also configure other settings for the USB disk in the Servers Center. Using Media Server Your wireless router allows DLNA-supported devices to access multimedia files from the USB disk connected to your wireless router. NOTE: Before using the DLNA Media Server function, connect your device to the RT-AC56U’s network.
To launch the Media Server setting page, go to General > USB application > Servers Center > Media Servers tab. Refer to the following for the descriptions of the fields: • Enable DLNA Media Server: Select ON/OFF to enable/ disable the DLNA Media Server. Enable iTunes Server?: Select ON/OFF to enable/disable the iTunes Server. • Media server directory: Select your media server directory and click Apply to share files from the USB disk to media devices in the network.
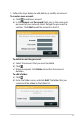
2. Follow the steps below to add, delete, or modify an account. To create a new account: a) Click to add new account. b) In the Account and Password fields, key in the name and password of your network client. Retype the password to confirm. Click Add to add the account to the list. To delete an existing account: a) Select the account that you want to delete. b) Click . c) When prompted, click Delete to confirm the account deletion. To add a folder: a) Click .
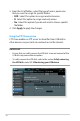
3. From the list of folders, select the type of access permission that you want to assign for specific folders: • R/W: Select this option to assign read/write access. • R: Select this option to assign read-only access. • No: Select this option if you do not want to share a specific file folder. 4. Click Apply to apply the changes. Using the FTP Share service FTP share enables an FTP server to share files from USB disk to other devices via your local area network or via the Internet.
To use FTP Share service: NOTES: Ensure that you have set up your FTP server through AiDisk. For more details, refer to the section 3.5.1 Using AiDisk. 1. From the navigation panel, click General > USB application > Servers Center > FTP Share tab. 2. From the list of folders, select the type of access rights that you want to assign for specific folders: • R/W: Select to assign read/write access for a specific folder. • W: Select to assign write only access for a specific folder.
Miscellaneous setting Miscellaneous setting allows you to configure other settings for the USB disk, including the maximum number of user logins, the device name, work group, and character set used on the FTP server. To configure Miscellaneous settings: 1. From the navigation panel, click General > USB application > Servers Center > Miscellaneous setting tab. 2. Configure the following settings: • Maximum Login User Set the maximum number of concurrent connections of the Network Neighborhood or FTP Server.
• Work Group Assigns the name of the local RT-AC56U network as seen in Network Neighborhood. NOTE: For Device Name and Work Group, the standard input characters include letters (a-z, A-Z), digits (0-9), space, underscores(_), and hyphens(-). The first and last character should not contain any spaces. An invalid workgroup name makes it harder for other devices to find your device in the network. • Character set on FTP Server Select the appropriate encoding used during data exchange on the FTP server. 3.5.
To set up 3G/4G internet access: 1. From the navigation panel, click General > USB application > 3G/4G. 2. In the Enable USB Modem field, select Yes. 3. Set up the following: • Location: Select your 3G/4G service provider’s location from the dropdown list. • ISP: Select your Internet Service Provider (ISP) from the dropdown list. • APN (Access Point Name) service (optional): Contact your 3G/4G service provider for detailed information.
3.6 Using AiCloud AiCloud is a cloud service application that allows you to save, sync, share, and access your files. To use AiCloud: 1. From Google Play Store or Apple Store, download and install the ASUS AiCloud app to your smart device. 2. Connect your smart device to your network. Follow the instructions to complete the AiCloud setup process.
3.6.1 Cloud Disk To create a cloud disk: 1. Insert a USB storage device into the wireless router. 2. Turn on Cloud Disk. 3. Go to https://www.asusnetwork.net and enter the router login account and password. For better user experience, we recommend that you use Google Chrome or Firefox.
4. You can now start accessing Cloud Disk files on devices connected to the network. NOTE: When accessing the devices that are connected to the network, you need to enter the device’s user name and password manually, which will not be saved by AiCloud for security reason.
3.6.2 Smart Access The Smart Access function allows you to easily access your home network via your router’s domain name. NOTES: 46 • You can create a domain name for your router with ASUS DDNS. For more details, refer to section 4.3.5 DDNS. • By default, AiCloud provides a secure HTTPS connection. Key in https://[yourASUSDDNSname].asuscomm.com for a very secure Cloud Disk and Smart Access usage.
3.6.3 Smart Sync To use Smart Sync: 1. Launch AiCloud, click Smart Sync > Go. 2. Select ON to enable Smart Sync. 3. Click Add new account. 4. Enter your ASUS WebStorage account password and select the directory that you want to sync with WebStorage. 5. Click Apply.
4 Configuring the Advanced Settings 4.1 Wireless 4.1.1 General The General tab allows you to configure the basic wireless settings. To configure the basic wireless settings: 1. From the navigation panel, go to Advanced Settings > Wireless > General tab. 2. Select 2.4GHz or 5GHz as the frequency band for your wireless network. 3. Assign a unique name containing up to 32 characters for your SSID (Service Set Identifier) or network name to identify your wireless network.
4. In the Hide SSID field, select Yes to prevent wireless devices from detecting your SSID. When this function is enabled, you would need to enter the SSID manually on the wireless device to access the wireless network. 5. Select any of these wireless mode options to determine the types of wireless devices that can connect to your wireless router: • Auto: Select Auto to allow 802.11AC, 802.11n, 802.11g, and 802.11b devices to connect to the wireless router. • Legacy: Select Legacy to allow 802.
• WPA/WPA2 Personal/WPA Auto-Personal: This option provides strong security. You can use either WPA (with TKIP) or WPA2 (with AES). If you select this option, you must use TKIP + AES encryption and enter the WPA passphrase (network key). • WPA/WPA2 Enterprise/WPA Auto-Enterprise: This option provides very strong security. It is with integrated EAP server or an external RADIUS back-end authentication server. • Radius with 802.
4.1.2 WPS WPS (Wi-Fi Protected Setup) is a wireless security standard that allows you to easily connect devices to a wireless network. You can configure the WPS function via the PIN code or WPS button. NOTE: Ensure that the devices support WPS. To enable WPS on your wireless network: 1. From the navigation panel, go to Advanced Settings > Wireless > WPS tab. 2. In the Enable WPS field, move the slider to ON. 3. WPS uses 2.4GHz by default.
Note: WPS supports authentication using Open System, WPA-Personal, and WPA2-Personal. WPS does not support a wireless network that uses a Shared Key, WPA-Enterprise, WPA2-Enterprise, and RADIUS encryption method. 3. In the WPS Method field, select Push Button or Client PIN code. If you select Push Button, go to step 4. If you select Client PIN code, go to step 5. 4. To set up WPS using the router’s WPS button, follow these steps: a.
4.1.3 Bridge Bridge or WDS (Wireless Distribution System) allows your ASUS wireless router to connect to another wireless access point exclusively, preventing other wireless devices or stations to access your ASUS wireless router. It can also be considered as a wireless repeater where your ASUS wireless router communicates with another access point and other wireless devices. To set up the wireless bridge: 1. From the navigation panel, go to Advanced Settings > Wireless > Bridge tab. 2.
• HYBRID: Enables the Wireless Bridge feature and allows other wireless devices/stations to connect to the router. NOTE: In Hybrid mode, wireless devices connected to the ASUS wireless router will only receive half the connection speed of the Access Point. 4. In the Connect to APs in list field, click Yes if you want to connect to an Access Point listed in the Remote AP List. 5. In the Control Channel field, select the operating channel for the wireless bridge.
4.1.4 Wireless MAC Filter Wireless MAC filter provides control over packets transmitted to a specified MAC (Media Access Control) address on your wireless network. To set up the Wireless MAC filter: 1. From the navigation panel, go to Advanced Settings > Wireless > Wireless MAC Filter tab. 2. In the Frequency field, select the frequency band that you want to use for the Wireless MAC filter. 3. In the MAC Filter Mode dropdown list, select either Accept or Reject.
4.1.5 RADIUS Setting RADIUS (Remote Authentication Dial In User Service) Setting provides an extra layer of security when you choose WPAEnterprise, WPA2-Enterprise, or Radius with 802.1x as your Authentication Mode. To set up wireless RADIUS settings: 1. Ensure that the wireless router’s authentication mode is set to WPA-Enterprise, WPA2-Enterprise, or Radius with 802.1x. NOTE: Please refer to section 4.1.1 General section for configuring your wireless router’s Authentication Mode. 2.
4.1.6 Professional The Professional screen provides advanced configuration options. NOTE: We recommend that you use the default values on this page. In the Professional Settings screen, you can configure the following: • Frequency: Select the frequency band that the professional settings will be applied to. • Enable Radio: Select Yes to enable wireless networking. Select No to disable wireless networking.
• Date to Enable Radio (weekend): You can specify which days of the weekend wireless networking is enabled. • Time of Day to Enable Radio: You can specify a time range when wireless networking is enabled during the weekend. • Set AP isolated: The Set AP isolated item prevents wireless devices on your network from communicating with each other. This feature is useful if many guests frequently join or leave your network. Select Yes to enable this feature or select No to disable.
• Wireless multicast forwarding: Select Enable to allow the wireless router to forward multicast traffic to other wireless devices that support multicast. Select Disable to prevent the router from forwarding multicast transmissions. • Enable WMM APSD: Enable WMM APSD (Wi-Fi Multimedia Automatic Power Save Delivery) to improve power management between wireless devices. Select Disable to switch off WMM APSD.
To modify the LAN IP settings: 1. From the navigation panel, go to Advanced Settings > LAN > LAN IP tab. 2. Modify the IP address and Subnet Mask. 3. When done, click Apply. 4.2.2 DHCP Server Your wireless router uses DHCP to assign IP addresses automatically on your network. You can specify the IP address range and lease time for the clients on your network. To configure the DHCP server: 1. From the navigation panel, go to Advanced Settings > LAN > DHCP Server tab. 2.
3. In the Domain Name text box, enter a domain name for the wireless router. 4. In the IP Pool Starting Address field, key in the starting IP address. 5. In the IP Pool Ending Address field, key in the ending IP address. 6. In the Lease Time field, specify in seconds when an assigned IP address will expire. Once it reaches this time limit, the DHCP server will then assign a new IP address. NOTES: • We recommend that you use an IP address format of 192.168.1.
4.2.3 Route If your network makes use of more than one wireless router, you can configure a routing table to share the same Internet service. NOTE: We recommend that you do not change the default route settings unless you have advanced knowledge of routing tables. To configure the LAN Routing table: 1. From the navigation panel, go to Advanced Settings > LAN > Route tab. 2. On the Enable static routes field, choose Yes. 3.
4.2.4 IPTV The wireless router supports connection to IPTV services through an ISP or a LAN. The IPTV tab provides the configuration settings needed to set up IPTV, VoIP, multicasting, and UDP for your service. Contact your ISP for specific information regarding your service.
4.3 WAN 4.3.1 Internet Connection The Internet Connection screen allows you to configure the settings of various WAN connection types. To configure the WAN connection settings: 1. From the navigation panel, go to Advanced Settings > WAN > Internet Connection tab. 2. Configure the following settings below. When done, click Apply. • WAN Connection Type: Choose your Internet Service Provider type. The choices are Automatic IP, PPPoE, PPTP, L2TP or fixed IP.
• Enable NAT: NAT (Network Address Translation) is a system where one public IP (WAN IP) is used to provide Internet access to network clients with a private IP address in a LAN. The private IP address of each network client is saved in a NAT table and is used to route incoming data packets.
• MAC Address: MAC (Media Access Control) address is a unique identifier for your networking device. Some ISPs monitor the MAC address of networking devices that connect to their service and reject any unrecognized device that attempt to connect. To avoid connection issues due to an unregistered MAC address, you can: • Contact your ISP and update the MAC address associated with your ISP service.
4.3.2 Port Trigger Port range triggering opens a predetermined incoming port for a limited period of time whenever a client on the local area network makes an outgoing connection to a specified port. Port triggering is used in the following scenarios: • More than one local client needs port forwarding for the same application at a different time. • An application requires specific incoming ports that are different from the outgoing ports. To set up Port Trigger: 1.
• Trigger Port: Specify a trigger port to open the incoming port. • Protocol: Select the protocol, TCP, or UDP. • Incoming Port: Specify an incoming port to receive inbound data from the Internet. • Protocol: Select the protocol, TCP, or UDP. NOTES: 68 • When connecting to an IRC server, a client PC makes an outgoing connection using the trigger port range 66660-7000. The IRC server responds by verifying the username and creating a new connection to the client PC using an incoming port.
4.3.3 Virtual Server/Port Forwarding Port forwarding is a method to direct network traffic from the Internet to a specific port or a specific range of ports to a device or number of devices on your local network. Setting up Port Forwarding on your router allows PCs outside the network to access specific services provided by a PC in your network.
2. Configure the following settings below. When done, click Apply. • Enable Port Forwarding: Choose Yes to enable Port Forwarding. • Famous Server List: Determine which type of service you want to access. • Famous Game List: This item lists ports required for popular online games to work correctly. • FTP Server Port: Avoid assigning the port range 20:21 for your FTP server as this would conflict with the router’s native FTP server assignment. • Service Name: Enter a service name.
• Local IP: Key in the client’s LAN IP address. NOTE: Use a static IP address for the local client to make port forwarding work properly. Refer to section 4.2 LAN for information. • Local Port: Enter a specific port to receive forwarded packets. Leave this field blank if you want the incoming packets to be redirected to the specified port range. • Protocol: Select the protocol. If you are unsure, select BOTH.
4.3.4 DMZ Virtual DMZ exposes one client to the Internet, allowing this client to receive all inbound packets directed to your Local Area Network. Inbound traffic from the Internet is usually discarded and routed to a specific client only if port forwarding or a port trigger has been configured on the network. In a DMZ configuration, one network client receives all inbound packets. Setting up DMZ on a network is useful when you need incoming ports open or you want to host a domain, web, or e-mail server.
4.3.5 DDNS Setting up DDNS (Dynamic DNS) allows you to access the router from outside your network through the provided ASUS DDNS Service or another DDNS service. To set up DDNS: 1. From the navigation panel, go to Advanced Settings > WAN > DDNS tab. 2. Configure the following settings below. When done, click Apply. • Enable the DDNS Client: Enable DDNS to access the ASUS router via the DNS name rather than WAN IP address. • Server and Host Name: Choose ASUS DDNS or other DDNS.
• Enable wildcard: Enable wildcard if your DDNS service requires one. NOTES: DDNS service will not work under these conditions: • When the wireless router is using a private WAN IP address (192.168. x.x, 10.x.x.x, or 172.16.x.x), as indicated by a yellow text. • The router may be on a network that uses multiple NAT tables. 4.3.6 NAT Passthrough NAT Passthrough allows a Virtual Private Network (VPN) connection to pass through the router to the network clients.
4.4 IPv6 This wireless router supports IPv6 addressing, a system that supports more IP addresses. This standard is not yet widely available. Contact your ISP if your Internet service supports IPv6. To set up IPv6: 1. From the navigation panel, go to Advanced Settings > IPv6. 2. Select your Connection Type. The configuration options vary depending on your selected connection type. 3. Enter your IPv6 LAN and DNS settings. 4. Click Apply.
4.5 VPN Server VPN (Virtual Private Network) provides a secure communication to a remote computer or remote network using a public network such as the Internet. NOTE: Before setting up a VPN connection, you would need the IP address or domain name of the VPN server you are trying to access. To set up access to a VPN server: 1. From the navigation panel, go to Advanced Settings > VPN Server. 2. On the Enable PPTP Server field, select Yes. 3. On the Network Place (Samba) Support field, select Yes. 4.
4.6 Firewall The wireless router can serve as a hardware firewall for your network. NOTE: The Firewall feature is enabled by default. 4.6.1 General To set up basic Firewall settings: 1. From the navigation panel, go to Advanced Settings > Firewall > General tab. 2. On the Enable Firewall field, select Yes. 3. On the Enable DoS protection, select Yes to protect your network from DoS (Denial of Service) attacks though this may affect your router’s performance. 4.
To set up a URL filter: 1. From the navigation panel, go to Advanced Settings > Firewall > URL Filter tab. 2. On the Enable URL Filter field, select Enabled. 3. Enter a URL and click the button. 4. Click Apply. 4.6.3 Keyword filter Keyword filter blocks access to webpages containing specified keywords. To set up a keyword filter: 1. From the navigation panel, go to Advanced Settings > Firewall > Keyword Filter tab. 2. On the Enable Keyword Filter field, select Enabled.
3. Enter a word or phrase and click the Add button. 4. Click Apply. NOTES: • The Keyword Filter is based on a DNS query. If a network client has already accessed a website such as http://www.abcxxx.com, then the website will not be blocked (a DNS cache in the system stores previously visited websites). To resolve this issue, clear the DNS cache before setting up the Keyword Filter. • Web pages compressed using HTTP compression cannot be filtered. HTTPS pages also cannot be blocked using a keyword filter.
To set up a Network Service filter: 1. From the navigation panel, go to Advanced Settings > Firewall > Network Service Filter tab. 2. On the Enable Network Services Filter field, select Yes. 3. Select the Filter table type. Black List blocks the specified network services. White List limits access to only the specified network services. 4. Specify the day and time when the filters will be active. 5. To specify a Network Service to filter, enter the Source IP, Destination IP, Port Range, and Protocol.
4.7 Administration 4.7.1 Operation Mode The Operation Mode page allows you to select the appropriate mode for your network. To set up the operating mode: 1. From the navigation panel, go to Advanced Settings > Administration > Operation Mode tab. 2. Select any of these operation modes: • Wireless router mode (default): In wireless router mode, the wireless router connects to the Internet and provides Internet access to available devices on its own local network.
4.7.2 System The System page allows you to configure your wireless router settings. To set up the System settings: 1. From the navigation panel, go to Advanced Settings > Administration > System tab. 2. You can configure the following settings: • Change router login password: You can change the password and login name for the wireless router by entering a new name and password.
4.7.3 Firmware Upgrade NOTE: Download the latest firmware from the ASUS website at http://www.asus.com To upgrade the firmware: 1. From the navigation panel, go to Advanced Settings > Administration > Firmware Upgrade tab. 2. In the New Firmware File field, click Browse to locate the downloaded file. 3. Click Upload. NOTES: • When the upgrade process is complete, wait for some time for the system to reboot.
4.8 System Log System Log contains your recorded network activities. NOTE: System log resets when the router is rebooted or powered off. To view your system log: 1. From the navigation panel, go to Advanced Settings > System Log. 2.
5 Utilities NOTES: • Install the wireless router's utilities from the bundled support CD. • If Autorun is disabled, run setup.exe from the root directory of the support CD. • The utilities are not supported on MAC OS. 5.1 Device Discovery Device Discovery is an ASUS WLAN utility that detects an ASUS wireless router device, and allows you to configure the wireless networking settings.